Showing posts with label CentOS 6. Show all posts

Tuesday, 2 April 2013

Scripted Install of Joomla 3.0 in Centos/RHEL 6.x

Joomla 3.0 was released a little while back so I thought I would write a new post showing how to install it, but it turns out that my previous post works just as well, so I'll just link to it.

Install Joomla

At the time of writing this is the latest version of Joomla.

I have written a script to automate the installation on a new server, see below.

It's not the best script ever but it seems to do the job.

Assuming you call the script joomlainstaller.sh, you should invoke it like this:
joomlainstaller.sh "http://joomlacode.org/gf/download/frsrelease/17965/78414/Joomla_3.0.3-Stable-Full_Package.zip" Joomla JoomlaUser Password

Don't forget to make your script executable with the folliwubg command:
chmod +x joomlainstaller.sh


#!/bin/bash

EXPECTED_ARGS=4
E_BADARGS=65

if [ $# -ne $EXPECTED_ARGS ]
then
  echo "Usage: $0 JoomlaZipUrl Joomladbname Joomladbuser Joomladbpass"
  exit $E_BADARGS
fi

S1="Create database if not exists $2;"
S2="CREATE USER '$3'@'localhost' IDENTIFIED BY '$4';"
S3="GRANT ALL PRIVILEGES ON '$2'.* TO '$3'@'localhost' IDENTIFIED BY '$4';"
S4="Flush privileges;"

SQLCMD = "${S1}${S2}${S3}${S4}"

echo -e "Install the Web Server\n"

yum groupinstall "Web Server"  -y

echo -e "Install the MySQL\n"

yum groupinstall "MySQL Database server" -y

echo -e "Install the PHP and few others\n"

yum install man wget php php-mysql unzip policycoreutils-python -y

mkdir joomlainst

filename=$(basename "$1")

echo -e "Get $filename from $1 \n"

wget $1

echo -e "Unzip $filename and move\n"

unzip $filename -d joomlainst
mv joomlainst/* /var/www/html

echo -e "Start MySQL Service\n"

service mysqld start; chkconfig mysqld on

/usr/bin/mysql_secure_installation

echo -e "Create $2 Database and user $3 MySQL Service\n"

mysql -u root -p -e "$SQLCMD"

echo -e "Open port 80 on Firewall\n"

iptables -I INPUT -p tcp --dport http -j ACCEPT ; service iptables save

echo -e "Turn output buffering off\n"

sed -i 's/output_buffering = 4096/output_buffering = Off/g' /etc/php.ini

echo -e "Create Joomla config file\n"

touch /var/www/html/configuration.php
chmod 666 /var/www/html/configuration.php

echo -e "Start Apache\n"

service httpd start; chkconfig httpd on

echo -e "Disable SELinux"

setenforce 0
sed -i 's/=enforcing/=disabled/' /etc/selinux/config


Saturday, 3 November 2012

Join CentOS 6.x server to Windows 2012 AD domain using Likewise Open (PowerBroker Identity Services)

I've used the Likewise Open package for AD integration of Linux machines before, but never for CentOS 6.x.

I'm not too sure, nor do I really care all that much, but it seems that it seems that the package is not called Likewise Open anymore, but rather PowerBroker Identity Services, at any rate, these are the instructions needed to join a CentOS 6.x to a Windows 2012 AD Domain.

Firstly, ensure that domain name resolution is working, at a minimum the CentOS box must be able to ping the domain controller by name. Example /etc/resolv.conf file below, where there is a dns server on 192.168.1.65 for domain dev.com:
search dev.com
nameserver 192.168.1.65
  1. Download the package from here (Although there is no support for CentOS 6.1 or higher it works fine):
  2. http://www.beyondtrust.com/Technical-Support/Downloads/PowerBroker-Identity-Services-Open-Edition/?Pass=True

  3. Disable SELinux. This is required by the installer 
  4. setenforce 0
  5. Install package:
  6. sh pbis-open-7.0.4.918.linux.x86_64.rpm.sh
  7. Join AD domain:
  8. domainjoin-cli join dev.com Administrator
  9. Create DNS entry:
  10. /opt/pbis/bin/update-dns
  11. Create SELinux Policy Module (see this link). Alternatively, disable SELinux altogether by editing the /etc/selinux/config file.
I must say that while using this product makes it simpler than my labour intensive way, I feel somewhat reticent to recommend this. It just feels like a cop out, maybe I'm a masochist who knows.

Sunday, 19 August 2012

Installing and using Pen Load balancing software in RHEL/CentOS 6.x

Last week I was asked to provide alternatives to NLB as we seem to be having problems getting delivery of a couple of switches for our test environment, or something like that. At any rate, NLB does not work too well with ESXi in our environment for various reasons, so I remembered about PEN, as I had used in a development environment ages ago.

You can compile from source, if you want to, but there is an already compiled rpm, which can be downloaded from here (This is the EPEL repository for CentOS 5).

Installing it's a simple case of using yum:
yum install -y pen
At this point you can start load balancing with pen like this:

 /usr/bin/pen -l pen8080.log 8080 10.168.20.82:8080 10.168.20.83:8080

This will distribute traffic arriving at this server on port 8080 to port 8080 on .82 and .83 with sticky sessions. If you want round robin stick an -r in, like this:

/usr/bin/pen -l pen8080.log -r 8080 10.168.20.82:8080 10.168.20.83:8080

The only downside of using pen like this is that if the box goes down for any reason so does Pen, which means that we need a start up script. I named the file /etc/init.d/penlb8080. The file name should match the servicename variable in the script:
#!/bin/bash
# Pen Starting Script
# chkconfig: 345 93 92
#Source function library
. /etc/init.d/functions

pen="/usr/bin/pen"
lockfile="/var/lock/subsys/pen"
servicename="penlb8080"
RETURNVALUE=0

PIDFILE=/var/run/pen.pid-8080
LOGFILE=/var/log/pen8080.log
CONTROLPORT=18080
LISTENPORT=8080
SERVERS=2
SERVER1=10.168.20.82:80
SERVER2=10.168.20.83:80

start() {
echo -n $"Starting $servicename: "
daemon $pen -S $SERVERS -p $PIDFILE -l $LOGFILE -C $CONTROLPORT $LISTENPORT $SERVER1 $SERVER2
RETURNVALUE=$?
echo
[ $RETURNVALUE = 0 ] && touch $lockfile
return $RETURNVALUE
}
stop() {
echo -n $"Stopping $servicename: "
kill -9 `cat $PIDFILE`
rm $PIDFILE
RETURNVALUE=$?
echo
[ $RETURNVALUE = 0 ] && rm -f $lockfile
return $RETURNVALUE
}
case "$1" in
start)
start
;;
stop)
stop
;;
restart)
stop
start
;;
status)
status $pen
;;
*)
echo "Usage: $servicename {start|stop|restart|status}"
exit 1
esac

exit $?
Make the script executable:
chmod +x /etc/init.d/penlb8080
Add to list of services controlled by chkconfig:
chkconfig --add penlb8080
Start this pen load balancer instance with:
service penlb8080 start
If you also wanted to run a second pen instance you could use the same script as above but with certain modifications. Say you wanted to run a second load balancer on port 80 as well, all you need to change are the following values, as well as the script name (penlb80):

servicename="penlb80"
PIDFILE=/var/run/pen.pid-80
LOGFILE=/var/log/pen80.log
CONTROLPORT=10080
LISTENPORT=80

Wednesday, 11 July 2012

Extend Logical Volume RHEL/CentOS 6.x

In a previous post, I discussed how to generally manipulate logical volumes, the one thing I forgot to do was to do a real life test. What do I mean by a real life test?

We had an old box with a single hard drive and RHEL 6 installed on it. Unfortunately, it was a very small hard drive and we wanted to dump a database on that server to do a few tests, so we added another hard drive then did the following, hopefully self-explanatory:
  1. pvcreate /dev/sdb1
  2. vgextend VolGroup /dev/sdb1
  3. lvextend -l +100%FREE /dev/mapper/VolGroup-lv_root
  4. resize2fs /dev/mapper/VolGroup-lv_root
Now the root filesystem is a ginormous 38 GB, which is big enough for our purposes.

It's crucial that step 4 is carried out, as otherwise the filesystem will not extend to the totality of the logical volume, which is what was missing from my previous post.

Tuesday, 15 May 2012

SSH Single Sign On for CentOS 6.2 or RHEL 6.0 using a Windows 8 Server Beta AD domain

In my previous post, I discussed how to join a CentOS 6.2 server to a Windows 8 Server Beta AD domain and in this post I discuss how to get Kerberos based single sign on working. I have tested this method with an openSSH client from Linux and with Putty from windows.

If testing from Linux, you will need at least two Linux servers that have joined the AD domain as explained in my previous post or one that has joined the domain and another with the ability to get a kerberos ticket from the DC.
If testing with Putty, all that is needed is to add a valid username in the Auto-login username field which can be found in Connection | Data. By valid, I mean a domain user with its Unix attributes set.
  1. From the Windows domain controller run the following command, which will create spns and upns. Note that you will need to run it as Administrator. I have also run this command for a fully qualified domain name instead of the hostname (i.e. host/pms3.sma.org) without any notable difference.
    ktpass.exe -princ host/pms3@SMA.ORG -mapuser SMA\pms3$ -pass Passw0rd123 -ptype KRB5_NT_PRINCIPAL -crypto All -out c:\pms3.keytab
  2. Copy pms3.keytab to your linux box, I simply mounted the c drive of the DC on the linux box, but this might not be available to you, see this post for instructions.
  3. If your server doesn't have a keytab file (/etc/krb5.keytab), then you can just move pms3.keytab to /etc/krb5.keytab otherwise you will need to merge it, which you can do with the ktutil tool, see this link for instructions.
  4. Restart the OpenSSH daemon:
    service sshd restart
  5. Configure the OpensSSH client. This will limit SSO to hosts in the domain:
  6. Host *.sma.org
    GSSAPIAuthentication yes
    GSSAPIDelegateCredentials yes
  7. Repeat steps 1 to 5 for the second server if needed.
  8. Login to first server with a domain account that has linux attributes set.
  9. Ensure that a Kerberos ticket has been issued: 
  10. klist
    Ticket cache: FILE:/tmp/krb5cc_0
    Default principal: atest@SMA.ORG

    Valid starting     Expires            Service principal
    05/15/12 15:25:45  05/16/12 01:23:44  krbtgt/SMA.ORG@SMA.ORG
            renew until 05/22/12 15:25:45
  11. Open secure shell on second server, which will log you without a prompt for credentials
    ssh pms3.sma.org
It is very important that name resolution is working correctly as you could get issues if it doesn't work properly, thus an up to date DNS server is quite useful. If you can't  update your DNS server make sure that your hosts files are up to date with all the server names involved.

If you hit any problems, the simplest way to trouble shoot is to open a debug ssh daemon, which you can do like this (you can add a couple more ds for extra debug info but I think debug1 is all you need):
/usr/sbin/sshd -p 31415 -d
You'll need to allow traffic on port 31415 or the port you choose, which you can easily do by stopping iptables. Clearly this should only be done in servers that are not internet facing. If the server is internet facing then just open port 31415, e.g:
iptables -I INPUT -p tcp --dport 31415 -j ACCEPT
You can connect to this server with:
ssh servername -p 31415 -v
This should tell you what the problem is, e.g:
debug1: Unspecified GSS failure.  Minor code may provide more information
Key table entry not found
This was actually caused by a name resolution problem.

Monday, 14 May 2012

Join CentOS 6.2 server to a Windows 8 Server Beta Active Directory domain

I've been using Windows 8 Server Beta for a bit (since VMware got their act together and sorted support for it in ESXi) and one thing I wanted to investigate was integration with Linux, in particular, using Windows 8 Beta Server as an Active Directory domain controller for Linux servers.

I will not discuss how to promote a Windows 8 server Beta to become a DC as it's a fairly straight forward process. I will say that it took me a while to work out that it is no longer possible to install the Identity Management for UNIX role through the UI, I thought I must be missing something because for the life of me I could not see it, because it wasn't there :)

The good news is that it can done from PowerShell. Thus I ran a PowerShell console as an Administrator and ran the following commands:
  1. Dism.exe /online /enable-feature /featurename:adminui /all  /NoRestart
  2. Dism.exe /online /enable-feature /featurename:nis /all /NoRestart
  3. Dism.exe /online /enable-feature /featurename:psync /all
Where the first command installs the administration tools for Identity Management for UNIX, the second installs Server for NIS and the third installs Password Synchronization. Ensure that you reboot the DC server after running the third command.

Once the DC server had been rebooted I added a group, LinuxTest and an account, lb, to act as the binding account and set their Unix Attributes as can be seen below (if you add the account and there is no "unix" group it'll complain, although you can ignore the message):


With the domain controller prepared I turned to the CentOS server, here are the steps needed to join the domain:
  1. Ensure that name resolution is working. At the very least you should be able to ping your domain controller, in my case win8pdc.dev.com. If you can't, have a look at your /etc/resolv.conf file in the first instance. Sample file:
    search sma.org test.com
    nameserver 10.168.20.93
  2. Ensure that your hosts file contains an entry with the ip address of the server, something like this:
    10.168.20.99 pms3 pms3.sma.org
  3. Depending on your installation type, you might have to install several of the packages below (It looks like I went for a base install only):
    yum install pam_krb5 pam_ldap nss-pam-ldapd samba policycoreutils-python -y
  4. Run authconfig-tui. Make sure that Kerberos realm is in capitals (I'm re-using the screenshots from previous posts):


  5.  Alternatively, the following command could be used (change parameters as needed):
    authconfig --enablemd5 --enableshadow --enableldap --enableldapauth --enablekrb5 --ldapserver='win8pdc.sma.org' --disablelocauthorize --ldapbasedn='dc=sma,dc=org' --krb5realm='SMA.ORG' --krb5adminserver='win8pdc.sma.org' --krb5kdc='win8pdc.sma.org' --update
  6. Ensure that Name Service Switch is configured for ldap authentication. In essence, check that /etc/nsswitch.conf has the following values:
  7. passwd:     files ldap
    shadow:     files ldap
    group:      files ldap
  8. Edit the local LDAP name service daemon configuration (/etc/nslcd.conf). A bind account to the Active Directory is needed, so create that account now (I have created binding in the Users OU). The mappings (for Active Directory) need to be modified. Below is a list of changes to /etc/nslcd.conf. In essence uncomment the relevant parts:
  9. binddn cn=lb, cn=Users,dc=dev,dc=com
    bindpw mypass 
    #The Default search scope
    scope sub 
    #Customize certain database lookups
    base   group  dc=dev,dc=com
    base   passwd dc=dev,dc=com
    base   shadow dc=dev,dc=com
    # Mappings for Active Directory
    pagesize 1000
    referrals off
    filter passwd (&(objectClass=user)(!(objectClass=computer))(uidNumber=*)(unixHomeDirectory=*))
    map    passwd uid              sAMAccountName
    map    passwd homeDirectory    unixHomeDirectory
    map    passwd gecos            displayName
    filter shadow (&(objectClass=user)(!(objectClass=computer))(uidNumber=*)(unixHomeDirectory=*))
    map    shadow uid              sAMAccountName
    map    shadow shadowLastChange pwdLastSet
    map    shadow userPassword     unixUserPassword
    filter group  (objectClass=group)
    map    group  uniqueMember     member
  10. Change permissions on /etc/nslcd.conf file so that it is only readable by root:
    chmod 600 /etc/nslcd.conf
  11. Restart the local LDAP name service daemon:
    service nslcd restart
  12. Ensure that the local LDAP name service daemon (nslcd) is set to start with the server:
    chkconfig nslcd on
  13. Edit /etc/samba/smb.conf. Make sure that there is only a security directive active. Comment out all others.
  14. Network Related Options
    workgroup =dev
    Domain members options
    security = ads
    realm = DEV.COM
    password server = win8pdc.dev.com
  15. Ensure that iptables lets traffic through on port 389:
  16. iptables –I INPUT –p tcp --dport ldap –j ACCEPT; service iptables save
  17. Run the following command to join the domain:
  18. net ads join –U domainadmin
  19. Ensure that the DNS Zone is configured to accept secure and nonsecure dynamic updates.
  20. At this point you have successfully joined to the AD domain, you can test this by getting a list of users or group. You should get back the users and/or groups that have Unix attributes, at least the binding account and a group if you created it. You can also check the Computers group in the Active Directory Users and Computers console.
    getent passwd
    getent group
  21. In order to create a user's home directory on first login add this directive to /etc/pam.d/sshd. I only log on using ssh. If you are logging in at the box, rather than remotely, you need to modify /etc/pam.d/logon too, I believe. Note that this will not work if SELinux is on.
    session required pam_mkhomedir.so skel=/etc/skel umask=0022
  22. Allow polyinstatiation in SELinux settings:
     setsebool -P allow_polyinstantiation 1
  23. Temporarily set SELinux to permissive:
  24. setenforce 0
  25. If you login with a domain user (ssh lb@pms1, where pms1 is the server that has just joined the domain), the directory will be created, but you will also have a record of what would've gone wrong on /var/log/audit/audit.conf had SElinux been on, which in my case is this:
  26. type=AVC msg=audit(1329063091.971:160): avc:  denied  { create } for  pid=5510 comm="mkhomedir_helpe" name="binding" scontext=unconfined_u:system_r:sshd_t:s0-s0:c0.c1023 tcontext=unconfined_u:object_r:home_root_t:s0 tclass=dir type=AVC msg=audit(1329063091.973:161): avc:  denied  { create } for  pid=5510 comm="mkhomedir_helpe" name=".bashrc" scontext=unconfined_u:system_r:sshd_t:s0-s0:c0.c1023 tcontext=unconfined_u:object_r:home_root_t:s0 tclass=file type=AVC msg=audit(1329063091.973:161): avc:  denied  { write open } for  pid=5510 comm="mkhomedir_helpe" name=".bashrc" dev=dm-0 ino=263825 scontext=unconfined_u:system_r:sshd_t:s0-s0:c0.c1023 tcontext=unconfined_u:object_r:home_root_t:s0 tclass=file type=AVC msg=audit(1329063091.973:162): avc:  denied  { setattr } for  pid=5510 comm="mkhomedir_helpe" name=".bashrc" dev=dm-0 ino=263825 scontext=unconfined_u:system_r:sshd_t:s0-s0:c0.c1023 tcontext=unconfined_u:object_r:home_root_t:s0 tclass=file type=AVC msg=audit(1329063092.015:163): avc:  denied  { setattr } for  pid=5510 comm="mkhomedir_helpe" name="binding" dev=dm-0 ino=263284 scontext=unconfined_u:system_r:sshd_t:s0-s0:c0.c1023 tcontext=unconfined_u:object_r:home_root_t:s0 tclass=dir
  27. Create a SELinux policy module to allow the creation of home directories when the user first logs in:
    less /var/log/audit/audit.log  | grep denied > mkdir.log 
    audit2why < mkdir.log 
    audit2allow -M mkdir -i mkdir.log 
    semodule -i mkdir.pp
  28. Renable SELinux:
    setenforce 1
That is it, you now should be able to login with AD users, that have their Unix Attributes set, to this server with SELinux on, see this post to configure Kerberos based single sign-on.


Monday, 23 April 2012

Run Linpack (HPL) on an HPC (beowulf-style) cluster using CentOS 6.2


A few weeks ago I attended a symposium on HPC and Open Source and ever since I've been wanting to set up my own HPC cluster. So I did, here are the instructions to set up an HPC cluster using CentOS 6.2. 

I have set up a two node cluster, but these instructions could be used for any number of nodes. The servers I've used only have a single 74 GB hard drive, a single NIC, 8 GB of RAM and 2 quad core CPUs, so that the cluster has 16 cores and 16 GB of RAM.
  1. Install CentOS using a minimum install to ensure that the smallest amount of packages get installed.
  2. Enable NIC by editing NIC config file (/etc/sysconfig/network-scripts/ifcfg-eth0) (I used the text install and it seems to leave the NIC disabled, but it's quicker to navigate from the ILO interface):
  3. DEVICE="eth0"
    ONBOOT="yes"
    BOOTPROTO=dhcp
  4. Disable and stop the firewall (I'm assuming no internet access for your cluster, of course):
    chkconfig iptables off; service iptables stop
  5. Install ssh clients and man. This installs the ssh client and scp among others things as well as man, which is always handy to have:
    yum -y install openssh-clients man
  6. Modify ssh client configuration to allow seamless addition of hosts to the cluster. Add this line to /etc/ssh/ssh_config (Note that this is a security risk if your cluster has access to the internet):
    StrictHostKeyChecking no
  7. Generate pass-phrase free key. This will make it easier to add hosts to the cluster (just press enter repeatedly after running ssh-keygen):
    ssh-keygen
  8. Install compilers and libraries (Note that development packages were obtained from here and yum was run from the directory containing them):
    yum -y install gcc gcc-c++ atlas blas lapack  mpich2 make mpich2-devel atlas-devel
  9. Add node hostname to /etc/hosts.
  10. Create file /$(HOME)/hosts and add node hostname to it.
This creates a single node and thus it would be a bit of a stretch to call it a cluster, but adding extra nodes is as simple as repeating steps 1-9.  A few extra steps are needed, though, to ensure smooth running:
  1. Add each extra node to the hosts file (/etc/hosts) of all nodes [A DNS server could be set up instead.] and to (/$(HOME)/hosts).
  2. Copy key generated in step 5 to all nodes (If you don't have a head node, i.e. a node that does not do any calculations, remember to add the key to itself too):
    ssh-copy-id hostname
I have not made any comments on networking and this is because the servers that I have been using only have a single NIC as mentioned above. There are gains to be made by forcing as much intra-node communication as possible through the loopback interface, but this requires unique (/etc/hosts) files for each node and my original plan was to set up a 16 node cluster.

SELinux does not seem to have any negative effects, so I have left it on. I plan to test without it to see whether performance is improved.

At this point all that remains is to add some software that can run on the cluster and there is nothing better than HPL or Linpack, which is widely used to measure cluster efficiency (the ratio between theoretical and actual performance). Do the following steps on all nodes:
  1. Download HPL from netlib.org and extract it to your home directory.
  2. Copy Make.Linux_PII_CBLAS file from  $(HOME)/hpl-2.0/setup/ to $(HOME)/hpl-2.0/
  3. Edit Make.Linux_PII_CBLAS file (Changes in Bold. Note that the MPI section is commented out):
  4. # ----------------------------------------------------------------------
    # - HPL Directory Structure / HPL library ------------------------------
    # ----------------------------------------------------------------------
    #
    TOPdir       = $(HOME)/hpl-2.0
    INCdir       = $(TOPdir)/include
    BINdir       = $(TOPdir)/bin/$(ARCH)
    LIBdir       = $(TOPdir)/lib/$(ARCH)
    #
    HPLlib       = $(LIBdir)/libhpl.a
    #
    # ----------------------------------------------------------------------
    # - Message Passing library (MPI) --------------------------------------
    # ----------------------------------------------------------------------
    # MPinc tells the  C  compiler where to find the Message Passing library
    # header files,  MPlib  is defined  to be the name of  the library to be
    # used. The variable MPdir is only used for defining MPinc and MPlib.
    #
    #MPdir        = /usr/lib64/mpich2
    #MPinc        = -I$(MPdir)/include
    #MPlib        = $(MPdir)/lib/libmpich.a
    #
    # ----------------------------------------------------------------------
    # - Linear Algebra library (BLAS or VSIPL) -----------------------------
    # ----------------------------------------------------------------------
    # LAinc tells the  C  compiler where to find the Linear Algebra  library
    # header files,  LAlib  is defined  to be the name of  the library to be
    # used. The variable LAdir is only used for defining LAinc and LAlib.
    #
    LAdir        = /usr/lib64/atlas
    LAinc        =
    LAlib        = $(LAdir)/libcblas.a $(LAdir)/libatlas.a
    # ----------------------------------------------------------------------
    # - Compilers / linkers - Optimization flags ---------------------------
    # ----------------------------------------------------------------------
    #
    CC           = /usr/bin/mpicc
    CCNOOPT      = $(HPL_DEFS)
    CCFLAGS      = $(HPL_DEFS) -fomit-frame-pointer -O3 -funroll-loops
    #
    # On some platforms,  it is necessary  to use the Fortran linker to find
    # the Fortran internals used in the BLAS library.
    #
    LINKER       = /usr/bin/mpicc
    LINKFLAGS    = $(CCFLAGS)
    #
    ARCHIVER     = ar
    ARFLAGS      = r
    RANLIB       = echo
    #
    # ----------------------------------------------------------------------
  5. Run make arch=Linux_PII_CBLAS.  
  6. You can now run Linpack (on a single node):
     cd bin/Linux_PII_CBLAS
    mpiexec.hydra -n 4 ./xhpl 
Repeat steps 1- 5 on all nodes and the you can now run Linpack on all nodes like this (from directory $(HOME)/hpl-2.0/Linux_PII_CBLAS/ ):
mpiexec.hydra -f /$(HOME)/hosts -n x ./xhpl 
where x is the number of cores in your cluster.

For results of running Linpack, see my next post here.

Sunday, 4 March 2012

Rescan NICs in CentOS 6.2

Our virtualization environment runs on ESX 4 and Vcenter 4, which means that it is not possible to customize 64bit Linux distros or at least Red Hat distros, following cloning. This is annoying as CentOS does not seem to be able to pick up the new NICs in a clone, even after the ifcfg files have been edited to amend the new MAC addresses.

It turns out there is a very easy solution to this problem:

rm -f /etc/udev/rules.d/70-persistent-net.rules; init 6

This will delete the file containing NIC information and rescan after a reboot.

Do note that the second time I tried this, it created new NIC names, i.e. eth4,eth5 and eth6 for my multiple nic clone.

If you encounter this issue, you could edit the file /etc/udev/rules.d/70-persistent-net.rules or rename the ifcfg files, either should work.

Hopefully, we will move to ESXi 5 soon.

Tuesday, 28 February 2012

SSH Single Sign On for CentOS 6.2 or RHEL 6.0 using a Windows 2008 AD domain

In one of my previous posts I discussed how to join a CentOS 6.2 server to a Windows 2008 AD domain. There was one thing that wasn't working and that really, and I mean, REALLY annoyed me and this was: single sign on, i.e. using SSH to login to another server in the domain without being prompted for your password again.

After a lot of head banging, cursing and wondering why oh why had I decided to embark in such a doomed enterprise, I managed to get it working. I assume that you have followed my previous post on how to join a CentOS 6 (RHEL 6 works too) and that you have two linux machines that have joined the domain. A second machine is only needed for testing purposes, you could use putty instead. I needed the second machine for other purposes, so that is the route I chose. I have also tested it with putty and it does work as well.

Here is the list of steps needed:
  1. From the Windows domain controller run the following command, which will create spns and upns. Note that you will need to run it as Administrator:
    ktpass -princ host/adtest.my.org@MY.ORG -mapuser MY\adtest$  -pass Passw0rd123 -ptype KRB5_NT_PRINCIPAL -crypto All -out adtest.keytab
  2. Copy adtest.keytab to your linux box, I simply mounted the c drive of the DC on the linux box, but this might not be available to you.
  3. If your server doesn't have a keytab file (/etc/krb5.keytab), then you can just move adtest.keytab to /etc/krb5.keytab otherwise you will need to merge it, which you can do with the ktutil tool, see this link for instructions.
  4. [Optional] Limit encryption to RC4-HMAC, by editing the kerberos configuration file /etc/krb5.conf and adding the following to the [libdefaults] directive:
  5. default_tkt_enctypes=rc4-hmac
    default_tgs_enctypes=rc4-hmac
    permitted_enctypes =rc4-hmac
  6. Restart the OpenSSH daemon:
    service sshd restart
  7. Configure the OpensSSH client. This will limit SSO to hosts in the domain:
  8. Host *.my.org
    GSSAPIAuthentication yes
    GSSAPIDelegateCredentials yes
  9. Repeat steps 1 to 6 for the second server if needed.
  10. Login to first server with a domain account that has linux attributes set.
  11. Ensure that a Kerberos ticket has been issued: 
  12. klist
    Ticket cache: FILE:/tmp/krb5cc_10000_TjT7rk
    Default principal: linuxuser@MY.ORG

    Valid starting     Expires            Service principal
    02/28/12 17:41:06  02/29/12 03:39:31  krbtgt/MY.ORG@MY.ORG
            renew until 02/29/12 03:41:06
  13. Open secure shell on second server, which will log you without a prompt for credentials
    ssh adtest5.my.org
It is very important that name resolution is working correctly as you could get issues if it doesn't work properly, thus an up to date DNS server is quite useful. If you don't have a DNS server make sure that your hosts files are up to date with all the server names involved.

If you hit any problems, the simplest way to trouble shoot is to open a debug ssh daemon, which you can do like this (you can add a couple more ds for extra debug info but I think debug1 is all you need):
/usr/sbin/sshd -p 31415 -d
You'll need to allow traffic on port 31415 or the port you choose, which you can easily do by stopping iptables. Clearly this should only be done in servers that are not internet facing. If the server is internet facing then just open port 31415, e.g:
iptables -I INPUT -p tcp --dport 31415 -j ACCEPT
You can connect to this server with:
ssh servername -p 31415 -v
This should tell you what the problem is, e.g:
debug1: Unspecified GSS failure.  Minor code may provide more information
Key table entry not found
This was actually caused by a name resolution problem.

Thursday, 23 February 2012

Join CentOS 6.2 server to a Windows 2008 Active Directory domain

Following on from my previous post detailing how to join a RHEL6 box to a Windows 2003 AD domain, in this post I discuss how to join to Windows 2008 AD domain (2008 Mode). This time rather than using RHEL 6, I've decided to use Centos 6.2 instead. I have used the standard installation rather than the minimal installation that used in the previous post, so here are the steps needed. 


Before I start though, I'd like to note that I installed the Identity Management for UNIX role in the Windows domain controller, so if you are following these instructions, make sure that you have that role installed in your domain controller. You will also need a binding account that has its Unix attributes set.

Without further ado, here are the instructions:
  1. Ensure that name resolution is working. At the very least you should be able to ping your domain controller, in my case pdc1.dev.org. If you can't, have a look at your /etc/resolv.conf file. Sample file:
    search dev.org test.com
    nameserver 10.168.20.203
  2. Depending on your installation type, you might have to install several of the packages below (It looks like I went for a base install only):
    yum install pam_krb5 pam_ldap nss-pam-ldapd samba policycoreutils-python -y
  3. Run authconfig-tui. Make sure that Kerberos realm is in capitals:


  4. Ensure that Name Service Switch is configured for ldap authentication. In essence, check that /etc/nsswitch.conf has the following values:
  5. passwd:     files ldap
    shadow:     files ldap
    group:      files ldap
  6. Edit the local LDAP name service daemon configuration (/etc/nslcd.conf). A bind account to the Active Directory is needed, so create that account now (I have created binding in the Users OU). The mappings (for Active Directory) need to be modified. Below is a list of changes to /etc/nslcd.conf. In essence uncomment the relevant parts:
  7. binddn cn=binding, cn=Users,dc=dev,dc=org
    bindpw mypass 
    #The Default search scope
    scope sub 
    #Customize certain database lookups
    base   group  dc=dev,dc=org
    base   passwd dc=dev,dc=org
    base   shadow dc=dev,dc=org
    # Mappings for Active Directory
    pagesize 1000
    referrals off
    filter passwd (&(objectClass=user)(!(objectClass=computer))(uidNumber=*)(unixHomeDirectory=*))
    map    passwd uid              sAMAccountName
    map    passwd homeDirectory    unixHomeDirectory
    map    passwd gecos            displayName
    filter shadow (&(objectClass=user)(!(objectClass=computer))(uidNumber=*)(unixHomeDirectory=*))
    map    shadow uid              sAMAccountName
    map    shadow shadowLastChange pwdLastSet
    map    shadow userPassword     unixUserPassword
    filter group  (objectClass=group)
    map    group  uniqueMember     member
  8. Change permissions on /etc/nslcd.conf file so that it is only readable by root:
    chmod 600 /etc/nslcd.conf
  9. Restart the local LDAP name service daemon:
    service nslcd restart
  10. Ensure that the local LDAP name service daemon (nslcd) is set to start with the server:
    chkconfig nslcd on
  11. Edit /etc/samba/smb.conf. Make sure that there is only a security directive active. Comment out all others.
  12. Network Related Options
    workgroup =dev
    Domain members options
    security = ads
    realm = DEV.COM
    use kerberos keytab = true  #not really sure about this one
    password server = pdc1.dev.org
  13. Ensure that iptables lets traffic through on port 389:
  14. iptables –I INPUT –p tcp --dport ldap –j ACCEPT; service iptables save
  15. Run the following command to join the domain:
  16. net ads join –U domainadmin
  17. A DNS record was not created for this server in my DNS server, not sure why, which meant that I had to add the record myself manually. Thus ensure that you do this before moving on if the DNS record is not added automatically, otherwise you might be unable to login.
  18. At this point you have successfully joined to the AD domain, you can test this by getting a list of users or group. You should get back the users and/or groups that have linux attributes, at least the binding account.
    getent passwd
    getent group
  19. In order to create a user's home directory on first login add this directive to /etc/pam.d/sshd. I only log on using ssh. If you are logging in at the box, rather than remotely, you need to modify /etc/pam.d/logon too, I believe. Note that this will not work if SELinux is on.
    session required pam_mkhomedir.so skel=/etc/skel umask=0022
  20. Allow polyinstatiation in SELinux settings:
     setsebool -P allow_polyinstantiation 1
  21. Temporarily set SELinux to permissive:
  22. setenforce 0
  23. If you login with a domain user (ssh binding@domainadtest, where domainadtest is the server that has just joined the domain), the directory will be created, but you will also have a record of what would've gone wrong on /var/log/audit/audit.conf had SElinux been on, which in my case is this:
  24. type=AVC msg=audit(1329063091.971:160): avc:  denied  { create } for  pid=5510 comm="mkhomedir_helpe" name="binding" scontext=unconfined_u:system_r:sshd_t:s0-s0:c0.c1023 tcontext=unconfined_u:object_r:home_root_t:s0 tclass=dir type=AVC msg=audit(1329063091.973:161): avc:  denied  { create } for  pid=5510 comm="mkhomedir_helpe" name=".bashrc" scontext=unconfined_u:system_r:sshd_t:s0-s0:c0.c1023 tcontext=unconfined_u:object_r:home_root_t:s0 tclass=file type=AVC msg=audit(1329063091.973:161): avc:  denied  { write open } for  pid=5510 comm="mkhomedir_helpe" name=".bashrc" dev=dm-0 ino=263825 scontext=unconfined_u:system_r:sshd_t:s0-s0:c0.c1023 tcontext=unconfined_u:object_r:home_root_t:s0 tclass=file type=AVC msg=audit(1329063091.973:162): avc:  denied  { setattr } for  pid=5510 comm="mkhomedir_helpe" name=".bashrc" dev=dm-0 ino=263825 scontext=unconfined_u:system_r:sshd_t:s0-s0:c0.c1023 tcontext=unconfined_u:object_r:home_root_t:s0 tclass=file type=AVC msg=audit(1329063092.015:163): avc:  denied  { setattr } for  pid=5510 comm="mkhomedir_helpe" name="binding" dev=dm-0 ino=263284 scontext=unconfined_u:system_r:sshd_t:s0-s0:c0.c1023 tcontext=unconfined_u:object_r:home_root_t:s0 tclass=dir
  25. Create a SELinux policy module to allow the creation of home directories when the user first logs in:
    less /var/log/audit/audit.log  | grep denied > mkdir.log 
    audit2why < mkdir.log 
    audit2allow -M mkdir -i mkdir.log 
    semodule -i mkdir.pp
  26. Renable SELinux:
    setenforce 1
That is it.

See this post to configure openSSH single sign on.

Thursday, 9 February 2012

Installing Joomla 2.5 on Centos 6.2 (netinstall)

I foolishly deleted the wrong VM a couple of weeks ago and yesterday I realized that Joomla 2.5 is out. It looks like Joomla 2.5 is the successor to Joomla 1.7. I guess version inflation is kicking off again. At any rate, I wanted to see whether my previous post would work and update it where necessary.

I have created a script to install Joomla, see this post, note that the script is only for Joomla, you will still need to manually install CentOS/RHEL.

Below are the steps needed to install Joomla on CentOS 6.2 using the netinstall iso, note that I'm running this from a VM using VirtualBox on a Windows XP SP3 system (don't ask why):

Note that if no screenshot is shown that means that you should use the default values or your own values (e.g. keyboard, time zone, etc.)
  1. Download Netinstall iso from http://isoredirect.centos.org/centos/6/isos/i386/ or http://isoredirect.centos.org/centos/6/isos/x86_64/ for 64 bit versions.
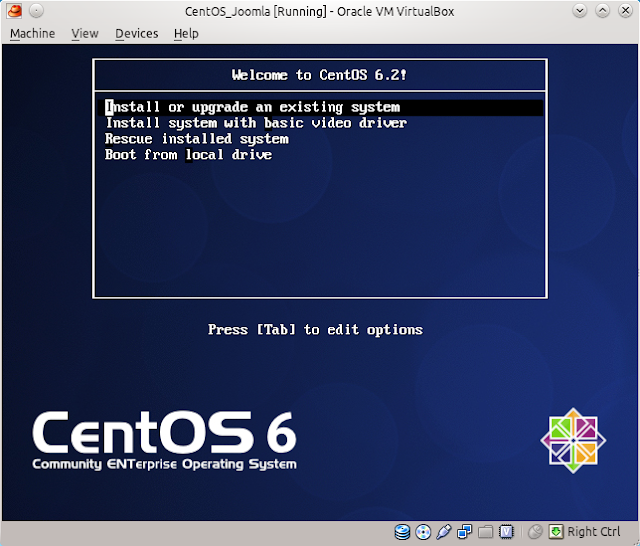
  2. Start a brand new VM and boot from the iso downloaded in step 1. 
  3. Select Install or upgrade an existing system.
  4. Select URL and press OK.
  5. Enter http://mirror.centos.org/centos/6.2/os/i386/or http://mirror.centos.org/centos/6.2/os/x86_64/ for the 64 bit version.
  6. I only gave 512 MB of ram to the VM, which meant that the TUI installer ran instead of a graphical interface.
  7. After selecting the hard drive, I received this prompt. Select Re-Initialize All.
  8. Once the installation has finished and you are back into your system (remember to remove the mounted iso) I decided to install not only mandatory packages but also optional so I added this line to /etc/yum.conf:
    group_package_types=default,mandatory,optional
  9. Install Apache:
    yum groupinstall "Web Server"
  10. Install MySQL:
    yum groupinstall "MySQL Database server" 
  11. Install wget, man, php-mysql, unzip and policycoreutils-python (see step 26 about this package):
    yum install man wget php php-mysql unzip policycoreutils-python -y
  12. Create a temporary directory to extract and download Joomla:
    mkdir /joomla; cd /joomla 
  13. Download Joomla (note that this is likely to change, check here for the latest version):
    wget http://joomlacode.org/gf/download/frsrelease/16512/72038/Joomla_2.5.1-Stable-Full_Package.zip
  14. Extract downloaded package:
    unzip Joomla_2.5.1-Stable-Full_Package.zip
  15. Move all files to home web directory:
    mv /joomla/* /var/www/html
  16. Start MySQL and set it to start at boot time:
    service mysqld start; chkconfig mysqld on
  17. Set root's password to MySQL and get MySQL production-ready (Essentially type Y to everything):
    /usr/bin/mysql_secure_installation
  18. Create Joomla User:
    mysql -u root -p
    CREATE USER 'JoomlaUser'@'localhost' IDENTIFIED BY 'mypass';
  19. Create Joomla Database:
    mysqladmin -u root -p create Joomla
  20. Provide appropriate privileges to the JoomlaUser user:
    mysql -u root -p
    GRANT ALL PRIVILEGES ON Joomla.*
                    TO JoomlaUser@localhost IDENTIFIED BY 'mypass';
            where:
            'Joomla' is the name of your database
            'JoomlaUser@localhost' is the userid of your webserver MySQL account
            'mypass' is the password required to log in as the MySQL user
  21. Apply privileges and exit:
    flush privileges; \q
  22. Open Firewall for port 80 and save changes:
    iptables -I INPUT -p tcp --dport http -j ACCEPT ; service iptables save
  23. Turn output buffering off by editing /etc/php.ini change:
    output_buffering=4096
    to
    output_buffering=Off
  24. Create empty configuration.php file and set permissions:
    touch /var/www/html/configuration.php
    chmod 666 /var/www/html/configuration.php
  25. Start Apache and set it to start on boot:
    service httpd start; chkconfig httpd on
  26. Disable SELinux (I recommend having a look at this post for a fix that will allow you to run SELinux and Joomla. Do ensure that you test everything that you are likely and unlikely to do, e.g. add articles, add blogs, etc..). Alternatively edit /etc/selinux/config and change:
    SELINUX=enforcing
    to
    SELINUX=disabled
  27. Start the Joomla install proper by navigating to:
    http://<yourserverip>
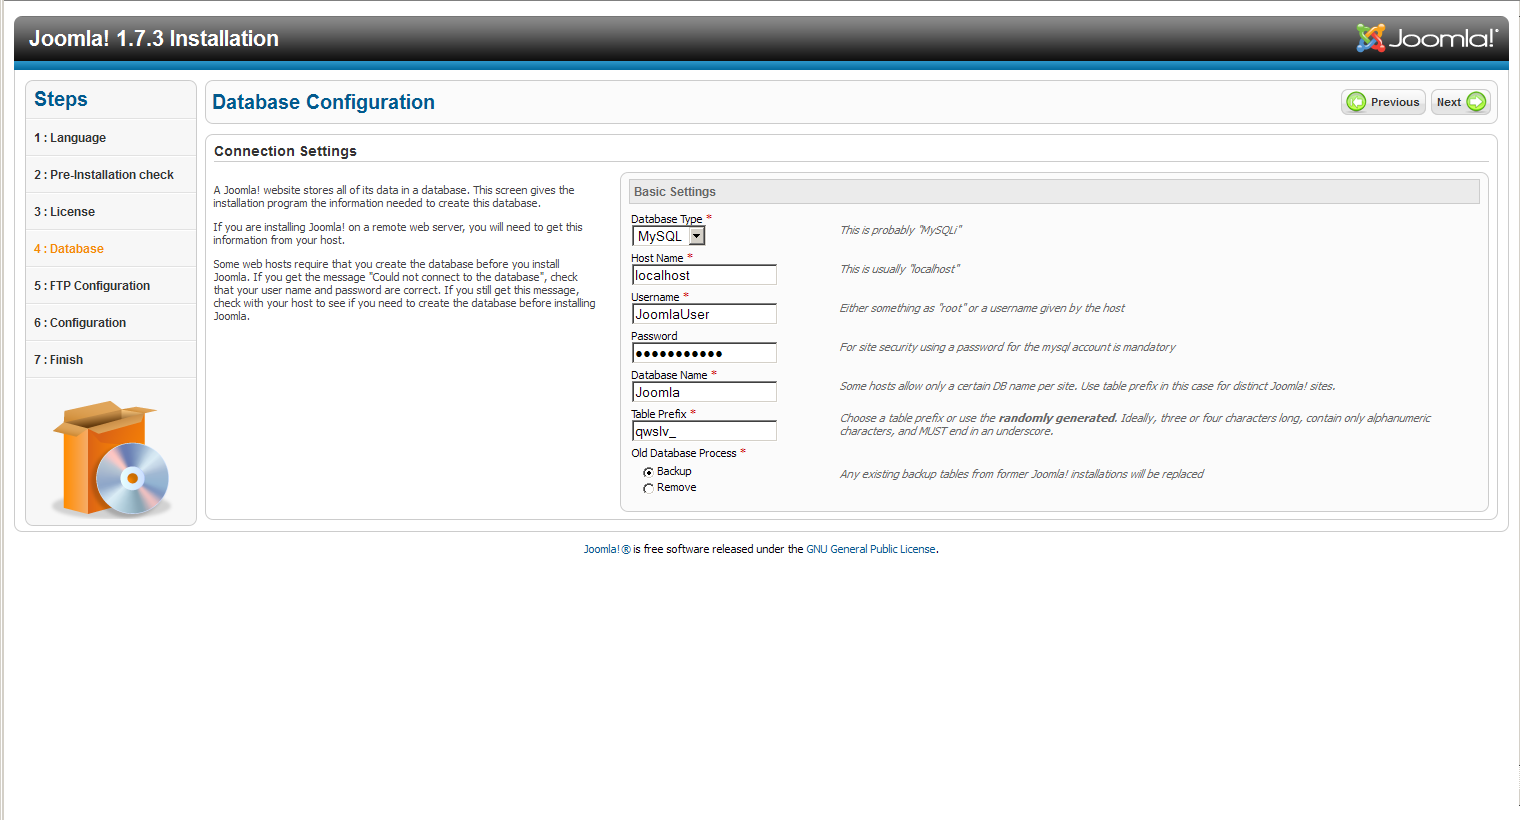
  28. On step 4 use the following settings:
  29. I chose to install the sample data on step 6.
  30. Ensure that you remove the installation directory
    rm -rf /var/www/html/installation/
  31. You can now go and administer your site or view the sample sites if you chose to install the sample data. Enjoy!

Note that if if you do decide to use SELinux, see step 26, you need an extra step to change the context for the Joomla files:
chcon -R  unconfined_u:object_r:httpd_sys_content_t:s0 /var/www/html/
See this post, if you want to configure multiple instances of Joomla in one server.

Tuesday, 24 January 2012

Installing secure phpMyAdmin on CentOS 6.2

Following on from Sunday's post on how to set up phpMyAdmin on CentOS 6.2, I thought it would be a good idea to set up phpMyAdmin as a secure website (HTTPS), rather than in clear-text (HTTP). This will ensure that all traffic between the web browser and phpMyAdmin is encrypted.

In a previous post I set up a Certification Authority so I will be using this CA to generate the necessary certificates, but don't worry if you don't have one, you can use makecert or OpenSSL to generate a self signed certificate.

All that is needed is a server and CA certificate, if you've followed my previous post on phpMyAdmin, you can go directly to step 7. Thus armed with a pkcs#12 server certificate (phpMyAdmin.pfx) and a CA certificate (win2kca.cer) we can start:
  1. Set SELinux to allow Apache to bind to a non-default port:
    setsebool -P allow_ypbind 1
  2. Download EPEL Release to enable usage of EPEL Repository: 
    wget http://download.fedora.redhat.com/pub/epel/6/i386/epel-release-6-5.noarch.rpm
  3. Install EPEL Release package:
    yum install epel-release-6-5.noarch.rpm -y
  4. Install phpMyAdmin:
    yum install phpmyadmin -y
  5. Create new directory to host the phpMyAdmin website: 
    mkdir /var/www/phpMyAdmin
  6. Copy phpMyAdmin installation to the directory created in the previous step: 
    cp -r /usr/share/phpMyAdmin/. /var/www/phpMyAdmin
  7. Extract public and private key from server certificate:
    openssl pkcs12 -in phpMyAdmin.pfx -out phpMyAdmin.key -nodes -nocerts
    openssl pkcs12 -in phpMyAdmin.pfx -out phpMyAdmin.crt -nodes -nokeys
  8. Restrict permissions on key file:
    chmod 400 phpMyAdmin.key
  9. Create certificate and key directories and move certificates and keys to them:
    mkdir /etc/httpd/conf.d/certs
    mkdir /etc/httpd/conf.d/keys
    mv phpMyAdmin.crt /etc/httpd/conf.d/certs
    mv phpMyAdmin.key /etc/httpd/conf.d/keys
    cp win2k8ca.cer /etc/httpd/conf.d/certs
  10. Set SELinux to permissive, this is to prevent issues with SELinux preventing Apache from working properly:
    setenforce 0
  11. Edit Apache's SSL configuration file (/etc/httpd/conf.d/ssl.conf). I have changed the port to 7777 and prevented LOW ciphers from being accepted. The rest is simply providing the location of the certificates. Only listing relevant parts of ssl.conf:
    Listen 7777

    <VirtualHost _default_:7777>

    #   SSL Cipher Suite:
    SSLCipherSuite ALL:!ADH:!EXPORT:!SSLv2:RC4+RSA:+HIGH:+MEDIUM

    #   Server Certificate:

    SSLCertificateFile /etc/httpd/conf.d/certs/phpMyAdmin.crt

    #   Server Private Key:

    SSLCertificateKeyFile /etc/httpd/conf.d/certs/phpMyAdmin.key

    #   Server Certificate Chain:
    SSLCertificateChainFile /etc/httpd/conf.d/certs/win2k8ca.cer

    #   Certificate Authority (CA):
    SSLCACertificateFile /etc/httpd/conf.d/certs/win2k8ca.cer

    </VirtualHost>
    1. You can check that the apache configuration file is correct by using:
      apachectl -t 
  12. Restart Apache:
    apachectl -k restart or service httpd restart
  13. Open firewall for port 7777 and save IPTables configuration:
    iptables -I INPUT -p tcp --dport 7777 -j ACCEPT; service iptables save
  14. You can now navigate to https://phpmyadmin.dev.com:7777/setup (If you are using Chrome, you will see this screen first. Other browsers will show similar screens). Note that you'll need a entry on your hosts file that points phpmyadmin.dev.com to the IP address of the Server: 
  15. Click Procceed anyway. You are seeing this because your CA is not trusted by Chrome.
    Although it would seem that the connection is not encrypted, the icon is misleading, it just means that it is not trusted. See below for confirmation:
  16. Because I'm lazy, I'm going to reuse the screenshots and text from my previous phpMyAdmin post, so .. Click New Server. I only changed the name and compression, accepted defaults for everything else:
  17. Go To Authentication Tab. See this link for an overview of the authentication types:
  18. Click Save, which will bring you to the screen below:
  19. Download the configuration file (config.inc.php) and copy it to /var/www/phpMyAdmin.
  20. You can now start using phpMyAdmin on https://phpmyadmin.dev.com:7777:
  21. All that remains is to renable SELinux and deal with the policy violations:
    cat /var/log/audit/audit.log | grep denied > ssl
    audit2allow -M apachessl -i ssl
    semodule -i apachessl.pp
    setenforce 1
Note that steps 2 & 3 simply add repository for the EPEL repository to your yum repository collection and install the repository key.

In theory, the setup script should be able to generate the configuration file for you, but I've not been able to get it to work. Instructions can be found here if you are interested. 

I haven't thoroughly tested this setup so it is possible, as always, that there could be SELinux issues. All I can suggest is that, if you have some inexplicable issue, have a look at the SELinux log (/var/log/audit/audit.log).

    Sunday, 22 January 2012

    Installing phpMyAdmin in CentOS 6.2 (netinstall)

    I really have no issue with using a terminal, in fact I quite love the geekiness associated with it, but for some reason I never feel comfortable using a terminal to manage mySQL, which is why I love phpMyAdmin.

    I am installing phpMyAdmin in a machine that hosts Joomla, see this post for more details, in practical terms this means that a second website will be needed to host phpMyAdmin, whether you host this site on a different port or a host header it's up to you, the process is fairly similar. Do bear in mind that using a different port has implications to your firewall configuration, in this post I will be using a different port.

    It is worth bearing in mind that this configuration is not secure and as such should only be used on internal networks. Although running the website on a non-standard port will provide obscurity, it does not provide security. Have a look at this post for a secure phpMyAdmin installation guide.

    Unfortunately phpMyAdmin is not, at the time of writing, included with RHEL based systems. Luckily, it is part of the Extra Packages for Enterprise Linux (EPEL) interest group. This means that the EPEL repository can be used to install phpMyAdmin thus obviating the need to install it from source.

    Here are the steps needed to install phpMyAdmin in a CentOS 6.2 server:
    1. Set SELinux to allow Apache to bind to a non-default port:
      setsebool -P allow_ypbind 1
    2. Download EPEL Release to enable usage of EPEL Repository: 
      wget http://download.fedoraproject.org/pub/epel/6/i386/epel-release-6-5.noarch.rpm
    3. Install EPEL Release package:
      yum install epel-release-6-5.noarch.rpm -y
    4. Install phpMyAdmin:
      yum install phpmyadmin -y
    5. Create new directory to host the phpMyAdmin website: 
      mkdir /var/www/phpMyAdmin
    6. Copy phpMyAdmin installation to the directory created in the previous step: 
      cp -r /usr/share/phpMyAdmin/. /var/www/phpMyAdmin
    7. Add a new virtual host to Apache, by editing the Apache configuration file /etc/httpd/conf/httpd.conf, see this post for more details. Relevant parts of httpd.conf:
      Listen 80
      Listen 8888

      NameVirtualHost *:80
      NameVirtualHost *:8888

      <VirtualHost *:80>
          ServerAdmin manyrootsofallevil@myhost.com
          DocumentRoot /var/www/html
          ServerName  Joomla
          ErrorLog logs/Joomla_error
          CustomLog logs/Joomla-access_log common
      </VirtualHost>

      <VirtualHost *:8888>
          ServerAdmin manyrootsofallevil@myhost.com
          DocumentRoot /var/www/phpMyAdmin
          ServerName  Joomla
          ErrorLog logs/phpMyAdmin_error
          CustomLog logs/phpMyAdmin-access_log common
      </VirtualHost>
      1. You can check that the apache configuration file is correct by using:
        apachectl -t 
    8. Restart Apache:
      apachectl -k restart or service httpd restart
    9. Open firewall for port 8888 and save IPTables configuration:
      iptables -I INPUT -p tcp --dport 8888 -j ACCEPT; service iptables save
    10. From a browser navigate to http://localhost:8888/setup :
    11. Click New Server. I only changed the name and compression, accepted defaults for everything else:
    12. Go To Authentication Tab. See this link for an overview of the authentication types:
    13. Click Save, which will bring you to the screen below:
    14. Download the configuration file (config.inc.php) and copy it to /var/www/phpMyAdmin.
    15. You can now start using phpMyAdmin on http://192.168.1.65:8888

    Note that steps 2 & 3 simply add repository for the EPEL repository to your yum repository collection and install the repository key.

    In theory, the setup script should be able to generate the configuration file for you, but I've not been able to get it to work. Instructions can be found here if you are interested.

    Tuesday, 3 January 2012

    Installing Joomla 1.7 on CentOS 6.2 (netinstall)

    I've been looking at using a CMS for a while as an alternative to designing websites from scratch. I finally have had a reason to use one (long story) but the short end of it is that it needs to run on Linux. There appear to be three main choices when it comes to open source CMSs:
    Note, that they all seem to run on Windows, but that's by the by as Windows servers tend to be more expensive than Linux servers. At any rate, although Ubuntu seems to be the most popular offering among VPS providers, I decided to use CentOS 6.2 because I feel more comfortable with Red Hat based Linux distros.

    I did not want to download the whole iso as I'm running on a laptop with limited hard disk space, so I decided to use the Netinstall, which in essence contains a bare bones system and grabs packages as needed. When I say that this is bare bones I'm not kidding, man is not actually installed. 

    Below are the steps needed to install Joomla on CentOS 6.2 using the netinstall iso, note that I'm running this from a VM using VirtualBox on a Kubuntu 11.10 system:

    I have created a script to install Joomla, see this post, note that the script is only for Joomla, you will still need to manually install CentOS/RHEL.

    Note that if no screenshot is shown that means that you should use the default values or your own values (e.g. keyboard, time zone, etc.)
    1. Download Netinstall iso from http://isoredirect.centos.org/centos/6/isos/i386/ or http://isoredirect.centos.org/centos/6/isos/x86_64/ for 64 bit versions.
    2. Start a brand new VM and boot from the iso downloaded in step 1. 
    3. Select Install or upgrade an existing system.
    4. Select URL and press OK.
    5. Enter http://mirror.centos.org/centos/6.2/os/i386/or http://mirror.centos.org/centos/6.2/os/x86_64/ for the 64 bit version.
    6. I only gave 512 MB of ram to the VM, which meant that the TUI installer ran instead of a graphical interface.
    7. After selecting the hard drive, I received this prompt. Select Re-Initialize All.
    8. Once the installation has finished and you are back into your system (remember to remove the mounted iso) I decided to install not only mandatory packages but also optional so I added this line to /etc/yum.conf:
      group_package_types=default,mandatory,optional
    9. Install Apache:
      yum groupinstall "Web Server"
    10. Install MySQL:
      yum groupinstall "MySQL Database server" 
    11. Install wget, man, php-mysql, unzip and policycoreutils-python (see step 26 about this package):
      yum install man wget php php-mysql unzip policycoreutils-python -y
    12. Create a temporary directory to extract and download Joomla:
      mkdir /joomla; cd /joomla 
    13. Download Joomla (note that this is likely to change, check here for the latest version):
      wget http://joomlacode.org/gf/download/frsrelease/16024/69674/Joomla_1.7.3-Stable-Full_Package.zip
    14. Extract downloaded package:
      unzip Joomla_1.7.3-Stable-Full_Package.zip
    15. Move all files to home web directory:
      mv /joomla/* /var/www/html
    16. Start MySQL and set it to start at boot time:
      service mysqld start; chkconfig mysqld on
    17. Set root's password to MySQL and get MySQL production-ready (Essentially type Y to everything):
      /usr/bin/mysql_secure_installation
    18. Create Joomla User:
      mysql -u root -p
      CREATE USER 'JoomlaUser'@'localhost' IDENTIFIED BY 'mypass';
    19. Create Joomla Database:
      mysqladmin -u root -p create Joomla
    20. Provide appropriate privileges to the JoomlaUser user:
      mysql -u root -p
      GRANT ALL PRIVILEGES ON Joomla.*
                      TO JoomlaUser@localhost IDENTIFIED BY 'mypass';
              where:
              'Joomla' is the name of your database
              'JoomlaUser@localhost' is the userid of your webserver MySQL account
              'mypass' is the password required to log in as the MySQL user
    21. Apply privileges and exit:
      flush privileges; \q
    22. Open Firewall for port 80 and save changes:
      iptables -I INPUT -p tcp --dport http -j ACCEPT ; service iptables save
    23. Turn output buffering off by editing /etc/php.ini change:
      output_buffering=4096
      to
      output_buffering=Off
    24. Create empty configuration.php file and set permissions:
      touch /var/www/html/configuration.php
      chmod 666 /var/www/html/configuration.php
    25. Start Apache and set it to start on boot:
      service httpd start; chkconfig httpd on
    26. Disable SELinux (I recommend having a look at this post for a fix that will allow you to run SELinux and Joomla. Do ensure that you test everything that you are likely and unlikely to do, e.g. add articles, add blogs, etc..). Alternatively edit /etc/selinux/config and change:
      SELINUX=enforcing
      to
      SELINUX=disabled
    27. Start the Joomla install proper by navigating to:
      http://<yourserverip>
    28. On step 4 use the following settings:
    29. I chose to install the sample data on step 6.
    30. Ensure that you remove the installation directory
      rm -rf /var/www/html/installation/
    31. You can now go and administer your site or view the sample sites if you chose to install the sample data. Enjoy!

    Note that if if you do decide to use SELinux, see step 26, you need an extra step to change the context for the Joomla files:
    chcon -R  unconfined_u:object_r:httpd_sys_content_t:s0 /var/www/html/