Showing posts with label Microsoft Azure. Show all posts

Monday, 8 October 2018

Using Dynamic 365 Service Endpoints - Part 2

In the previous post, we discussed using Service Endpoints and how they can be used to integrate with other systems via a Azure Service Bus Queue.

There are other ways that Service Points can be used for integrating with other systems.

  1. Topic

  2. Integrating with a Topic is very similar to integrating with a Queue, except that multiple systems can consume the same message.

    Let's say we wanted to integrate with our customer's Audit service and a third party system, then we would use a Topic to ensure that both systems would get the messages

  3. One-Way Listener

  4. This requires an active listener.If there is no active listener on an endpoint, the post to the service bus fails. Dynamics 365 will retry the post in exponentially larger and larger time spans until the asynchronous system job that is posting the request is eventually aborted and its status is set to Failed

    The utility of this is beyond me given that the operation will always succeed in Dynamics due to endpoint steps requiring to be asynchronous. I might be misunderstanding how this works though.

    A sample can be found here

  5. Two-Way Listener

  6. A two-way contract is similar to a one-way contract except that a string value can be returned from the listener to the plug-in or custom workflow activity that initiated the post.

    This seems like a more interesting proposition as the other system can send information back to Dynamics 365, e.g. return the result of a calculation

    A sample can be found here

  7. REST Listener

  8. A REST contract is similar to a two-way contract on a REST endpoint.

    A sample can be found here

  9. Event Hub

  10. This contract type applies to Azure Event Hub solutions.


Friday, 5 October 2018

Using Dynamic 365 Service Endpoints - Part 1

Dynamics 365 offers various possibilities for integrating with 3rd party systems, one of them is using a Service Endpoint, which is a fancy way of calling the Azure Service Bus, which can be used for integrating with 3rd party systems.

In reality things are a bit more complicated and will be discussed in a future post.

In this example we will create a Service Bus queue that will receive any new Search Engines so that these can be processed by a single 3rd party system.


1. Create Azure Service Bus Queue

From the Azure Portal
  1. Create a Namespace


  2. Create a Queue


  3. Add SAS Policy


2. Register Service Endpoint

In order to register a Service Endpoint we will need the connection details for the Queue, which can be obtained from the Azure Portal.

  1. Register New Endpoint


  2. Add Connection Details


  3. Complete Registration


  4. The Message Format is important as the code needed to read the messages will be different depending on the format.


  5. Register New Step


  6. Bear in mind that it needs to be registered against the service endpoint itself.


    This is what we've ended up with

3. Test

We create a new Search Engine


We can see that the message has been sent on Azure Portal


4. Processing Queue Messages

The code used to process the Queue messages can be found here and the full VS Solution can be found here.

Some of the code has been pilfered from the CRM Samples and updated it to work with the latest version, at the time of writing of Azure Service Bus.

The verbosity of the messages is peculiar and it would be nice to be able to do something similar to plug-in  (Pre/Pro)EntityImages, namely just send a few parameters.

In this highly contrived exampled we might just need to send two parameters (name and url) to our 3rd party system, yet ~ 5 KB of data are sent.

Tuesday, 25 September 2018

Azure Cognitive Services and Dynamics 365 - Part 2

In part 1, we looked at how we could integrate Azure Cognitive Services with Dynamics 365 to provide keyword search suggestions for Knowledge Based articles.

In this second part we discuss the Similar Records Suggestions Feature


Important

At the time of writing, the integration of Cognitive Services with Dynamics 365 is in preview mode and the preview is only available for North American instances.


In order to configure the integration, see sections 1 to 3 of part 1


1A. Add Advanced Similarity Rules
  1. Navigate to Settings | Data Management | Similar Records Suggestions
  2. Click New
  3. Fill in details, ensuring that Use Text Analytics for Target Match is set to Yes and entity is set to Case
  4. Click Save
1B. Add Match Fields

On the same record as section 1A, we click the plus sign as shown below and we add some Match Fields.

We set the same fields as in part 1, namely Subject of any regarding activity, title of any regarding note and description field.


Once this has been done, the similarity rule can be activated.

2. Testing It

We create a few cases with similar description and/or subject for tasks, title for notes.


When we click on Similar Cases: Find

This appears to have picked up the word fault on the description and used it to suggest it, not exactly what we were after but it highlights the posibilities


These are a complement to the duplicate detection rules although I have to admit that I've not managed to get them to trigger but the API in Azure is being invoked ...

Monday, 24 September 2018

Azure Cognitive Services and Dynamics 365 - Part 1

Microsoft Cognitive Services is a collection of APIs, which can be used to add artificial intelligence capabilities into applications. You can see see the full list here and play with the demos by clicking on the links therein.

Important

At the time of writing, the integration of Cognitive Services with Dynamics 365 is in preview mode and the preview is only available for North American instances.


1. Activate Text Analytics

In order to enable the integration follow these steps:

  1. Navigate to Settings | Administration | System Settings
  2. Go to Preview tab
  3. Select Yes on Enable the Dynamics 365 Text Analytics Preview
  4. Click OK
2. Create Text Analytics Endpoint in Azure

We need to create a Text Analytics service in Azure:
  1. Login to Azure Portal
  2. Click Create a resource
  3. Search for Text Analytics
  4. Click Create, which will take you to the wizard (of sorts)
  5. Fill in:
    • Name
    • Subscription
    • Location
    • Pricing Tier
    • Resource Group
Once the resource has been created we will need endpoint URL and an access key to access it from Dynamics 365, which we can get from the resource itself on the azure portal, as shown below:


3. Configure Dynamics 365 to use Text Analytics

The final configuration step is to add the details from section 2 to Dynamics 365.
  1. Navigate to Settings | Administration | Azure Machine Learning Text Analytics Service Configuration
  2. Fill in with details from the previous section: 
    • Azure Service Url
    • Azure Account Key
  3. Click Test Connection
  4. Click Activate
  5. Tick Activate existing text analytics models and Click Activate
Note that the results of Test Connection will be displayed on the Connection Test Information section.

4A. Create Knowledge Search Model
  1. Navigate to Settings | Service Management | Knowledge Search Field Settings
  2. Click New
  3. Fill in details
  4. Click Save
4B. Create Keyword or Key phrase Determination Field

On the same record as section 4A, we click the plus sign as shown below and we add some rules

The rules determine which fields will be used to generate the default search strings for Knowledge Based articles.

In the example below we  have set up, perhaps somewhat redundantly the subject of regarding Tasks, Activities, the case description field and the title of any regarding notes as relevant keywords/phrases.


5. Add Knowledge Base Search Suggestions to Case

  1. Navigate to Settings | Customizations | Customize the System
  2. Expand Entities | Case | Form
  3. Click on the Default Form: Case
  4. Double Click on the Conversation Tab
  5. Go to Web Client Properties | Knowledge Base Search
  6. On Additional Options, tick Turn on Automatic Suggestions 
  7. On Give knowledge base (KB) suggestions using, ensure you select Text Analytics
  8. Save Form
  9. Publish Entity.
6. Testing it

The feature will use Text Analytics to extract meaningful keywords to search for from the fields set up on section 4B

As mentioned on section 4B, in this example we  have set up,  the subject of Tasks, Activities, the case description field and the title of any notes as relevant keywords/phrases.

So in an example case, where we have a description and a task like this:


If we click on KB Records this is the result


It's used the fields to suggest the search words

I have to admit that I expected it to search the KB articles, but this is not what the feature is about.


7. Enable Knowledge Management on Other Entity

It is possible to do the same for pretty much any entity

  1. Navigate to Settings | Customizations | Customize the System
  2. Expand Entities | Account 
  3. Tick Knowledge Management
  4. Click on the Default Form: Account
  5. Add Knowledge Base Search
  6. On Additional Options, tick Turn on Automatic Suggestions 
  7. On Give knowledge base (KB) suggestions using, ensure you select Text Analytics
  8. Click Ok
  9. Save Form
  10. Publish Entity.
We will then need to create a Knowledge Search Model as per section 4.

Saturday, 2 May 2015

Squid, Azure and beating youtube's regional filter

Every so often I try to watch videos on YouTube that are not available for my region/country (UK) and normally I can easily find an alternative that is available for the UK but last week I thought, why not just use a proxy?.

I have an MSDN subscription, which among other things, gives me £100 of Azure credit a month, so I thought I'd use some of the credit for this.

I provisioned a A0 OpenLogic 7.0 box and I got started. If you're wondering the cost for a linux A0 instance is £0.0011/hr ~ £8 a month and bandwidth is £0.08 per GB (first 5GB are free).
  1. Install Squid

  2. sudo yum -y install squid

  3. Add allowed IP addresses

  4. sudo vi /etc/squid/squid.conf

    # Example rule allowing access from your local networks.
    # Adapt to list your (internal) IP networks from where browsing
    # should be allowed
    acl localnet src 10.0.0.0/8     # RFC1918 possible internal network
    acl localnet src 172.16.0.0/12  # RFC1918 possible internal network
    acl localnet src 192.168.0.0/16 # RFC1918 possible internal network
    acl localnet src fc00::/7       # RFC 4193 local private network range
    acl localnet src fe80::/10      # RFC 4291 link-local (directly plugged) machine  s

    acl work src  111.111.111.0/24
    acl home src  111.111.111.111

    # INSERT YOUR OWN RULE(S) HERE TO ALLOW ACCESS FROM YOUR CLIENTS

    http_access allow work
    http_access allow home


  5. Enable IP Forwarding by editing sysctl.conf file.

  6. sudo vi /etc/sysctl.conf
    Add the following to file: net.ipv4.ip_forward = 1
    sudo sysctl -p /etc/sysctl.conf


  7. Enable and start Squid

  8. systemctl enable squid
    systemctl start squid


Now we need to open the firewall in Azure for the box, Squid listens, by default on port 3128 and configure your browser to use this proxy ... Bye, Bye dreaded: The uploader has not made this video available in your country.

It's worth pointing out that this doesn't work for all websites, see my post about a setting up a VPN server on AWS if you want to a VPN server. Azure doesn't support GRE protocol 47, so it's SSL VPNs only on Azure.

Thursday, 20 November 2014

Introduction to the Cloud with Microsoft Azure - Part 2

Following from the previous post, I will continue explaining the features that Azure offers for VMs.

The first feature I want to discuss is the Dashboard, which allows you to have a view of what your VM is doing.


A very nice feature of Azure VMs is alerting, in essence, you can get notified once a certain threshold has been exceed. In the example below will set an alert to email the administrator if CPU exceeds 80% for more than 5 minutes.

Click on Monitor and Select the Metric that you want and alert for and then Click add Rule


The next feature I want to cover is the firewall. When a new machine is provisioned the firewall will only be opened for PowerShell and Remote Desktop/SSH

You can see this by navigating to Virtual Machines -> <YourVM> -> Dashboard -> Endpoints


Let's add a new rule. Just Click Add and follow the screens below:


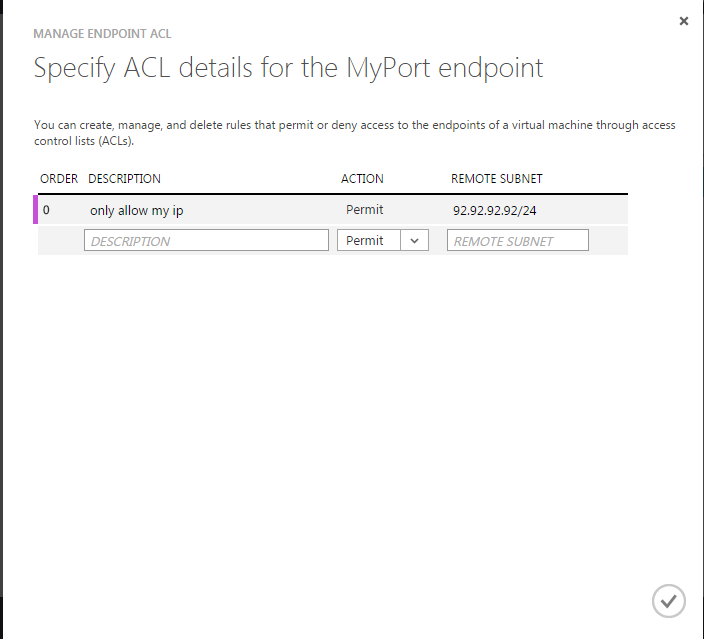
It is possible to specify ACLs for firewall rules, so below I've added a rule for my IP address, note that this only apply to the  particular rule selected when you clicked manage ACL:


Finally, one of my favourite features. Configuring the VM itself. It is possible to change the sizing of the VM here, but this will effectively take offline for a few minutes:


I haven't covered availability sets and a few other features, which I guess will have to wait until part 3.

Wednesday, 12 November 2014

Introduction to the Cloud with Microsoft Azure - Part 1

My new company has been kind enough to provide me with an MSDN subscription, which comes with some Azure credits so I thought that I would try to make use of it.

I thought I would start with the easiest part and describe Virtual Machines in the cloud.

The first thing to bear in mind is that this is not a substitute for regular hosting providers, if you are going to be using your server 24/7, you would be worse off in the cloud. Take this small example:

At the time of writing, you can get a dedicated 16 CPUs, 64 GB of RAM, 1.2 TB of HDD and unmetered connection for £150 per month (123 hosting)

A comparable machine in Azure, A7 (8 CPUs, 56 GB of RAM, not sure how much HDD), will set you back £416 per month and that doesn't count data transfers or disk operations.

So, Why would anybody use Azure or any other cloud solution?

It's pay as you go, which means that you can have say, a test environment, and only use it when there is a release, this might mean that your usage is one out of every four weeks depending on your release scheduled and because you can turn it off while not in use, you might only pay for say 5 days or 2.5 days if you turn it off at the end of the day, so now the comparison looks more like:

Traditional Hosting: £150
Azure: £33.60 + Bandwidth + Disk Operations

A much better proposition.

At any rate, enough with the economics of the cloud.

Logging to the Azure Portal and navigate to Virtual Machines, where you'll find something like this:


Click on New -> Quick Create -> Create Virtual Machine

I've gone for gold and selected the most powerful machine.


You can also browse the gallery, if you don't like the OS options available or you want a pre-built machine. Say you want a Biztalk2013 image


Finally, when you've tired of all the playing about you can just delete it:

Navigate to Cloud Services -> Select the one you want to delete -> Click Delete -> Select Delete the cloud service and its deployments.


You can manage your VMs from Virtual Machines on the menu and I will go on more detail about it on my next post.

Sunday, 26 October 2014

Enable .NET Framework 3.5 in Windows 2012 Azure Virtual Machine (VM) - Error Code 0x800F0906

Yesterday I tried to install Ms SQL Server in a Azure VM that was running Windows 2012 R2, but it would complain about not being able to enable it.

So I tried from Server Manager and I got the following error:


Since this is a Azure VM, I don't think I should be downloading the Windows ISO, so ... well, it turns out that this is a known issue for which there is a fix, so all you need to do is apply the latest Windows updates and then it will install fine.

Control Panel -> Windows Updates


11 updates, WTF MS?


The one we care about.

The question I have is why in the name of all that is holy, isn't the fix already applied when the VM is provisioned? I get that MS can't just release a new image for every fix but preventing the install of SQL Server seems to be a big enough issue to warrant a new image, even if there are SQL Server VMs, but they are more expensive and .... at any rate, hope it saves people time.

I guess it's a matter of time, hopefully.

Sunday, 15 January 2012

Windows Azure from Windows XP

A few days ago a colleague pointed out that thanks to our subscription to MSDN we get free access to the Microsoft cloud system, Windows Azure. So I thought I would give it a try, boy was I in for a surprise.

After signing up and logging in, I made an attempt to get the SDK to see what all the fuss was about and this is where all the fun began. Microsoft's answer to Yum or Aptitute,  Microsoft Web Platform Installer was installed and then all the pre-requisites are installed in order, which takes an awful long time and when you think it has finished, you realized it has failed to install everything because, and I'm not kidding, IIS 7.x is needed, say what? I'm running Windows XP, why the b£$%^& h!"£ would it not check this first? I appreciate that each installer will run its own checks but why doesn't MS Web PI check this? Why isn't it clear that development on Windows XP for the Windows Azure is no longer supported, if it ever was. I sometimes dispear with Microsoft.

You need to go to the microsoft download page, e.g. sdk 1.4 itself to check the pre-requisites as there is nothing on the Windows Azure page itself. If you click install this launches MS Web PI and then you run through the whole frustrating process.