Showing posts with label HA. Show all posts

Friday, 9 December 2011

Install MS Dynamics CRM 2011 to an Active-Active MS SQL Server Failover Cluster using ESX 4.0

The fifth post of the series describes how to install Microsoft Dynamics CRM 2011 to both SQL Server failover clusters. Previous posts in the series can be found here: 1, 2, 3 & 4.

I have created a couple of VMs, CRM2011APPA & CRM2011APPB, to use as MS Dynamics CRM 2011 Application Servers.

In this configuration you will need at least two application servers per SQL Server failover cluster, as there is little point in having resilience only in one side of the fence, as it were, but for the purposes of this demo two VMs will suffice.

There are quite a few pre-requisites that need to be fulfilled before MS Dynamics CRM 2011 can be installed:

  • You need to install two instances, SSRSA & SSRSB, of MS SQL Server Reporting Server 2008, SSRS henceforth. You can install them in separate Guests or you can reuse your SQL Server failover cluster servers, which is what I have done. You can scale out the SSRS deployment to provide high availability. Note that it would seem that it is not possible to create two scaled-out deployments on the SQL Server failover cluster servers, so I have gone for single-server SSRS deployments. (I know, I know) 
  • You will need to create at least an OU on your domain to install MS Dynamics CRM 2011, I have actually created two (HACRM2011A & HACRM2011B): One for each deployment. The installer account(s) will need full control of these OUs (it doesn’t really, but it makes life easier that way).
  • You will need at least a new service account to run MS Dynamics CRM 2011, and it is recommended that the sandbox service is run under a separate account too, so make that two accounts or four (two per deployment). Arguably you could re-use the SQL Server failover cluster account if all you are going to do with the cluster is run MS Dynamics CRM 2011, which is what I have done, so the service accounts are sqlcluster2k8a & sqlcluster2k8b.

I think that using a single service account per deployment is acceptable. In essence if the cluster goes down, so does your application, which means that having a separate account will not protect you. If you separate the accounts and the MS Dynamics CRM 2011 service account goes, you still don't have an application, so you have not really gained anything. All of this assumes that you are not using the cluster for some other application.

I shall now describe how to install both instances SSRS so that they can be used by MS Dynamics CRM 2011.

You need to create a couple of service accounts, ssrs2k8a & ssrs2k8b, to run each instance of SSRS, but unlike in SSRS 2005, you do not need IIS.

From the first cluster node, win2k8a, run setup.exe, which will start the SQL Server Installation Center wizard. From the installation tab, select New SQL Server stand-alone installation or add features to an existing installation, which you should know by now, will launch a wizard to check the setup support files and ask you to install them, even if you have installed them before. After many wizards you will arrive at the SQL Server 2008 Setup wizard:

  • On the Installation Type tab: select Perform a new installation of SQL Server 2008.
  • On the Feature Selection tab: select Reporting Services.
  • On the Instance Configuration tab: use SSRSA as the name of the instance.
  • On the Server Configuration tab: set the user account and password (ssrs2k8a)
  • On the Installation Rules tab: select install but not configure

Once the installation has completed, you need to configure it. Run the Reporting Service Configuration Manager from Start -> All Programs -> Microsoft SQL Server 2008 -> Connfiguration Tools -> Reporting Service Configuration Manager.

  • Connect to the SSRSA instance.
  • On the Web Service Url tab: accept the defaults by pressing apply.
  • On the Database tab: click Change Database which will launch the Report Server Database Configuration Wizard.
  • On the Action tab: select Create a new report server database.
  • On the Database Server tab: set Server Name to sql2k8a\sql2k8a and ensure test connection has succeeded. You will need to use your hostname\instancename.
  • On the Report Manager URL tab: press apply, if you go to the next tab and come back to this tab, you’ll now see the advanced button is enabled.
  • On the Encryption Keys tab: ensure that you backup the symmetric key, by pressing backup. A great improvement from SQL Server 2005 is that you are now prompted for a confirmation password.
  • On the Web Service URL tab, double click on the URL, which should take you to the report server website.

The installation process for the second node is identical to the first node, except for the need to use a different instance name, SSRSB and a different user account, ssrs2k8b.

Once the installation has completed, you need to configure it. Run the Reporting Service Configuration Manager from Start -> All Programs -> Microsoft SQL Server 2008 -> Connfiguration Tools -> Reporting Service Configuration Manager.

  • Connect to the SSRSB instance.
  • On the Web Service Url tab: accept the defaults by pressing apply.
  • On the Database tab: click Change Database which will launch the Report Server Database Configuration Wizard.
  • On the Action tab: select Create a new report server database.
  • On the Database Server tab: set Server Name to sql2k8b\sql2k8b and ensure test connection has succeeded. You will need to use your hostname\instancename.
  • On the Report Manager URL tab: press apply, if you go to the next tab and come back to this tab, you’ll now see the advanced button is enabled.
  • On the Encryption Keys tab: ensure that you backup the symmetric key, by pressing backup. A great improvement from SQL Server 2005 is that you are now prompted for a confirmation password.
  • On the Web Service URL tab, double click on the URL, which should take you to the report server website.

At this point you are ready to start the MS Dynamics CRM 2011 install. However, neither deployment has been scaled out, so this is a single point of failure. I guess this is another one that I'll need to investigate.

From the first application server, CRM2011APPA, Run splash.exe and select Install Dynamics CRM Server, which will launch the Microsoft Dynamics CRM Setup wizard to install MS Dynamics CRM 2011:

  • On the Install Required Components screen: click install. Once the .NET framework 4 has installed you will need to reboot and launch the wizard again. When you get back to this screen, click install to finish the installation of the required components.
  • On the Specify Deployment Options screen: enter sql2k8a\sql2k8a (your first SQL Server failover cluster hostname\instance name)
  • On the Select the organization unit screen: select the HACRM2011A OU.
  • On the Specify Service Accounts screen: you should use a separate account for the Sandbox Processing Service, this is a best practice, which I have not followed. I have used sqlcluser2k8a for all services.
  • On the Specify Reporting Service Server screen: ensure that you type the correct url: http://win2k8a/ReportServer_SSRSA

As if by magic the necessary features have been added to the OS, a little bit cheeky of Microsoft perhaps? At any rate, you can now access your new instance of MS Dynamics CRM 2011 on http://localhost.

From the second application server, CRM2011APPB, repeat the process changing the instance (sql2k8b\sql2k8b), OU(HACRM2011B), service account(sqlcluster2k8b) and ssrs deployment (http://win2k8b/ReportServer_SSRSB)

In order to complete the installation you need to install Microsoft Dynamics CRM Reporting Extensions to each SSRS instance.

From node 1, win2k8a, Run Splash.exe and select Install Microsoft Dynamics CRM Reporting Extensions.
  • You need to install .NET framework 4, which means that a reboot will be needed.
  • On the Specify Configuration Database Server screen: select sql2k8a\sql2k8a
  • On the Specify SSRS instance name screen: select SSRSA

From node 2, win2k8b, repeat the same steps to install Microsoft Dynamics CRM Reporting Extensions to SSRSB.

You have now two MS Dynamics CRM 2011 deployments on a active-active SQL Server failover cluster configuration.

Thursday, 8 December 2011

Active-Active MS SQL Server Failover Cluster using ESX 4.0 - part 4

The fourth post in this series, without a doubt the shortest, describes how to install the second SQL Server 2008 failover cluster, SQL2K8B. Other posts in the series can be found here: 1, 2 & 3.

The process is fairly similar to the process described in the previous post to install the first SQL Server 2008 failover cluster, SQL2K8A. 

You need to make sure that all the cluster resources are in Node 1 and then start the installer by launching Setup.exe. Run the gauntlet of wizards until you get to the Install a SQL Server failover cluster wizard:

  • On the Instance Configuration tab: set the sql server network name and the InstanceID to: SQL2K8B.
  • On the Cluster Resource Group tab: accept the default: SQL Server (SQL2K8B).
  • On the Cluster Disk Selection tab: select the remaining Disk (Cluster Disk 3).
  • On the Cluster Network Configuration tab: set the IP address to 10.168.20.244, namely the IP address for SQL2k8b.
  • On the Server Configuration tab: use the service account for the second cluster (sqlcluster2k8b).

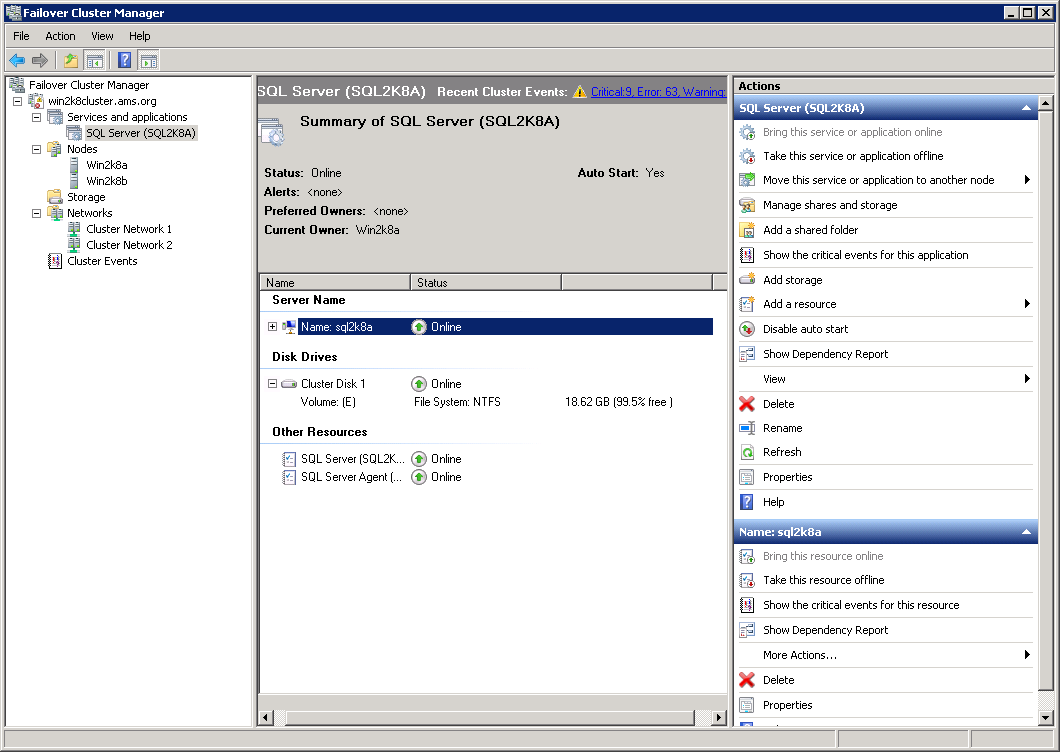
Once completed  you can check a successful install by running the Failover Cluster Manager.
Figure 4.1 Failover Cluster Manager console display both SQL Server failover groups
Now, you can repeat the same process to add the second node to the second cluster.

You should now repeat the same tests as in part 3. When finished, remember to failover each service to a different node, so that you have a true active-active SQL Server failover cluster, see Figure 4.2 below.
Figure 4.2 Failover Cluster Manager displaying Active-Active configuration.
You now have an active-active SQL Server 2008 failover cluster, it doesn't do much, or anything really, but we'll soon give it something to do. Stay tuned for the fifth part of the series.

Wednesday, 7 December 2011

Active-Active MS SQL Server Failover Cluster using ESX 4.0 - part 3

In the first part of this series, I discussed how to set up the ESX Guests to enable Active-Active failover clustering. In the second part of this series, I discussed how to set up a Windows Failover Cluster in Windows 2008 R2. The third part in this series describes how to install the first SQL Server 2008 failover cluster, SQL2K8A of the Active-Active SQL Server 2008 failover cluster.

You need to create a couple of service accounts in your domain to run the SQL Server and associated services. If you are not going to use service SIDs then you will also need a couple of domain groups. I have decided to use service SIDS. This option is only available for Windows 2008 and thus I have only created two domain user accounts:
  • SQLCluster2K8a.
  • SQLCluster2K8b. 
You can add this account to the local administrator group to allow you to administer the servers, but it is not necessary.

The rationale behind this decision, to use two service accounts, is: to prevent an account lock-out from taking both of your SQL failover clusters down. It is not a requirement and thus you can simply use a single account to run both SQL failover clusters, as indeed I have done for this demonstration (Talk about do as I say, not as I do).

In order to prevent potential issues compatibility issues it is necessary to slipstream SP1 into the installation media. You can check this link for details on how to do this. Please note, that it is not necessary to slipstream all architectures as the link suggests, you just need to do the architecture that you are using. 

Run Setup.exe and from the Installation tab, select New SQL Server failover cluster installation, which will launch a wizard that will guide you through the installation process. The wizard will check the server for its suitability as a failover cluster and it will then install the setup support files. The installation wizard proper will run after this.

On the Setup Rules Support tab, I encountered a few warnings:
  1. Distributed Transaction Coordinator (MSDTC) Clustered
  2. Microsoft Cluster Service (MSCS) cluster verification warnings
  3. Microsoft .NET Application Security
  4. Network Binding order
Which were dealt with like this:
  1. I don’t think MS Dynamics CRM  2011 uses MSDTC, so I’m not too bothered about this warning, however, see this link for details of how to cluster the MSDTC service.
  2. I ran a cluster validation test and the warning went away.
  3. Guests I'm using don’t have access to the internet so this is to be expected.
  4. In theory, following this KB should have fixed the issue, alas the warning continues to appear and I'm not sure why. The binding order is definitely correct on both nodes.
See Figure 3.1 to see the selections I made on the Feature Selection tab:
Figure 3.1 Selected Features for first node of SQL2K8A failover cluster.
You might already have the management tools installed somewhere else, but I've always found it useful to have them in the actual server.

  • On the Instance Configuration tab: I set the SQL Server Network name and the instance name so that it matches the SQL Cluster DNS A Record, namely SQL2K8A.
  • On the Cluster Disk Selection tab: make sure that you only select one of the Cluster Disks, you'll need the other for the second SQL failover cluster.
  • On the Cluster Network Configuration tab: Deselect use DHCP and set the IP Address for SQL2K8A,   10.168.20.243 in this case.
  • On the Database Engine Configuration tab, add the service account (SQLCluster2K8A) and your user.

Once the installation completes, you can check that it has successfully created a new cluster service (Resource group in Windows 2003 parlance) by running the Failover Cluster Manager, see figure 3.2  Do not try to failover this group yet, as it has not been installed on the passive node.
Figure 3.2 Failover Cluster Manager displaying the components of the first SQL Server failover cluster (SQL2K8A).
The procedure for installing the second node of the SQL Server failover cluster is fairly similar to installing the first node. Assuming that you have slipstreamed SP1 for this node you can start the installation by running Setup.exe and going through the wizard, however, rather than selecting New SQL Server failover cluster installation from the Installation tab, you need to select Add node to a SQL Server failover cluster. This will launch a wizard, that will run some checks and then it will launch another wizard that will install the setup support files before finally launching the Add a Failover Cluster Node wizard.

I encountered an error related to .NET Framework before even launching the first wizard, which did not occur in node 1. I’m not sure what the source of this error is, but since there is an easy workaround, which is to add the .NET Framework 3.5.1 Feature, that is what I did. All Features can be installed from Server Manager. Note that the .NET Framework 3.5.1 Feature will require you to install some dependencies.

On the Cluster Node Configuration tab, ensure that you use the same SQL Server instance as for node 1, in practice this should mean to simply accept the defaults.
Continue the Wizard until it finishes the installation. You now have, assuming that you haven’t encountered any errors, a SQL Server failover cluster, congratulations.

It is advisable to test the reliability of the cluster at this stage. I would suggest that you run the following tests (these are similar tests to those in part 2):
  1. Turn off Active node. All cluster resources should failover to the passive node.
  2. From Failover Cluster Manager move SQL Service to passive node.
  3. From ESX, switch off the public network on the active node. The cluster should fail over to the passive node. When I tried this, it did not work. I’ll need to investigate
This concludes part three of the series, in the fourth part I will show how to install the second SQL failover cluster.

Tuesday, 6 December 2011

Active-Active MS SQL Server Failover Cluster using ESX 4.0 - part 2

In the second part of this series, I will show how to install and configure a failover cluster in Windows 2008.  Following from the previous post, I’m going to assume that you have already installed Windows 2008 to both nodes.

In order to make your life easier it would be a good idea to name the network cards in Windows, public and private. I’ve given 192.168.168.1 & 192.168.168.3 respectively to the private network NICs, whereas the public network NICs have been given an IP address in our development network (10.168.20.240 & 10.168.20.241).

An active-active cluster needs three A Name Records in your DNS server:
  • One Record for the Windows cluster (win2k8cluster -> 10.168.20.242).
  • Two Records for each “SQL cluster” sql2k8a & sql2k8b -> 10.168.20.243 & 10.168.20.244 respectively.

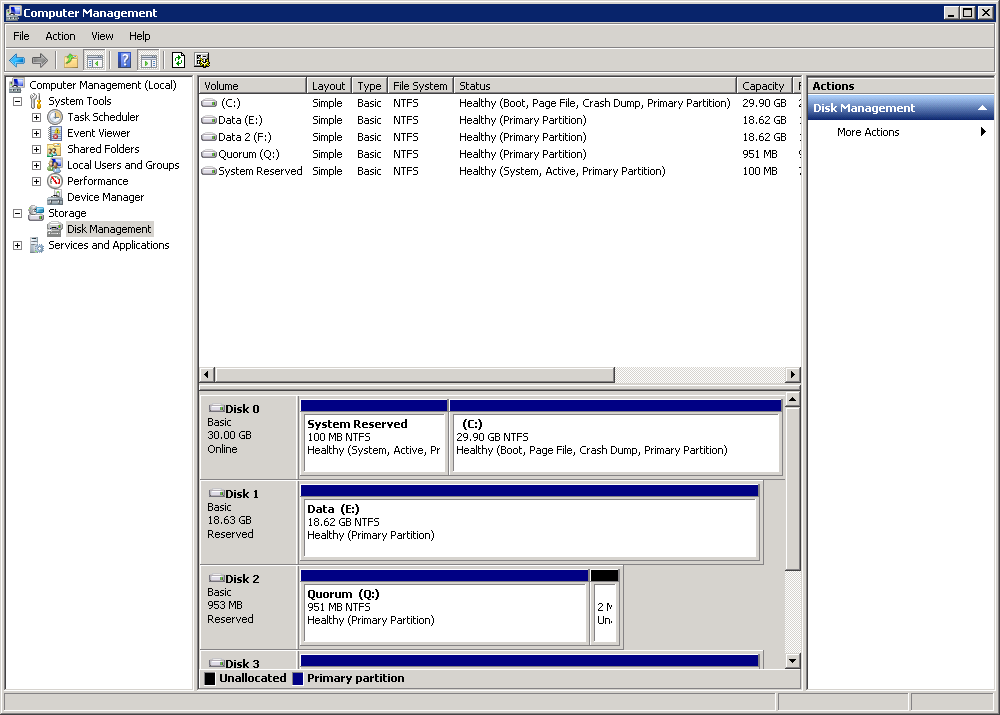
You can add the LUNs (SAN Volumes) to Windows. Run the Computer Management console, from Start -> Run  -> compmgmt.msc, and select Disk Management:
  1. Right click on disk 1 and select Online. Ensure all disks are selected and click OK.
  2. Right click on disk 1 and click Initialize Disk. 
  3. Right click on disk 1 and select New Simple Volume. Follow the Wizard. Suggest that you provide a Volume Label (e.g. Data A).
Repeat steps 2 & 3 for the other disks.
Figure 2.1 Computer Management Console showing Quorum Disk and two Data disks
In contrast to Windows 2003, where failover clustering is installed by default, in Windows 2008 you need to add the failover clustering feature, which you can do in Server Manager. Thus, from Server Manager:
  1. Click Features.
  2. Click Add Features.
  3. Select Failover Clustering.
  4. Click Install.
You can now start the cluster administration console or Failover Cluster Manager, from Start -> Run -> cluadmin.msc. Note that cluadmin does not appear to work as it did in Windows 2003, you will need to type cluadmin.msc.
Figure 2.2 Failover Cluster Manager Console
You can now create a new cluster, by clicking on create a new cluster. This will launch a wizard that will guide you through the process of creating a new cluster.

On Step 3, run through the validation tests. As I mentioned in the first post of this series, the firewall test failed. This is the error message:

Validate Windows Firewall Configuration
Validate that the Windows Firewall is properly configured to allow failover cluster network communication.
Validating that Windows Firewall is properly configured to allow failover cluster network communication.
An error occurred while executing the test.
There was an error verifying the firewall configuration.
An item with the same key has already been added.


This is an issue with Guest (VM) cloning. I got around it by adding a couple more NICs to the second node, so that it now has 4 NICs, with the first two disabled, not very elegant but it does the trick.
Make sure that you change the ip addresses on NICs 1 & 2 just in case they accidentally get enabled as it could be a barrel of laughs if they inadvertently do get enabled.

On Step 4, enter your cluster name and make sure that you only enable the public NIC for administering the cluster. You need to ensure that the IP address assigned to the public network (10.0.0.0/8) is the IP address of the cluster name.
Figure 2.3 Create Cluster Wizard. Add an Access point for administering the cluster
Follow the wizard until the Cluster is created.

It is advisable to test the reliability of the cluster at this stage. I would suggest that you run the following tests:
  1. Turn off Active node. The cluster resources should failover to the passive node.
  2. Failover Cluster Group. This should move the cluster group to the passive node. This can be accomplished with the following command (needs to be run as an Administrator): Cluster group “Cluster Group” /move:wink2kb
  3. From ESX, switch off the public network on the active node. The cluster should fail over to the passive node. When I tried this, it did not work. I’ll need to investigate.
This concludes part two of the series, in the third part I will show how to install the first SQL Server failover cluster.

Monday, 5 December 2011

Active-Active MS SQL Server Failover Cluster using ESX 4.0 - part 1

Microsoft SQL Server does not support scale out deployments, which means that scaling out has to be built-in into the design of the application. The simplest way of doing this is by splitting data across two or more databases and running an active-active cluster. This is a series of posts that will show you how to do deploy such a system.  I will then use the active-active cluster to deploy two separate organizations of Microsoft Dynamics CRM 2011.

VMware has a pretty good document detailing how to create the necessary Guests (VMs) to run a successful Microsoft failover cluster here. In my opinion, there is no point in running a failover cluster from the same host, you could argue that there is no point in looking for database performance in ESX but that's a different point. At any rate, I am using a set up that allows the guests to be on different hosts and these are the pre-requisites for the hosts:
  • Two physical network adapters dedicated to the MSCS cluster and to the public and private networks.
  • One physical network adapter dedicated to the service console (ESX hosts) or the VMkernel (ESXi hosts).
  • Fibre Channel (FC) SAN. Shared storage must be on an FC SAN.
  • RDM in physical compatibility (pass-through) or virtual compatibility (non-pass-through) mode. VMware recommends physical compatibility mode. The cluster cannot use virtual disks for shared storage. Failover clustering with Windows Server 2008 is not supported with virtual compatibility mode (nonpass-through) RDMs
If you have all that, then let's move on, otherwise you could have a look at VMWare's document and follow the single host section.

I created three volumes (LUNs) in our SAN array, two for Data (one for each resource group, more on this later) and another one for the Quorum disk. The quorum disk can be small, in production (Win2k3) we run with 0.5 GB, but here I gave it 1 GB and 20 GB for the Data disks.

I tried to save time and simply cloned an already existing Guest with Windows 2008 R2 installed but it turns out that this is not a very good idea, have a look at this post. In essence, the network cards get the same Guid and this creates problems. I got around this by adding a couple of extra NICs to the second Guest, but there must be a more elegant way of doing this. I'll have to investigate.

Anyway, at this point you should have: three LUNs in your SAN array that are accessible to your Hosts, two Guests with at least two NICs and a hard drive for the OS.

Before you start, you need to ensure that the LUNs you created in the SAN array are available to the Hosts, you can do this in vSphere or through the console. (Not sure how to do it in the console, so I’ll have to investigate that as well).

In vSphere, from Home -> Inventory -> Datastores, Right Click on the Datacentre containing your Hosts -> Select Rescan for Datastores…-> Click OK.
1.1 vSphere Datastores View.
You can check that the scan has successfully found the new LUNs by trying to add a new store. Right Click on you datacentre -> Add Datastore -> Select your Host -> Select Disk/LUN -> You should now see your LUNs, see figure 1.2.
1.2 Example LUN.
Do Not Add the LUN here, just click cancel, this is a simple test to check that the LUNs are visible to the Hosts.

Note that from the console, you can just check the output of: fdisk -l

You are finally ready to start. In vSphere from Home -> Inventory -> VMs and Templates, Right Click on Node 1 (win2k8a in my example) and select Edit Settings:
1.3 Node1 (win2k8a) original settings.
  1.  Click Add.
  2. Select Hard Disk.
  3. Select Raw Mappings Device.
  4. Select the first LUN you want to use.
  5. Select Store with Virtual Machine.
  6. Select Physical Compatibility.
  7. Set Virtual Device Node to SCSI (1:0).
  8. Click Finish.
In step 6 I’ve selected Physical Compatibility, because I’m not fussed about taking snapshots as I’m running this as a test, this might not be your case, so you might want to set it to Virtual Compatibility, your call.

In Step 7, it is important that you select a different controller from the controller where your OS disk is. Normally, setting to SCSI (1:0) should be ok. If done correctly a new controller would have been added by ESX.

Repeat steps 1 to 8 for the other two LUNs. Note that you’ll need to use different virtual device nodes in step 7, e.g. 1:1 & 1:2.

Ensure that you set the SCSI controller 1 SCSI Bus Sharing to Physical, as per figure 1.4.
1.4 Second Controller SCSI Bus Sharing settings.
Let’s now move to the second node. Right Click Node 2 (win2k8b in my example) and select Edit Settings:
  1. Click Add.
  2. Select Hard Disk.
  3. Select Use an existing virtual disk.
  4. Browse to the datastore holding node 1 and in the directory for node 1, select the first LUN disk.
  5. Set Virtual Device Node to SCSCI (1:0).
  6. Click Finish.
In step 4, you should add the disks in the same order, so that they map onto each other. Not sure if this is needed, but it makes, kind of, sense.

In Step 5, it is important that you select a different controller from the controller where your OS disk is. Normally, setting to SCSI (1:0) should be ok. If done correctly a new controller would have been added by ESX.

Ensure that you set the SCSI controller 1  SCSI Bus Sharing to Physical, see figure 1.4.

This pretty much concludes the ESX setup and part one of this series. In the next post, I'll cover how to install failover clustering.

Sunday, 6 November 2011

HA windows service with Windows Cluster Service

We support a MS Dynamics CRM application that uses a few SSIS jobs for tidying up data, however they were awfully slow, so we decided to forgo them. In fairness, it is only SSIS jobs that call a web service that were too slow and I'm sure that given enough time, we could make them run faster, but we decided to go for a different route and that was to use a windows service running on the backend, but our backend is clustered, which raises the problem of how to make sure that this service runs in High Availability mode.
It turns out that it is surprisingly easy to do with windows cluster service. There is a resource type called generic service and this can be used to start the service on various nodes as needed.

Assuming that you have your windows service installed in all the nodes in your cluster, this is what you need to do to have a clustered windows service.
  1. Start the cluster console (start|run|cluadmin)
  2. Connect to cluster if needed (it normally connects to the cluster running on the box by default)
  3. Right Click on Groups. Select New| Group. Follow wizard, make sure that all Nodes are available, as shown in the screenshot below and click Finish.
  4. Right Click on the group you have just created. Select New|Resource.
  5. Make sure that you select Generic Service in Resource Type and follow the wizard.  
  6. When prompted for a service name, make sure that this is the service name and not the service's display name. If your service has starts parameters this is where you can add them.  
  7. You can now bring the service online, by bringing the whole group or just the service.
That is all, you should now have an HA windows service. Note that you don't actually have to create a new group, but I think it's just good practice to do so.
Also note that all the windows cluster service will do is to bring the service up after a failover, if your windows service runs a long running process and it stops halfway because the active node goes down, the service will be brought up on the other node, which may or may not cause issues.