Showing posts with label phpMyAdmin. Show all posts

Tuesday, 24 January 2012

Installing secure phpMyAdmin on CentOS 6.2

Following on from Sunday's post on how to set up phpMyAdmin on CentOS 6.2, I thought it would be a good idea to set up phpMyAdmin as a secure website (HTTPS), rather than in clear-text (HTTP). This will ensure that all traffic between the web browser and phpMyAdmin is encrypted.

In a previous post I set up a Certification Authority so I will be using this CA to generate the necessary certificates, but don't worry if you don't have one, you can use makecert or OpenSSL to generate a self signed certificate.

All that is needed is a server and CA certificate, if you've followed my previous post on phpMyAdmin, you can go directly to step 7. Thus armed with a pkcs#12 server certificate (phpMyAdmin.pfx) and a CA certificate (win2kca.cer) we can start:
  1. Set SELinux to allow Apache to bind to a non-default port:
    setsebool -P allow_ypbind 1
  2. Download EPEL Release to enable usage of EPEL Repository: 
    wget http://download.fedora.redhat.com/pub/epel/6/i386/epel-release-6-5.noarch.rpm
  3. Install EPEL Release package:
    yum install epel-release-6-5.noarch.rpm -y
  4. Install phpMyAdmin:
    yum install phpmyadmin -y
  5. Create new directory to host the phpMyAdmin website: 
    mkdir /var/www/phpMyAdmin
  6. Copy phpMyAdmin installation to the directory created in the previous step: 
    cp -r /usr/share/phpMyAdmin/. /var/www/phpMyAdmin
  7. Extract public and private key from server certificate:
    openssl pkcs12 -in phpMyAdmin.pfx -out phpMyAdmin.key -nodes -nocerts
    openssl pkcs12 -in phpMyAdmin.pfx -out phpMyAdmin.crt -nodes -nokeys
  8. Restrict permissions on key file:
    chmod 400 phpMyAdmin.key
  9. Create certificate and key directories and move certificates and keys to them:
    mkdir /etc/httpd/conf.d/certs
    mkdir /etc/httpd/conf.d/keys
    mv phpMyAdmin.crt /etc/httpd/conf.d/certs
    mv phpMyAdmin.key /etc/httpd/conf.d/keys
    cp win2k8ca.cer /etc/httpd/conf.d/certs
  10. Set SELinux to permissive, this is to prevent issues with SELinux preventing Apache from working properly:
    setenforce 0
  11. Edit Apache's SSL configuration file (/etc/httpd/conf.d/ssl.conf). I have changed the port to 7777 and prevented LOW ciphers from being accepted. The rest is simply providing the location of the certificates. Only listing relevant parts of ssl.conf:
    Listen 7777

    <VirtualHost _default_:7777>

    #   SSL Cipher Suite:
    SSLCipherSuite ALL:!ADH:!EXPORT:!SSLv2:RC4+RSA:+HIGH:+MEDIUM

    #   Server Certificate:

    SSLCertificateFile /etc/httpd/conf.d/certs/phpMyAdmin.crt

    #   Server Private Key:

    SSLCertificateKeyFile /etc/httpd/conf.d/certs/phpMyAdmin.key

    #   Server Certificate Chain:
    SSLCertificateChainFile /etc/httpd/conf.d/certs/win2k8ca.cer

    #   Certificate Authority (CA):
    SSLCACertificateFile /etc/httpd/conf.d/certs/win2k8ca.cer

    </VirtualHost>
    1. You can check that the apache configuration file is correct by using:
      apachectl -t 
  12. Restart Apache:
    apachectl -k restart or service httpd restart
  13. Open firewall for port 7777 and save IPTables configuration:
    iptables -I INPUT -p tcp --dport 7777 -j ACCEPT; service iptables save
  14. You can now navigate to https://phpmyadmin.dev.com:7777/setup (If you are using Chrome, you will see this screen first. Other browsers will show similar screens). Note that you'll need a entry on your hosts file that points phpmyadmin.dev.com to the IP address of the Server: 
  15. Click Procceed anyway. You are seeing this because your CA is not trusted by Chrome.
    Although it would seem that the connection is not encrypted, the icon is misleading, it just means that it is not trusted. See below for confirmation:
  16. Because I'm lazy, I'm going to reuse the screenshots and text from my previous phpMyAdmin post, so .. Click New Server. I only changed the name and compression, accepted defaults for everything else:
  17. Go To Authentication Tab. See this link for an overview of the authentication types:
  18. Click Save, which will bring you to the screen below:
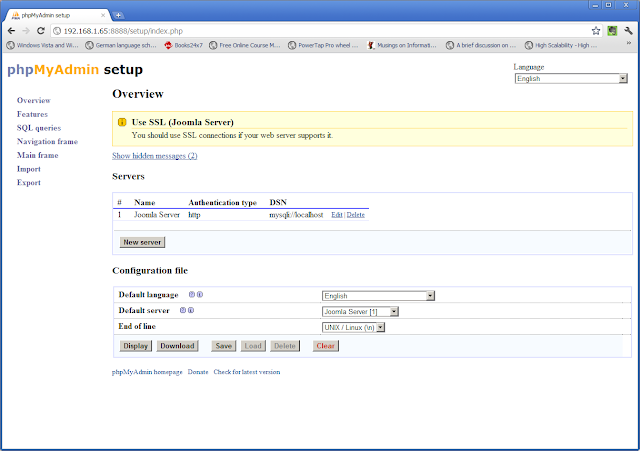
  19. Download the configuration file (config.inc.php) and copy it to /var/www/phpMyAdmin.
  20. You can now start using phpMyAdmin on https://phpmyadmin.dev.com:7777:
  21. All that remains is to renable SELinux and deal with the policy violations:
    cat /var/log/audit/audit.log | grep denied > ssl
    audit2allow -M apachessl -i ssl
    semodule -i apachessl.pp
    setenforce 1
Note that steps 2 & 3 simply add repository for the EPEL repository to your yum repository collection and install the repository key.

In theory, the setup script should be able to generate the configuration file for you, but I've not been able to get it to work. Instructions can be found here if you are interested. 

I haven't thoroughly tested this setup so it is possible, as always, that there could be SELinux issues. All I can suggest is that, if you have some inexplicable issue, have a look at the SELinux log (/var/log/audit/audit.log).

    Sunday, 22 January 2012

    Installing phpMyAdmin in CentOS 6.2 (netinstall)

    I really have no issue with using a terminal, in fact I quite love the geekiness associated with it, but for some reason I never feel comfortable using a terminal to manage mySQL, which is why I love phpMyAdmin.

    I am installing phpMyAdmin in a machine that hosts Joomla, see this post for more details, in practical terms this means that a second website will be needed to host phpMyAdmin, whether you host this site on a different port or a host header it's up to you, the process is fairly similar. Do bear in mind that using a different port has implications to your firewall configuration, in this post I will be using a different port.

    It is worth bearing in mind that this configuration is not secure and as such should only be used on internal networks. Although running the website on a non-standard port will provide obscurity, it does not provide security. Have a look at this post for a secure phpMyAdmin installation guide.

    Unfortunately phpMyAdmin is not, at the time of writing, included with RHEL based systems. Luckily, it is part of the Extra Packages for Enterprise Linux (EPEL) interest group. This means that the EPEL repository can be used to install phpMyAdmin thus obviating the need to install it from source.

    Here are the steps needed to install phpMyAdmin in a CentOS 6.2 server:
    1. Set SELinux to allow Apache to bind to a non-default port:
      setsebool -P allow_ypbind 1
    2. Download EPEL Release to enable usage of EPEL Repository: 
      wget http://download.fedoraproject.org/pub/epel/6/i386/epel-release-6-5.noarch.rpm
    3. Install EPEL Release package:
      yum install epel-release-6-5.noarch.rpm -y
    4. Install phpMyAdmin:
      yum install phpmyadmin -y
    5. Create new directory to host the phpMyAdmin website: 
      mkdir /var/www/phpMyAdmin
    6. Copy phpMyAdmin installation to the directory created in the previous step: 
      cp -r /usr/share/phpMyAdmin/. /var/www/phpMyAdmin
    7. Add a new virtual host to Apache, by editing the Apache configuration file /etc/httpd/conf/httpd.conf, see this post for more details. Relevant parts of httpd.conf:
      Listen 80
      Listen 8888

      NameVirtualHost *:80
      NameVirtualHost *:8888

      <VirtualHost *:80>
          ServerAdmin manyrootsofallevil@myhost.com
          DocumentRoot /var/www/html
          ServerName  Joomla
          ErrorLog logs/Joomla_error
          CustomLog logs/Joomla-access_log common
      </VirtualHost>

      <VirtualHost *:8888>
          ServerAdmin manyrootsofallevil@myhost.com
          DocumentRoot /var/www/phpMyAdmin
          ServerName  Joomla
          ErrorLog logs/phpMyAdmin_error
          CustomLog logs/phpMyAdmin-access_log common
      </VirtualHost>
      1. You can check that the apache configuration file is correct by using:
        apachectl -t 
    8. Restart Apache:
      apachectl -k restart or service httpd restart
    9. Open firewall for port 8888 and save IPTables configuration:
      iptables -I INPUT -p tcp --dport 8888 -j ACCEPT; service iptables save
    10. From a browser navigate to http://localhost:8888/setup :
    11. Click New Server. I only changed the name and compression, accepted defaults for everything else:
    12. Go To Authentication Tab. See this link for an overview of the authentication types:
    13. Click Save, which will bring you to the screen below:
    14. Download the configuration file (config.inc.php) and copy it to /var/www/phpMyAdmin.
    15. You can now start using phpMyAdmin on http://192.168.1.65:8888

    Note that steps 2 & 3 simply add repository for the EPEL repository to your yum repository collection and install the repository key.

    In theory, the setup script should be able to generate the configuration file for you, but I've not been able to get it to work. Instructions can be found here if you are interested.