Showing posts with label Windows 2008. Show all posts

Saturday, 17 November 2012

Clear Certificate Revokation List (CRL) Cache

While investigating yesterday's post I had to republish the CRL a few times, the issue was that it would not be refreshed on the server as well, which was really annoying, particularly because it took me a few minutes to work out what was going on. At any rate, I found that there is a very simple command that clears the cache:
C:\>certutil -setreg chain\ChainCacheResyncFiletime @now
Software\Microsoft\Cryptography\OID\EncodingType 0\CertDllCreateCertificateChain
Engine\Config\ChainCacheResyncFiletime:

Old Value:
  ChainCacheResyncFiletime REG_BINARY = 17/11/2012 10:45

New Value:
  ChainCacheResyncFiletime REG_BINARY = 17/11/2012 10:47
CertUtil: -setreg command completed successfully.
The CertSvc service may need to be restarted for changes to take effect.

Monday, 10 September 2012

Install IIS Role Services (features) using PowerShell

In the almost certainly futile attempt to automate the deployment of this project I'm working on, I'm feeling a little bit despondent today, so excuse my pessimism, I was asked to complete the installation of IIS via a script. 

MS Dynamics CRM 2011 will install all the Role services it needs to run, but it will not install some crucial features like logging.

At any rate, to cut a long story short this is what is needed to install http logging in IIS 7.5
  1. Run PowerShell as Administrator.
  2. Import-module servermanager
  3. Get-WindowsFeature | where {$_.Name -like "Web*"}
  4. Add-WindowsFeature Web-Http-Logging

Any other Role Services (features) can installed in a similar manner.

Thursday, 12 July 2012

Date Parsing issues in C# (Regional Settings in Windows 2008)


A while ago I posted about some issues we had while parsing dates in a .NET application, well it was a MS Dynamics CRM application, but the code itself was a simple, run of the mill, web method.

Imagine my surprise when yesterday I had to sort out a similar issue for a new project I'm working on, though this time there were a couple of differences:
  1. No domain account was being used for the application pools.
  2. Operating System was Windows 2008 R2 Enterprise edition.
  3. Everybody concerned was convinced that it had been working up until now.
In all likelihood, it had only worked, because they had not looked far enough in to the future, i.e. they were parsing 10/07/2012, (i.e. 10th July) which would be parsed as 7th October, so when they tried 13/07/2012 the system stopped working.

The source of the problem as well as the solution were the same as last time:
  • The source: Using US version of Windows.
  • The solution: Set all users to UK settings.
This is accomplished like this (I assume that you have set up your current user with the local settings that you want, in my case UK):
  1. Open Region and Language section of Control Panel (Start | Control Panel | Region and Language)


  2. Select Administrative tab.


  3. Click Copy Settings.


  4. Tick as per screenshot.


  5. Click OK twice.
This sets all user and system accounts to use the same regional settings and solved all of our date parsing problems.

Saturday, 19 May 2012

Join Ubuntu 12.04 (Precise Pangolin) server to a Windows 2008 R2/ 8 Server Beta Active Directory domain

In a previous post, I showed how to join a CentOS/RHEL 6.x server to a Windows 8 Server Beta Active Directory domain using a rather laborious method. In this post I will show you how to join a a Windows 8 Server Beta Active Directory domain using a far simpler way, by using Likewise Open. I've not tried using this method for CentOS/RHEL 6.x but Likewise Open is supported, so stay tuned.

In theory, this method should work for Windows 2003/2008 (R2) domains, but I've only tried it for  Windows 2008 R2 domain and Windows 8 Server Beta.

I had already set up the domain and DNS servers from my previous post, so I won't dwell on this, all I will say is that ensure that name resolution works from the Ubuntu server, e.g. make sure that at least you can ping the DC by hostname. An example /etc/resolv.conf file is shown below for a domain called test.org and DNS server with ip address (10.168.20.93), this should be set up automatically from your DHCP server, if not you'll need to edit /etc/networking/interfaces (note that the options are different to those in /etc/resolv.conf, see man page for resolvconf):
search test.org
nameserver 10.168.20.93
Install Likewise Open:
sudo apt-get install likewise-open5
You can now join the domain with this command (where test.org is the domain and Administrator is an account with Admin access to the domain):
sudo domainjoin-cli join test.org Administrator
Since I'm running a default server version of Ubuntu with no GUI, there is no need to reboot the server to be able to login to the server with domain accounts.

I've not managed to get this command to add an entry for the server to the DNS server so I had to issue this command:
sudo lw-update-dns
Finally, in order to allow domain users to use sudo, you can add this line to the /etc/sudoers file (It might be more appropriate to restrict this to a domain admins or a custom group):
%test\\domain^users ALL=(ALL) ALL
In order to login remember that you will need to use a valid username of this form domain\username rather than simply using the username as with the labour intensive way for CentOS/RHEL that I have discussed in the past.

Another upside of using Likewise Open is that users don't need to have their Unix attributes set, which I guess means that it's probably not necessary to install the Identity Management for UNIX components on the domain controller.

See this post for details on how to set up SSH single sign-on for Ubuntu 12.04.

Tuesday, 28 February 2012

SSH Single Sign On for CentOS 6.2 or RHEL 6.0 using a Windows 2008 AD domain

In one of my previous posts I discussed how to join a CentOS 6.2 server to a Windows 2008 AD domain. There was one thing that wasn't working and that really, and I mean, REALLY annoyed me and this was: single sign on, i.e. using SSH to login to another server in the domain without being prompted for your password again.

After a lot of head banging, cursing and wondering why oh why had I decided to embark in such a doomed enterprise, I managed to get it working. I assume that you have followed my previous post on how to join a CentOS 6 (RHEL 6 works too) and that you have two linux machines that have joined the domain. A second machine is only needed for testing purposes, you could use putty instead. I needed the second machine for other purposes, so that is the route I chose. I have also tested it with putty and it does work as well.

Here is the list of steps needed:
  1. From the Windows domain controller run the following command, which will create spns and upns. Note that you will need to run it as Administrator:
    ktpass -princ host/adtest.my.org@MY.ORG -mapuser MY\adtest$  -pass Passw0rd123 -ptype KRB5_NT_PRINCIPAL -crypto All -out adtest.keytab
  2. Copy adtest.keytab to your linux box, I simply mounted the c drive of the DC on the linux box, but this might not be available to you.
  3. If your server doesn't have a keytab file (/etc/krb5.keytab), then you can just move adtest.keytab to /etc/krb5.keytab otherwise you will need to merge it, which you can do with the ktutil tool, see this link for instructions.
  4. [Optional] Limit encryption to RC4-HMAC, by editing the kerberos configuration file /etc/krb5.conf and adding the following to the [libdefaults] directive:
  5. default_tkt_enctypes=rc4-hmac
    default_tgs_enctypes=rc4-hmac
    permitted_enctypes =rc4-hmac
  6. Restart the OpenSSH daemon:
    service sshd restart
  7. Configure the OpensSSH client. This will limit SSO to hosts in the domain:
  8. Host *.my.org
    GSSAPIAuthentication yes
    GSSAPIDelegateCredentials yes
  9. Repeat steps 1 to 6 for the second server if needed.
  10. Login to first server with a domain account that has linux attributes set.
  11. Ensure that a Kerberos ticket has been issued: 
  12. klist
    Ticket cache: FILE:/tmp/krb5cc_10000_TjT7rk
    Default principal: linuxuser@MY.ORG

    Valid starting     Expires            Service principal
    02/28/12 17:41:06  02/29/12 03:39:31  krbtgt/MY.ORG@MY.ORG
            renew until 02/29/12 03:41:06
  13. Open secure shell on second server, which will log you without a prompt for credentials
    ssh adtest5.my.org
It is very important that name resolution is working correctly as you could get issues if it doesn't work properly, thus an up to date DNS server is quite useful. If you don't have a DNS server make sure that your hosts files are up to date with all the server names involved.

If you hit any problems, the simplest way to trouble shoot is to open a debug ssh daemon, which you can do like this (you can add a couple more ds for extra debug info but I think debug1 is all you need):
/usr/sbin/sshd -p 31415 -d
You'll need to allow traffic on port 31415 or the port you choose, which you can easily do by stopping iptables. Clearly this should only be done in servers that are not internet facing. If the server is internet facing then just open port 31415, e.g:
iptables -I INPUT -p tcp --dport 31415 -j ACCEPT
You can connect to this server with:
ssh servername -p 31415 -v
This should tell you what the problem is, e.g:
debug1: Unspecified GSS failure.  Minor code may provide more information
Key table entry not found
This was actually caused by a name resolution problem.

Thursday, 23 February 2012

Join CentOS 6.2 server to a Windows 2008 Active Directory domain

Following on from my previous post detailing how to join a RHEL6 box to a Windows 2003 AD domain, in this post I discuss how to join to Windows 2008 AD domain (2008 Mode). This time rather than using RHEL 6, I've decided to use Centos 6.2 instead. I have used the standard installation rather than the minimal installation that used in the previous post, so here are the steps needed. 


Before I start though, I'd like to note that I installed the Identity Management for UNIX role in the Windows domain controller, so if you are following these instructions, make sure that you have that role installed in your domain controller. You will also need a binding account that has its Unix attributes set.

Without further ado, here are the instructions:
  1. Ensure that name resolution is working. At the very least you should be able to ping your domain controller, in my case pdc1.dev.org. If you can't, have a look at your /etc/resolv.conf file. Sample file:
    search dev.org test.com
    nameserver 10.168.20.203
  2. Depending on your installation type, you might have to install several of the packages below (It looks like I went for a base install only):
    yum install pam_krb5 pam_ldap nss-pam-ldapd samba policycoreutils-python -y
  3. Run authconfig-tui. Make sure that Kerberos realm is in capitals:


  4. Ensure that Name Service Switch is configured for ldap authentication. In essence, check that /etc/nsswitch.conf has the following values:
  5. passwd:     files ldap
    shadow:     files ldap
    group:      files ldap
  6. Edit the local LDAP name service daemon configuration (/etc/nslcd.conf). A bind account to the Active Directory is needed, so create that account now (I have created binding in the Users OU). The mappings (for Active Directory) need to be modified. Below is a list of changes to /etc/nslcd.conf. In essence uncomment the relevant parts:
  7. binddn cn=binding, cn=Users,dc=dev,dc=org
    bindpw mypass 
    #The Default search scope
    scope sub 
    #Customize certain database lookups
    base   group  dc=dev,dc=org
    base   passwd dc=dev,dc=org
    base   shadow dc=dev,dc=org
    # Mappings for Active Directory
    pagesize 1000
    referrals off
    filter passwd (&(objectClass=user)(!(objectClass=computer))(uidNumber=*)(unixHomeDirectory=*))
    map    passwd uid              sAMAccountName
    map    passwd homeDirectory    unixHomeDirectory
    map    passwd gecos            displayName
    filter shadow (&(objectClass=user)(!(objectClass=computer))(uidNumber=*)(unixHomeDirectory=*))
    map    shadow uid              sAMAccountName
    map    shadow shadowLastChange pwdLastSet
    map    shadow userPassword     unixUserPassword
    filter group  (objectClass=group)
    map    group  uniqueMember     member
  8. Change permissions on /etc/nslcd.conf file so that it is only readable by root:
    chmod 600 /etc/nslcd.conf
  9. Restart the local LDAP name service daemon:
    service nslcd restart
  10. Ensure that the local LDAP name service daemon (nslcd) is set to start with the server:
    chkconfig nslcd on
  11. Edit /etc/samba/smb.conf. Make sure that there is only a security directive active. Comment out all others.
  12. Network Related Options
    workgroup =dev
    Domain members options
    security = ads
    realm = DEV.COM
    use kerberos keytab = true  #not really sure about this one
    password server = pdc1.dev.org
  13. Ensure that iptables lets traffic through on port 389:
  14. iptables –I INPUT –p tcp --dport ldap –j ACCEPT; service iptables save
  15. Run the following command to join the domain:
  16. net ads join –U domainadmin
  17. A DNS record was not created for this server in my DNS server, not sure why, which meant that I had to add the record myself manually. Thus ensure that you do this before moving on if the DNS record is not added automatically, otherwise you might be unable to login.
  18. At this point you have successfully joined to the AD domain, you can test this by getting a list of users or group. You should get back the users and/or groups that have linux attributes, at least the binding account.
    getent passwd
    getent group
  19. In order to create a user's home directory on first login add this directive to /etc/pam.d/sshd. I only log on using ssh. If you are logging in at the box, rather than remotely, you need to modify /etc/pam.d/logon too, I believe. Note that this will not work if SELinux is on.
    session required pam_mkhomedir.so skel=/etc/skel umask=0022
  20. Allow polyinstatiation in SELinux settings:
     setsebool -P allow_polyinstantiation 1
  21. Temporarily set SELinux to permissive:
  22. setenforce 0
  23. If you login with a domain user (ssh binding@domainadtest, where domainadtest is the server that has just joined the domain), the directory will be created, but you will also have a record of what would've gone wrong on /var/log/audit/audit.conf had SElinux been on, which in my case is this:
  24. type=AVC msg=audit(1329063091.971:160): avc:  denied  { create } for  pid=5510 comm="mkhomedir_helpe" name="binding" scontext=unconfined_u:system_r:sshd_t:s0-s0:c0.c1023 tcontext=unconfined_u:object_r:home_root_t:s0 tclass=dir type=AVC msg=audit(1329063091.973:161): avc:  denied  { create } for  pid=5510 comm="mkhomedir_helpe" name=".bashrc" scontext=unconfined_u:system_r:sshd_t:s0-s0:c0.c1023 tcontext=unconfined_u:object_r:home_root_t:s0 tclass=file type=AVC msg=audit(1329063091.973:161): avc:  denied  { write open } for  pid=5510 comm="mkhomedir_helpe" name=".bashrc" dev=dm-0 ino=263825 scontext=unconfined_u:system_r:sshd_t:s0-s0:c0.c1023 tcontext=unconfined_u:object_r:home_root_t:s0 tclass=file type=AVC msg=audit(1329063091.973:162): avc:  denied  { setattr } for  pid=5510 comm="mkhomedir_helpe" name=".bashrc" dev=dm-0 ino=263825 scontext=unconfined_u:system_r:sshd_t:s0-s0:c0.c1023 tcontext=unconfined_u:object_r:home_root_t:s0 tclass=file type=AVC msg=audit(1329063092.015:163): avc:  denied  { setattr } for  pid=5510 comm="mkhomedir_helpe" name="binding" dev=dm-0 ino=263284 scontext=unconfined_u:system_r:sshd_t:s0-s0:c0.c1023 tcontext=unconfined_u:object_r:home_root_t:s0 tclass=dir
  25. Create a SELinux policy module to allow the creation of home directories when the user first logs in:
    less /var/log/audit/audit.log  | grep denied > mkdir.log 
    audit2why < mkdir.log 
    audit2allow -M mkdir -i mkdir.log 
    semodule -i mkdir.pp
  26. Renable SELinux:
    setenforce 1
That is it.

See this post to configure openSSH single sign on.

Tuesday, 6 December 2011

Manual Failover of Cluster Groups

As part of my series in Active-Active clustering, first post here, I was trying to failover the cluster disks to take a screenshot and it turns out that it isn’t possible to failover a group from one node to the next using Cluadmin.msc

So after a quick google search I found this:
cluster group "cluster group" /move:<nodehostname>

Active-Active MS SQL Server Failover Cluster using ESX 4.0 - part 2

In the second part of this series, I will show how to install and configure a failover cluster in Windows 2008.  Following from the previous post, I’m going to assume that you have already installed Windows 2008 to both nodes.

In order to make your life easier it would be a good idea to name the network cards in Windows, public and private. I’ve given 192.168.168.1 & 192.168.168.3 respectively to the private network NICs, whereas the public network NICs have been given an IP address in our development network (10.168.20.240 & 10.168.20.241).

An active-active cluster needs three A Name Records in your DNS server:
  • One Record for the Windows cluster (win2k8cluster -> 10.168.20.242).
  • Two Records for each “SQL cluster” sql2k8a & sql2k8b -> 10.168.20.243 & 10.168.20.244 respectively.

You can add the LUNs (SAN Volumes) to Windows. Run the Computer Management console, from Start -> Run  -> compmgmt.msc, and select Disk Management:
  1. Right click on disk 1 and select Online. Ensure all disks are selected and click OK.
  2. Right click on disk 1 and click Initialize Disk. 
  3. Right click on disk 1 and select New Simple Volume. Follow the Wizard. Suggest that you provide a Volume Label (e.g. Data A).
Repeat steps 2 & 3 for the other disks.
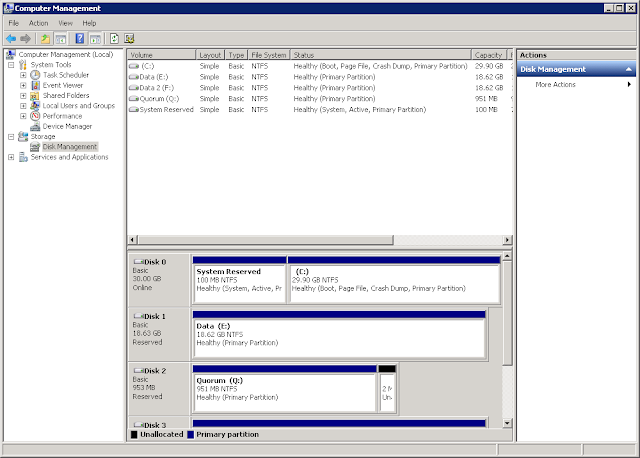
Figure 2.1 Computer Management Console showing Quorum Disk and two Data disks
In contrast to Windows 2003, where failover clustering is installed by default, in Windows 2008 you need to add the failover clustering feature, which you can do in Server Manager. Thus, from Server Manager:
  1. Click Features.
  2. Click Add Features.
  3. Select Failover Clustering.
  4. Click Install.
You can now start the cluster administration console or Failover Cluster Manager, from Start -> Run -> cluadmin.msc. Note that cluadmin does not appear to work as it did in Windows 2003, you will need to type cluadmin.msc.
Figure 2.2 Failover Cluster Manager Console
You can now create a new cluster, by clicking on create a new cluster. This will launch a wizard that will guide you through the process of creating a new cluster.

On Step 3, run through the validation tests. As I mentioned in the first post of this series, the firewall test failed. This is the error message:

Validate Windows Firewall Configuration
Validate that the Windows Firewall is properly configured to allow failover cluster network communication.
Validating that Windows Firewall is properly configured to allow failover cluster network communication.
An error occurred while executing the test.
There was an error verifying the firewall configuration.
An item with the same key has already been added.


This is an issue with Guest (VM) cloning. I got around it by adding a couple more NICs to the second node, so that it now has 4 NICs, with the first two disabled, not very elegant but it does the trick.
Make sure that you change the ip addresses on NICs 1 & 2 just in case they accidentally get enabled as it could be a barrel of laughs if they inadvertently do get enabled.

On Step 4, enter your cluster name and make sure that you only enable the public NIC for administering the cluster. You need to ensure that the IP address assigned to the public network (10.0.0.0/8) is the IP address of the cluster name.
Figure 2.3 Create Cluster Wizard. Add an Access point for administering the cluster
Follow the wizard until the Cluster is created.

It is advisable to test the reliability of the cluster at this stage. I would suggest that you run the following tests:
  1. Turn off Active node. The cluster resources should failover to the passive node.
  2. Failover Cluster Group. This should move the cluster group to the passive node. This can be accomplished with the following command (needs to be run as an Administrator): Cluster group “Cluster Group” /move:wink2kb
  3. From ESX, switch off the public network on the active node. The cluster should fail over to the passive node. When I tried this, it did not work. I’ll need to investigate.
This concludes part two of the series, in the third part I will show how to install the first SQL Server failover cluster.

Wednesday, 10 August 2011

Trust me, I'm a Certification Authority.The joy of certificates - Part 3

I thought it would be instructive to install a Certification Authority (CA henceforth) using Windows 2008, I might do a windows 2003 CA if I'm bored one of these days, and show how to run a secure website with client authentication via certificates.

I have a brand new VM with Windows 2008 R8 datacentre edition installed that has been joined to my dev.com domain. Start the Server Manager:


When you select CA web enrollment, you'll get the following popup:


From here on, simply accept the defaults until you get to the last screen:


You can see that the CA certificate has been installed to the Local Computer Trusted CAs:


You can now create certificates by visiting http://localhost/certsrv


That's really it for a CA. In order to make this useful, your other servers will need to trust this CA, which you can do by hitting the Download a CA certificate, certificate chain, or CRL link:

You'll be prompted to save the certificate to a file, I accepted the default certnew.cer. You can now install this certificate in another server so this CA is trusted.

So, logged in to the remote server, double click on certnew.cer


 You can now drag and drop the certificate to the Local Computer Trusted Root Authority Store

Now we can install a certificate from this CA on our web server. See the next post for details on how to do this.