Showing posts with label Joomla. Show all posts

Tuesday, 2 April 2013

Scripted Install of Joomla 3.0 in Centos/RHEL 6.x

Joomla 3.0 was released a little while back so I thought I would write a new post showing how to install it, but it turns out that my previous post works just as well, so I'll just link to it.

Install Joomla

At the time of writing this is the latest version of Joomla.

I have written a script to automate the installation on a new server, see below.

It's not the best script ever but it seems to do the job.

Assuming you call the script joomlainstaller.sh, you should invoke it like this:
joomlainstaller.sh "http://joomlacode.org/gf/download/frsrelease/17965/78414/Joomla_3.0.3-Stable-Full_Package.zip" Joomla JoomlaUser Password

Don't forget to make your script executable with the folliwubg command:
chmod +x joomlainstaller.sh


#!/bin/bash

EXPECTED_ARGS=4
E_BADARGS=65

if [ $# -ne $EXPECTED_ARGS ]
then
  echo "Usage: $0 JoomlaZipUrl Joomladbname Joomladbuser Joomladbpass"
  exit $E_BADARGS
fi

S1="Create database if not exists $2;"
S2="CREATE USER '$3'@'localhost' IDENTIFIED BY '$4';"
S3="GRANT ALL PRIVILEGES ON '$2'.* TO '$3'@'localhost' IDENTIFIED BY '$4';"
S4="Flush privileges;"

SQLCMD = "${S1}${S2}${S3}${S4}"

echo -e "Install the Web Server\n"

yum groupinstall "Web Server"  -y

echo -e "Install the MySQL\n"

yum groupinstall "MySQL Database server" -y

echo -e "Install the PHP and few others\n"

yum install man wget php php-mysql unzip policycoreutils-python -y

mkdir joomlainst

filename=$(basename "$1")

echo -e "Get $filename from $1 \n"

wget $1

echo -e "Unzip $filename and move\n"

unzip $filename -d joomlainst
mv joomlainst/* /var/www/html

echo -e "Start MySQL Service\n"

service mysqld start; chkconfig mysqld on

/usr/bin/mysql_secure_installation

echo -e "Create $2 Database and user $3 MySQL Service\n"

mysql -u root -p -e "$SQLCMD"

echo -e "Open port 80 on Firewall\n"

iptables -I INPUT -p tcp --dport http -j ACCEPT ; service iptables save

echo -e "Turn output buffering off\n"

sed -i 's/output_buffering = 4096/output_buffering = Off/g' /etc/php.ini

echo -e "Create Joomla config file\n"

touch /var/www/html/configuration.php
chmod 666 /var/www/html/configuration.php

echo -e "Start Apache\n"

service httpd start; chkconfig httpd on

echo -e "Disable SELinux"

setenforce 0
sed -i 's/=enforcing/=disabled/' /etc/selinux/config


Monday, 4 February 2013

Multiple installations of Joomla in single server.

This has been asked multiple times, How do I host multiple installs of Joomla in a single server? in this post, actually only once, but I thought I would answer it properly here.

I am going to assume that you have followed my guide to install Joomla, here, which means that you already have a working instance of Joomla.

Note that while the original post was for CentOS 6.x, it also works fine for Amazon Linux AMI as long as you remember to sudo most commands and indeed RHEL 6. I've left sudo out of the commands to keep it more general.
  1. Extract downloaded package again:
    unzip Joomla_2.5.1-Stable-Full_Package.zip
  2. Create New Joomla directory
  3. mkdir /var/www/html/secondjoomla
  4. Move all files to home web directory:
    mv /joomla/* /var/www/html/secondjoomla
  5. Create second Joomla User (note that these are two separate commands):
    mysql -u root -p
    CREATE USER 'SecondJoomlaUser'@'localhost' IDENTIFIED BY 'mypass';
  6. Create second Joomla Database:
    mysqladmin -u root -p create SecondJoomla
  7. Provide appropriate privileges to the second Joomla User user  (note that these are two separate commands):
    mysql -u root -p
    GRANT ALL PRIVILEGES ON SecondJoomla.*
                    TO SecondJoomlaUser@localhost IDENTIFIED BY 'mypass';
            where:
            'SecondJoomla' is the name of your database
            'SecondJoomlaUser@localhost' is the userid of your webserver MySQL account
            'mypass' is the password required to log in as the MySQL user
  8. Apply privileges and exit:
    flush privileges; \q
  9. Create empty configuration.php file and set permissions:
    touch /var/www/html/secondjoomla/configuration.php
    chmod 666 /var/www/html/secondjoomla/configuration.php
  10. Set up Virtual Hosts in Apache. You will need to edit /etc/httpd/conf/httpd.conf. You can find a sample below. Ensure that the first directive has been uncommented.
  11. NameVirtualHost *:80 
    <VirtualHost *:80>
     ServerAdmin webmaster@example1.com
     DocumentRoot /var/www/html
     ServerName example1.com
     ServerAlias www.example1.com
     ErrorLog logs/example1.com-error_log
     CustomLog logs/example1.com-access_log common
    </VirtualHost> 
    <VirtualHost *:80>
     ServerAdmin webmaster@example2.com
     DocumentRoot /var/www/html/secondjoomla
     ServerName example1.com
     Serveralias www.example2.com
     ErrorLog logs/example1.com-error_log
     CustomLog logs/example1.com-access_log common
    </VirtualHost>
  12. Ensure config syntax is ok and restart Apache.
  13. apachectl -S
    apachectl restart
  14. You can now start the Second Joomla install proper by navigating to:
    http://www.example2.com
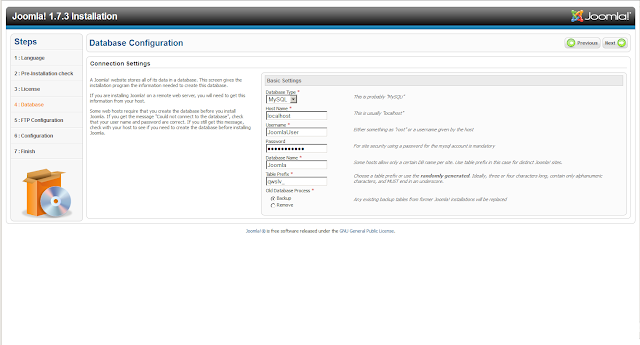
  15. On step 4 use the following settings:
  16. Ensure that you remove the installation directory
    rm -rf /var/www/html/secondjoomla/installation/
  17. You can now go and administer your second site or view the sample sites if you chose to install the sample data. Enjoy!
Please note that in order to test this setup (two Joomla websites), the machine browsing to the joomla websites must be able to resolve example1.com and example2.com, or whatever domain names are being used.
Ordinarily this is done by a DNS server, but the above entries can be added to the hosts file. It is imperative that all devices accessing the website are able to resolve those names, otherwise the first website (example1) will be displayed.


Thursday, 9 February 2012

Installing Joomla 2.5 on Centos 6.2 (netinstall)

I foolishly deleted the wrong VM a couple of weeks ago and yesterday I realized that Joomla 2.5 is out. It looks like Joomla 2.5 is the successor to Joomla 1.7. I guess version inflation is kicking off again. At any rate, I wanted to see whether my previous post would work and update it where necessary.

I have created a script to install Joomla, see this post, note that the script is only for Joomla, you will still need to manually install CentOS/RHEL.

Below are the steps needed to install Joomla on CentOS 6.2 using the netinstall iso, note that I'm running this from a VM using VirtualBox on a Windows XP SP3 system (don't ask why):

Note that if no screenshot is shown that means that you should use the default values or your own values (e.g. keyboard, time zone, etc.)
  1. Download Netinstall iso from http://isoredirect.centos.org/centos/6/isos/i386/ or http://isoredirect.centos.org/centos/6/isos/x86_64/ for 64 bit versions.
  2. Start a brand new VM and boot from the iso downloaded in step 1. 
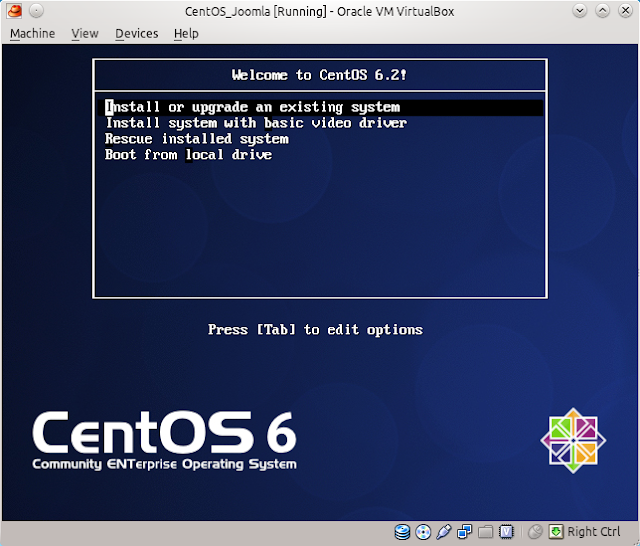
  3. Select Install or upgrade an existing system.
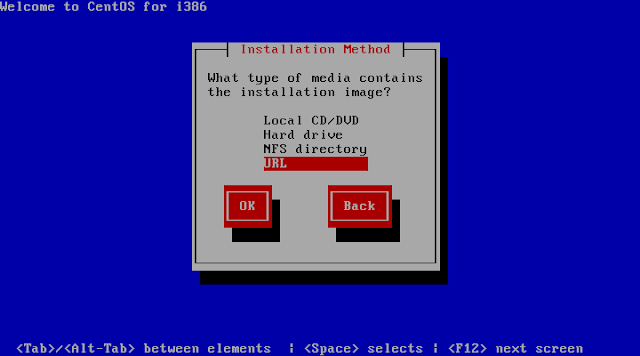
  4. Select URL and press OK.
  5. Enter http://mirror.centos.org/centos/6.2/os/i386/or http://mirror.centos.org/centos/6.2/os/x86_64/ for the 64 bit version.
  6. I only gave 512 MB of ram to the VM, which meant that the TUI installer ran instead of a graphical interface.
  7. After selecting the hard drive, I received this prompt. Select Re-Initialize All.
  8. Once the installation has finished and you are back into your system (remember to remove the mounted iso) I decided to install not only mandatory packages but also optional so I added this line to /etc/yum.conf:
    group_package_types=default,mandatory,optional
  9. Install Apache:
    yum groupinstall "Web Server"
  10. Install MySQL:
    yum groupinstall "MySQL Database server" 
  11. Install wget, man, php-mysql, unzip and policycoreutils-python (see step 26 about this package):
    yum install man wget php php-mysql unzip policycoreutils-python -y
  12. Create a temporary directory to extract and download Joomla:
    mkdir /joomla; cd /joomla 
  13. Download Joomla (note that this is likely to change, check here for the latest version):
    wget http://joomlacode.org/gf/download/frsrelease/16512/72038/Joomla_2.5.1-Stable-Full_Package.zip
  14. Extract downloaded package:
    unzip Joomla_2.5.1-Stable-Full_Package.zip
  15. Move all files to home web directory:
    mv /joomla/* /var/www/html
  16. Start MySQL and set it to start at boot time:
    service mysqld start; chkconfig mysqld on
  17. Set root's password to MySQL and get MySQL production-ready (Essentially type Y to everything):
    /usr/bin/mysql_secure_installation
  18. Create Joomla User:
    mysql -u root -p
    CREATE USER 'JoomlaUser'@'localhost' IDENTIFIED BY 'mypass';
  19. Create Joomla Database:
    mysqladmin -u root -p create Joomla
  20. Provide appropriate privileges to the JoomlaUser user:
    mysql -u root -p
    GRANT ALL PRIVILEGES ON Joomla.*
                    TO JoomlaUser@localhost IDENTIFIED BY 'mypass';
            where:
            'Joomla' is the name of your database
            'JoomlaUser@localhost' is the userid of your webserver MySQL account
            'mypass' is the password required to log in as the MySQL user
  21. Apply privileges and exit:
    flush privileges; \q
  22. Open Firewall for port 80 and save changes:
    iptables -I INPUT -p tcp --dport http -j ACCEPT ; service iptables save
  23. Turn output buffering off by editing /etc/php.ini change:
    output_buffering=4096
    to
    output_buffering=Off
  24. Create empty configuration.php file and set permissions:
    touch /var/www/html/configuration.php
    chmod 666 /var/www/html/configuration.php
  25. Start Apache and set it to start on boot:
    service httpd start; chkconfig httpd on
  26. Disable SELinux (I recommend having a look at this post for a fix that will allow you to run SELinux and Joomla. Do ensure that you test everything that you are likely and unlikely to do, e.g. add articles, add blogs, etc..). Alternatively edit /etc/selinux/config and change:
    SELINUX=enforcing
    to
    SELINUX=disabled
  27. Start the Joomla install proper by navigating to:
    http://<yourserverip>
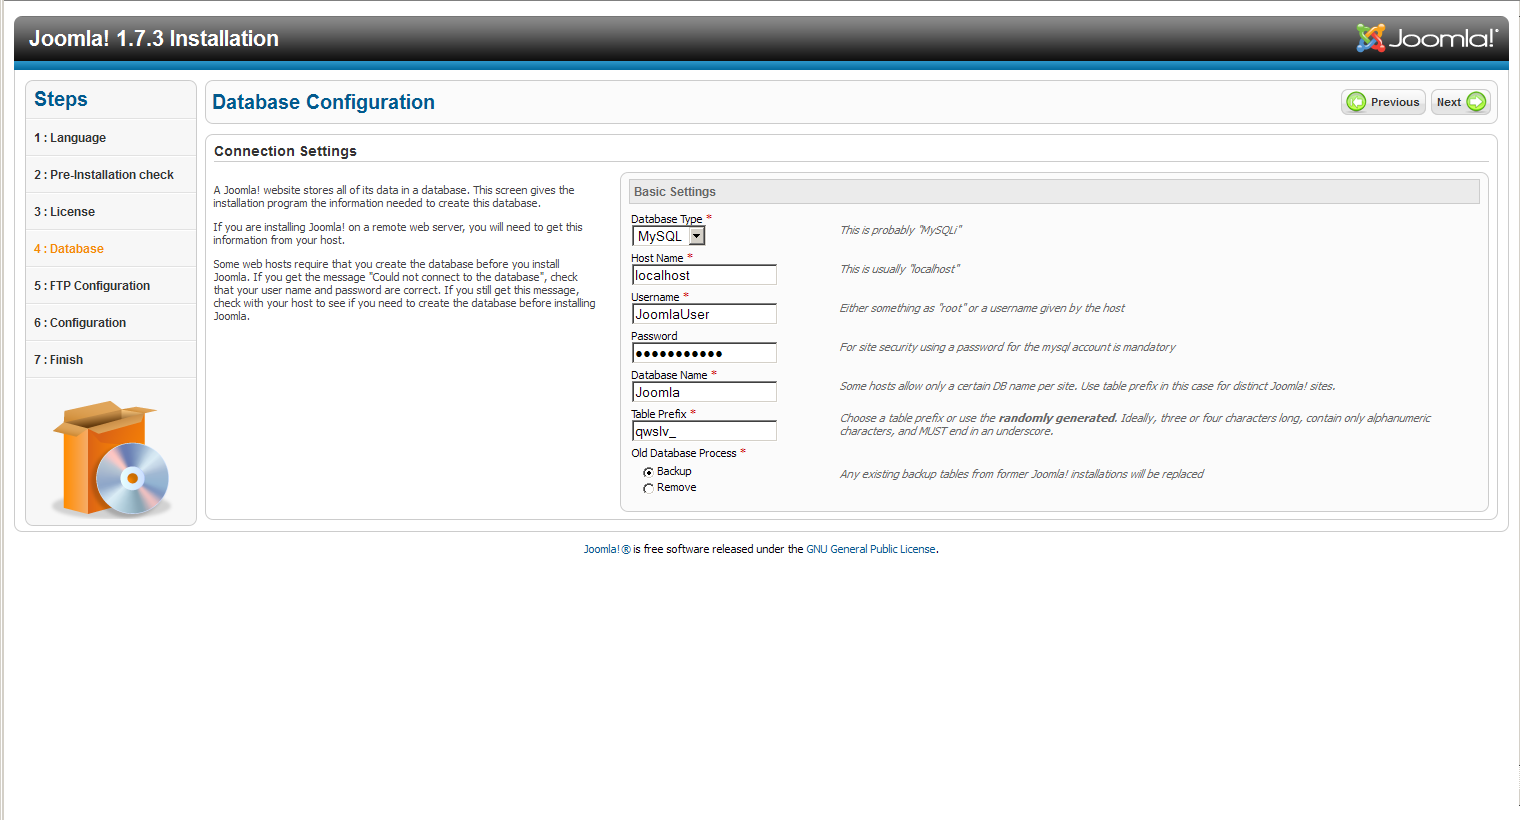
  28. On step 4 use the following settings:
  29. I chose to install the sample data on step 6.
  30. Ensure that you remove the installation directory
    rm -rf /var/www/html/installation/
  31. You can now go and administer your site or view the sample sites if you chose to install the sample data. Enjoy!

Note that if if you do decide to use SELinux, see step 26, you need an extra step to change the context for the Joomla files:
chcon -R  unconfined_u:object_r:httpd_sys_content_t:s0 /var/www/html/
See this post, if you want to configure multiple instances of Joomla in one server.

Tuesday, 3 January 2012

Installing Joomla 1.7 on CentOS 6.2 (netinstall)

I've been looking at using a CMS for a while as an alternative to designing websites from scratch. I finally have had a reason to use one (long story) but the short end of it is that it needs to run on Linux. There appear to be three main choices when it comes to open source CMSs:
Note, that they all seem to run on Windows, but that's by the by as Windows servers tend to be more expensive than Linux servers. At any rate, although Ubuntu seems to be the most popular offering among VPS providers, I decided to use CentOS 6.2 because I feel more comfortable with Red Hat based Linux distros.

I did not want to download the whole iso as I'm running on a laptop with limited hard disk space, so I decided to use the Netinstall, which in essence contains a bare bones system and grabs packages as needed. When I say that this is bare bones I'm not kidding, man is not actually installed. 

Below are the steps needed to install Joomla on CentOS 6.2 using the netinstall iso, note that I'm running this from a VM using VirtualBox on a Kubuntu 11.10 system:

I have created a script to install Joomla, see this post, note that the script is only for Joomla, you will still need to manually install CentOS/RHEL.

Note that if no screenshot is shown that means that you should use the default values or your own values (e.g. keyboard, time zone, etc.)
  1. Download Netinstall iso from http://isoredirect.centos.org/centos/6/isos/i386/ or http://isoredirect.centos.org/centos/6/isos/x86_64/ for 64 bit versions.
  2. Start a brand new VM and boot from the iso downloaded in step 1. 
  3. Select Install or upgrade an existing system.
  4. Select URL and press OK.
  5. Enter http://mirror.centos.org/centos/6.2/os/i386/or http://mirror.centos.org/centos/6.2/os/x86_64/ for the 64 bit version.
  6. I only gave 512 MB of ram to the VM, which meant that the TUI installer ran instead of a graphical interface.
  7. After selecting the hard drive, I received this prompt. Select Re-Initialize All.
  8. Once the installation has finished and you are back into your system (remember to remove the mounted iso) I decided to install not only mandatory packages but also optional so I added this line to /etc/yum.conf:
    group_package_types=default,mandatory,optional
  9. Install Apache:
    yum groupinstall "Web Server"
  10. Install MySQL:
    yum groupinstall "MySQL Database server" 
  11. Install wget, man, php-mysql, unzip and policycoreutils-python (see step 26 about this package):
    yum install man wget php php-mysql unzip policycoreutils-python -y
  12. Create a temporary directory to extract and download Joomla:
    mkdir /joomla; cd /joomla 
  13. Download Joomla (note that this is likely to change, check here for the latest version):
    wget http://joomlacode.org/gf/download/frsrelease/16024/69674/Joomla_1.7.3-Stable-Full_Package.zip
  14. Extract downloaded package:
    unzip Joomla_1.7.3-Stable-Full_Package.zip
  15. Move all files to home web directory:
    mv /joomla/* /var/www/html
  16. Start MySQL and set it to start at boot time:
    service mysqld start; chkconfig mysqld on
  17. Set root's password to MySQL and get MySQL production-ready (Essentially type Y to everything):
    /usr/bin/mysql_secure_installation
  18. Create Joomla User:
    mysql -u root -p
    CREATE USER 'JoomlaUser'@'localhost' IDENTIFIED BY 'mypass';
  19. Create Joomla Database:
    mysqladmin -u root -p create Joomla
  20. Provide appropriate privileges to the JoomlaUser user:
    mysql -u root -p
    GRANT ALL PRIVILEGES ON Joomla.*
                    TO JoomlaUser@localhost IDENTIFIED BY 'mypass';
            where:
            'Joomla' is the name of your database
            'JoomlaUser@localhost' is the userid of your webserver MySQL account
            'mypass' is the password required to log in as the MySQL user
  21. Apply privileges and exit:
    flush privileges; \q
  22. Open Firewall for port 80 and save changes:
    iptables -I INPUT -p tcp --dport http -j ACCEPT ; service iptables save
  23. Turn output buffering off by editing /etc/php.ini change:
    output_buffering=4096
    to
    output_buffering=Off
  24. Create empty configuration.php file and set permissions:
    touch /var/www/html/configuration.php
    chmod 666 /var/www/html/configuration.php
  25. Start Apache and set it to start on boot:
    service httpd start; chkconfig httpd on
  26. Disable SELinux (I recommend having a look at this post for a fix that will allow you to run SELinux and Joomla. Do ensure that you test everything that you are likely and unlikely to do, e.g. add articles, add blogs, etc..). Alternatively edit /etc/selinux/config and change:
    SELINUX=enforcing
    to
    SELINUX=disabled
  27. Start the Joomla install proper by navigating to:
    http://<yourserverip>
  28. On step 4 use the following settings:
  29. I chose to install the sample data on step 6.
  30. Ensure that you remove the installation directory
    rm -rf /var/www/html/installation/
  31. You can now go and administer your site or view the sample sites if you chose to install the sample data. Enjoy!

Note that if if you do decide to use SELinux, see step 26, you need an extra step to change the context for the Joomla files:
chcon -R  unconfined_u:object_r:httpd_sys_content_t:s0 /var/www/html/