Showing posts with label Windows 2012 R2. Show all posts

Monday, 30 June 2014

Configure Federation Trust for Claim Based authentication in Ms Dynamics CRM 2013 using ADFS 3.0 ( Windows Server 2012 R2) part 3

In part 1, I described how to install and configure ADFS on a Windows 2012 R2 server. In part 2, I described how to configure Ms Dynamics CRM 2013 to use claim based authentication and in this final post of this series I configure a federation trust to allow users from a separate forest to access MS Dynamics CRM 2013.
 
In our case, this is due to an acquisition, so that we are hosting Dynamics CRM in a domain called dev.local and the company bought has their own domain called taleb.local.
 
The objective is to allow users from taleb.local to log on, with their taleb.local accounts into our instance of Dynamics CRM, so we could say that taleb.local is the Accounts domain and dev.local is the Dynamics Domain.
 
Pre-Requisites:
  • Working ADFS servers on both domain/forests
  • Name resolution working between domain/forests as well as inside forests, I have used stub zones but any way that works for you is good.
  • TCP port 443 between ADFS servers and Dynamics Servers(or at least Front End Servers) open.
  • Account with permissions to configure both ADFS servers.
 
In our case, due to the internal use, Public certificates are not in use, so the first step is to ensure that taleb.local machines trust the dev.local CA. This is out of scope for this post, see this link for details.
 
The ADFS server(s) in dev.local need to trust the taleb.local CA, which can be achieved by adding the certificate to the trusted store for the computer account.
 
On the Accounts domain's (taleb.local) ADFS server, add a Relying Party Trust for the dev.local ADFS endpoint:


When the Claim Rules window opens, Click add Rule and Add a Send LDAP Attribute as Claims Claim Rule. The only LDAP Attribute that we are after is UPN.


On the Dynamics domain's (dev.local) ADFS Server, Add a Claims Provider Trust for the Accounts domain (taleb.local) ADFS endpoint:


When the Claim Rules window opens, Click add Rule and Add a Pass Through or Filter an Incoming Claim Claim Rule. I think that we only really need UPN, but I've added Windows Account Name and Primary SID as well for good measure.


At this point, all that remains is for accounts from the Accounts domain (taleb.local) to be added to Dynamics CRM as users and given a role so that they can log in to Dynamics CRM.
 
Ensure that UPN is used to add a new user to Dynamics CRM, e.g. For a user with logon: taleb\NN, the username in Dynamics CRM would be: nn@taleb.local. Annoyingly, it doesn't retrieve first name, last name so these will need to be added manually. I'd love to know if it's actually possible (to get the first/last name to auto populate) by adding more claims but I've never been able to get it working.
 
I've added both domains to the trusted sites as our default configuration is for automatic logon with current username and password on trusted sites.
 

Navigating to https://allinone.dev.local/lospolloshermanos/main.aspx from a machine in the accounts domain (taleb.local) brings this screen up: 


Selecting sts1.taleb.local will redirect to https://allinone.dev.local/lospolloshermanos/main.aspx with the current account from the accounts domain (taleb.local).


Monday, 16 June 2014

Install/Uninstall library/assembly (DLL) in to GAC using PowerShell

On Friday, I screwed a little bit, as the build relied on some assemblies being in the GAC and I had not added them to the GAC.
 
I normally use Gacutil but this being a test server, it had no such tools, but no matter, PowerShell to the rescue.
Add-Type -AssemblyName System.EnterpriseServices
$Publisher = New-Object System.EnterpriseServices.Internal.Publish
$Publisher.GacInstall("C:\Users\Account\Desktop\mydll.dll)
gwmi win32_service | ? {$_.Name -match "MSCRM|W3SVC"} | %{Restart-Service -Name $_.Name}

The last step restarts all services containing MSCRM on its name as well as the World Wide Publishing Service, so that both async and sync plugins can make use of this library.

Removing the Assembly from the Gac can be achieved with the following commands:
Add-Type -AssemblyName System.EnterpriseServices
$Publisher = New-Object System.EnterpriseServices.Internal.Publish
$Publisher.GacRemove("C:\Users\Account\Desktop\mydll.dll)
gwmi win32_service | ? {$_.Name -match "MSCRM|W3SVC"} | %{Restart-Service -Name $_.Name}
Add-Type is a PowerShell 3.0 onwards cmdlet, you can use this instead:
[System.Reflection.Assembly]::LoadWithPartialName("System.EnterpriseServices")

Monday, 26 May 2014

Configure Claim Based authentication in Ms Dynamics CRM 2013 using ADFS 3.0 ( Windows Server 2012 R2) part 2

On part 1, I described how to install and configure ADFS on a Windows 2012 R2 server and in this post I will describe how to configure Ms Dynamics CRM 2013 to use claim based authentication.

Pre-Requisite:
  • A wildcard certificate with private key installed.
The first step is to ensure that the Ms Dynamics CRM 2013 website is configured to use HTTPS, so from the IIS Manager (Windows Key + R -> inetmgr):

Add New Binding
Note that IIS will display the certificate friendly name here, you can always click view to ensure that you have the correct certificate here.

Click Ok and then Click Close.
Ms Dynamics CRM 2013 should now be available on HTTPS :)

Now we need to ensure that the service account for the CRM website, i.e. the account that run CRMAppPool, has access to the private key of the wildcard certificate, so from a certificate console  (Windows Key + R -> mmc -> ctrl + M -> Certificates -> Computer Account):


Note how because I'm using Network Service to run the CRMAppPool, that is the account that needs to be able to read the private key.

The next step is to configure Ms Dynamics CRM 2013 for Claim based authentication.
First we need to ensure that the binding type is set to HTTPS.

From the Deployment Manager.


Set Binding Type to HTTPS (There is no need to have the port number)


Make sure you that you click Apply.

Click on Configure Claim Based Authentication and follow the wizard.


It is possible to copy the URL for the relying party by opening the log file and scrolling down to the bottom of the file.
From the ADFS server, start the ADFS Management Console (Server Manager -> Tools -> AD FS Management). We need to ensure that Forms Authentication will be allowed from the internal network. Click on Authentication Policies, then on Edit.


Tick Forms Authentication and click Ok.


 A claim rule is needed to obtain the UPN from the Active Directory domain, so from Claim Provider Trust, select Active Directory and click on Edit Claim Rules..


Click Add Rule


We are now ready to add a relying party trust, so on the Relying Party Trust menu, click on Add Relying Party Trust.


Note how this is the URL the Claims Based authentication wizard tells us to use for configuring a relying trust, it's https://<FQDN>/FederationMetadata/2007-06/FederationMetadata.xml.


Once the wizard completes (just click Next until you get to the end), it is necessary to add three Issuance Transform Rules.

A Pass Through Rule for UPN:


A Pass Through Rule for Primary SID:


A Transform  Rule for Windows Account Name:


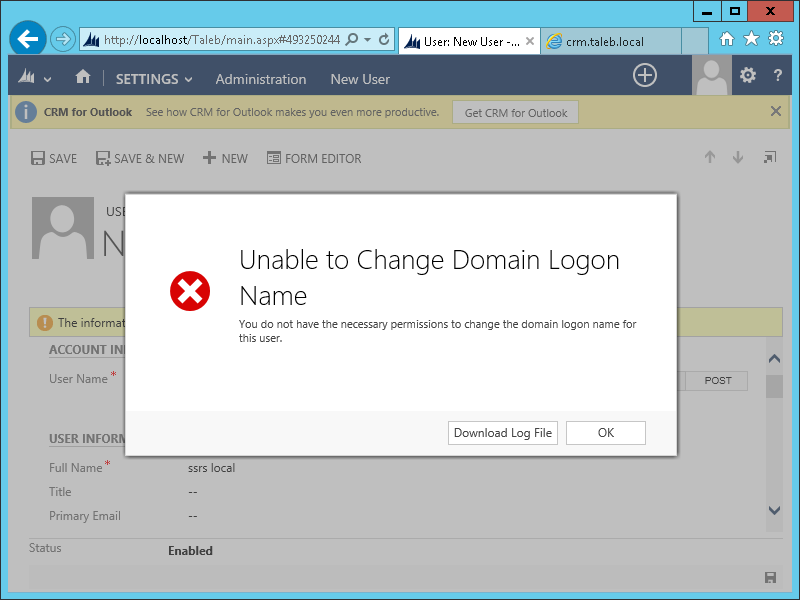
At this point I hit another snag. I tried to add a new user with UPN format, e.g. sts@taleb.local and I had this error:

The solution was to turn Auto Group Management Off, which is done via a registry key:

HKEY_LOCAL_MACHINE\SOFTWARE\Microsoft\MSCRM\AutoGroupManagementOff

Default value is 0, i.e. Auto Group Management is On

It can be turned off by setting it to 1.
Having done this, I was able to add a new user in UPN format and successfully sign in: