Tuesday, 3 January 2012

Installing Joomla 1.7 on CentOS 6.2 (netinstall)

I've been looking at using a CMS for a while as an alternative to designing websites from scratch. I finally have had a reason to use one (long story) but the short end of it is that it needs to run on Linux. There appear to be three main choices when it comes to open source CMSs:
Note, that they all seem to run on Windows, but that's by the by as Windows servers tend to be more expensive than Linux servers. At any rate, although Ubuntu seems to be the most popular offering among VPS providers, I decided to use CentOS 6.2 because I feel more comfortable with Red Hat based Linux distros.

I did not want to download the whole iso as I'm running on a laptop with limited hard disk space, so I decided to use the Netinstall, which in essence contains a bare bones system and grabs packages as needed. When I say that this is bare bones I'm not kidding, man is not actually installed. 

Below are the steps needed to install Joomla on CentOS 6.2 using the netinstall iso, note that I'm running this from a VM using VirtualBox on a Kubuntu 11.10 system:

I have created a script to install Joomla, see this post, note that the script is only for Joomla, you will still need to manually install CentOS/RHEL.

Note that if no screenshot is shown that means that you should use the default values or your own values (e.g. keyboard, time zone, etc.)
  1. Download Netinstall iso from http://isoredirect.centos.org/centos/6/isos/i386/ or http://isoredirect.centos.org/centos/6/isos/x86_64/ for 64 bit versions.
  2. Start a brand new VM and boot from the iso downloaded in step 1. 
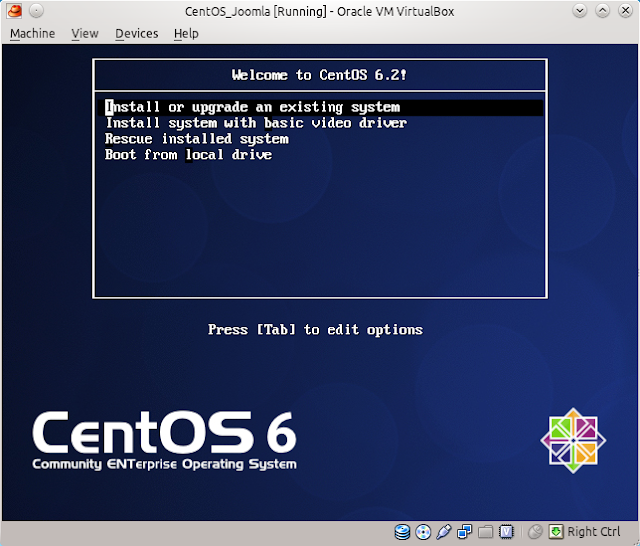
  3. Select Install or upgrade an existing system.
  4. Select URL and press OK.
  5. Enter http://mirror.centos.org/centos/6.2/os/i386/or http://mirror.centos.org/centos/6.2/os/x86_64/ for the 64 bit version.
  6. I only gave 512 MB of ram to the VM, which meant that the TUI installer ran instead of a graphical interface.
  7. After selecting the hard drive, I received this prompt. Select Re-Initialize All.
  8. Once the installation has finished and you are back into your system (remember to remove the mounted iso) I decided to install not only mandatory packages but also optional so I added this line to /etc/yum.conf:
    group_package_types=default,mandatory,optional
  9. Install Apache:
    yum groupinstall "Web Server"
  10. Install MySQL:
    yum groupinstall "MySQL Database server" 
  11. Install wget, man, php-mysql, unzip and policycoreutils-python (see step 26 about this package):
    yum install man wget php php-mysql unzip policycoreutils-python -y
  12. Create a temporary directory to extract and download Joomla:
    mkdir /joomla; cd /joomla 
  13. Download Joomla (note that this is likely to change, check here for the latest version):
    wget http://joomlacode.org/gf/download/frsrelease/16024/69674/Joomla_1.7.3-Stable-Full_Package.zip
  14. Extract downloaded package:
    unzip Joomla_1.7.3-Stable-Full_Package.zip
  15. Move all files to home web directory:
    mv /joomla/* /var/www/html
  16. Start MySQL and set it to start at boot time:
    service mysqld start; chkconfig mysqld on
  17. Set root's password to MySQL and get MySQL production-ready (Essentially type Y to everything):
    /usr/bin/mysql_secure_installation
  18. Create Joomla User:
    mysql -u root -p
    CREATE USER 'JoomlaUser'@'localhost' IDENTIFIED BY 'mypass';
  19. Create Joomla Database:
    mysqladmin -u root -p create Joomla
  20. Provide appropriate privileges to the JoomlaUser user:
    mysql -u root -p
    GRANT ALL PRIVILEGES ON Joomla.*
                    TO JoomlaUser@localhost IDENTIFIED BY 'mypass';
            where:
            'Joomla' is the name of your database
            'JoomlaUser@localhost' is the userid of your webserver MySQL account
            'mypass' is the password required to log in as the MySQL user
  21. Apply privileges and exit:
    flush privileges; \q
  22. Open Firewall for port 80 and save changes:
    iptables -I INPUT -p tcp --dport http -j ACCEPT ; service iptables save
  23. Turn output buffering off by editing /etc/php.ini change:
    output_buffering=4096
    to
    output_buffering=Off
  24. Create empty configuration.php file and set permissions:
    touch /var/www/html/configuration.php
    chmod 666 /var/www/html/configuration.php
  25. Start Apache and set it to start on boot:
    service httpd start; chkconfig httpd on
  26. Disable SELinux (I recommend having a look at this post for a fix that will allow you to run SELinux and Joomla. Do ensure that you test everything that you are likely and unlikely to do, e.g. add articles, add blogs, etc..). Alternatively edit /etc/selinux/config and change:
    SELINUX=enforcing
    to
    SELINUX=disabled
  27. Start the Joomla install proper by navigating to:
    http://<yourserverip>
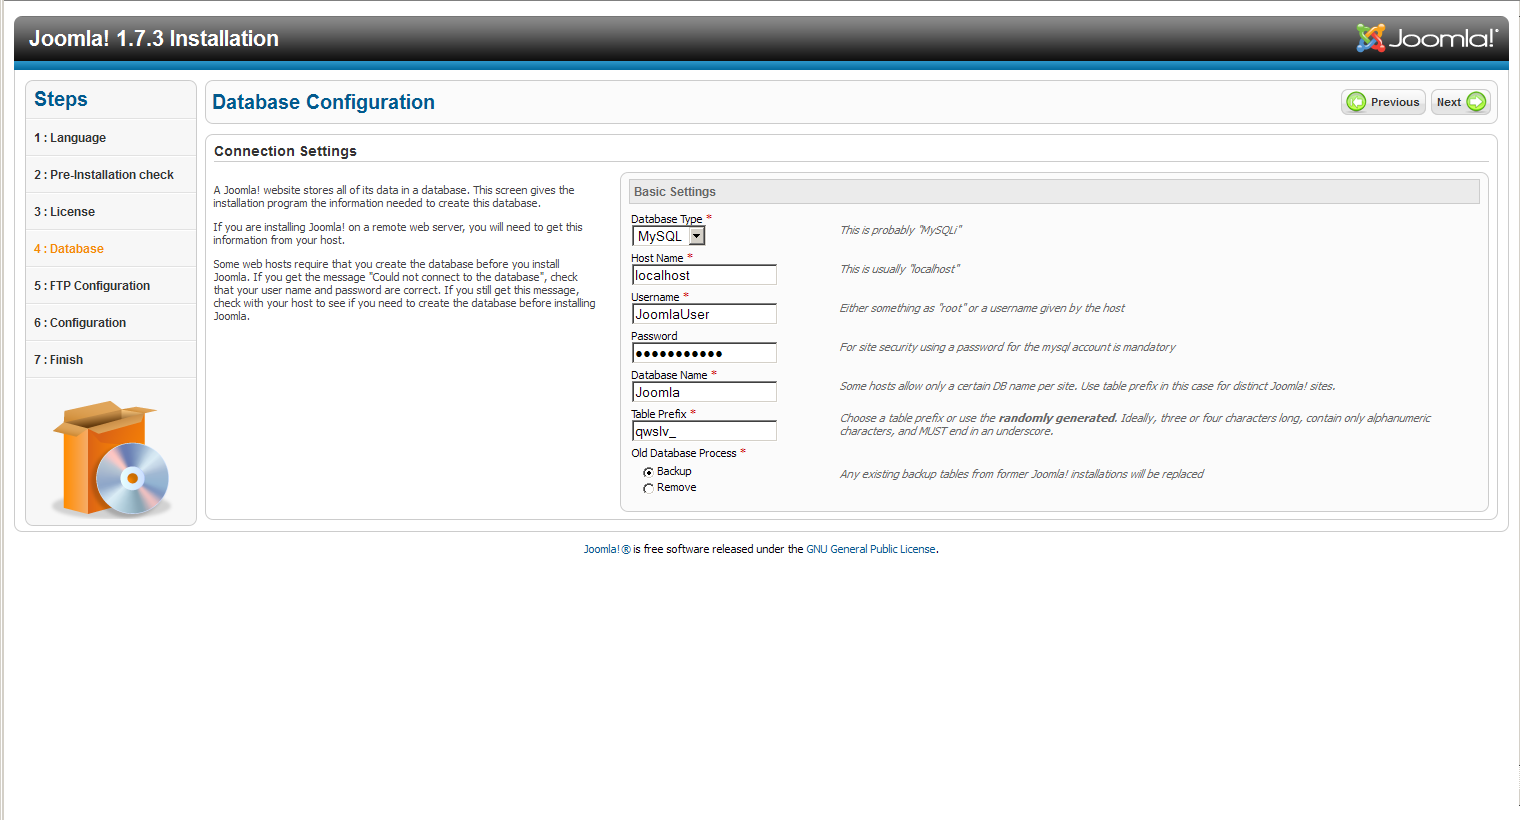
  28. On step 4 use the following settings:
  29. I chose to install the sample data on step 6.
  30. Ensure that you remove the installation directory
    rm -rf /var/www/html/installation/
  31. You can now go and administer your site or view the sample sites if you chose to install the sample data. Enjoy!
Note that if if you do decide to use SELinux, see step 26, you need an extra step to change the context for the Joomla files:
chcon -R  unconfined_u:object_r:httpd_sys_content_t:s0 /var/www/html/

    Thursday, 29 December 2011

    Dual-Booting McAfee Endpoint Encryption

    I've just spent the best part of two days getting my laptop back up and running. I foolishly installed Kubuntu 11.10, which overwrote the MBR and then I could not boot to Windows, which is what I use at work and because the Windows partition was encrypted there was little I could do to get back in.

    After a bit of time wasting with the help desk, I decided to bite the bullet and reinstall everything to get back my dual-boot setup, hoping that I had backed up everything of importance.

    In essence the process is fairly simple:
    1. Install Windows
    2. Install Kubuntu (Linux)
    3. Ensure that you can boot to both OSs
    4. Install McAfee Endpoint Encryption
    Once all that is done, I get the Endpoint Encryption logon prompt, before the Grub menu, so that I can now boot to either Windows or Kubuntu.

    We use McAfee Endpoint Encryption 5.2 so I don't know whether this will work for other versions.

    Today I found this post which provides a good tip on how to back up the MBR, using the trusted DD command in Linux ( and a different (better?) way of doing the dual boot dance with McAfee EE):
    dd if=/dev/sda of=/your_usb_drive/safeboot.mbr bs=512 count=1
    If only I've read this before I started.

    Note to restore MBR copy safeboot.mbr to /boot from Linux and then you'll need to add an entry to the grub menu, see this how-to for instructions.

    Thursday, 22 December 2011

    Negotiate client certificate in IIS 6.0

    The ongoing saga of our SSL issues continues. After some help from a kind soul, we got some java code to do mutual authentication against IIS but this wasn’t working either. If you are wondering why we are after some java code, well that is what they are throwing against IIS.

    In my opinion, OpenSSL is the ultimate arbiter of all things SSL and OpenSSL was working, so I was a bit miffed to be asked to make some changes, but I do like playing about with computers so I thought I’d give it a go.

    The feeling was that IIS implementation of the SSL handshake would not work with Apache’s HTTPClient and thus we needed to change IIS's configuration. It is true that IIS will only ask for the client certificate when the client makes a request, at which point there will be a renegotiation, rather than within the original handshake, but my understanding is that this is a perfectly valid approach, I’ll need to investigate whether this is indeed the case. In other words, IIS does a simple TLS handshake upon connection and then a renegotiation attempt, when an actual request is made to the server. This is simply a client authenticated handshake, that is initiated by the server via making a HelloRequest.

    At any rate, I ran a couple of tests against our IIS dev box using OpenSSL, see this post for more details. Edited output from OpenSSL:
    CONNECTED(00000003)
    >>> TLS 1.0 Handshake [length 006c], ClientHello
        01 ... 00
    <<< TLS 1.0 Handshake [length 0051], ServerHello
        02 ..   00
    <<< TLS 1.0 Handshake [length 058e], Certificate
        0b ... 41
    <<< TLS 1.0 Handshake [length 0004], ServerHelloDone
        0e 00 00 00
    >>> TLS 1.0 Handshake [length 0086], ClientKeyExchange
        10 .. d1
    >>> TLS 1.0 ChangeCipherSpec [length 0001]
        01
    >>> TLS 1.0 Handshake [length 0010], Finished
        14 00 00 0c ae 1d da b8 d4 14 ab ed 03 50 77 a0
    <<< TLS 1.0 ChangeCipherSpec [length 0001]
        01
    <<< TLS 1.0 Handshake [length 0010], Finished
        14 00 00 0c d6 9b 9b 66 04 5d c6 5d d2 e1 25 7e
    ---
    Certificate chain
     0 s:/C=US/ST=York/L=York/O=/OU=YORK/CN=server.dev.com
       i:/DC=com/DC=dev/CN=TESTAuthority
    ---
    Server certificate
    -----BEGIN CERTIFICATE-----
    -----END CERTIFICATE-----
    subject=/C=US/ST=York/L=York/O=YORK/OU=YORK/CN=server.dev.com
    issuer=/DC=com/DC=dev/CN=TESTAuthority
    ---
    No client certificate CA names sent
    ---
    SSL handshake has read 1555 bytes and written 295 bytes
    ---
    New, TLSv1/SSLv3, Cipher is RC4-MD5
    Server public key is 1024 bit
    Secure Renegotiation IS supported
    Compression: NONE
    Expansion: NONE
    SSL-Session:
        Protocol  : TLSv1
        Cipher    : RC4-MD5
        Session-ID: 7C130000B6F9142AD5E179ECCEC696C6F3C3CE4E100B503ABF3477FD3F7AD8B3
        Session-ID-ctx:
        Master-Key: 44EA6B1B1AACCE188E097F3E904838F33361FAC67207B6311CC0477A2CEEFE6D8F2AE7AF338B9537713381D34460FE05
        Key-Arg   : None
        Krb5 Principal: None
        PSK identity: None
        PSK identity hint: None
        Start Time: 1324388318
        Timeout   : 7200 (sec)
        Verify return code: 0 (ok)
    ---
    At this point a request is made to IIS:
    GET /home.htm

    <<< TLS 1.0 Handshake [length 0004], HelloRequest
        00 00 00 00
    >>> TLS 1.0 Handshake [length 007b], ClientHello
        01 ... 00
    <<< TLS 1.0 Handshake [length 0069], ServerHello
        02 ...7e
    <<< TLS 1.0 Handshake [length 058e], Certificate
        0b ... 41
    <<< TLS 1.0 Handshake [length 0c0f], CertificateRequest
        0d ... 79
    <<< TLS 1.0 Handshake [length 0004], ServerHelloDone
        0e 00 00 00
    >>> TLS 1.0 Handshake [length 09a4], Certificate
        0b ..    d4
    >>> TLS 1.0 Handshake [length 0086], ClientKeyExchange
        10 ... 05
    >>> TLS 1.0 Handshake [length 0086], CertificateVerify
        0f ... 9b
    >>> TLS 1.0 ChangeCipherSpec [length 0001]
        01
    >>> TLS 1.0 Handshake [length 0010], Finished
        14 00 00 0c 58 50 80 3d d0 74 f4 52 cb ad ad 50
    <<< TLS 1.0 ChangeCipherSpec [length 0001]
        01
    <<< TLS 1.0 Handshake [length 0010], Finished
        14 00 00 0c 3e d0 e2 69 96 29 7b 83 16 68 f7 c8

    As I mentioned above the renegotiation process is started by the server and then all that follows is a simple client authenticated handshake. Note that the arrows indicate the direction from the server's perspective, so that the bold line means that the server is requesting a Certificate from the client.

    This appears to be the problem, but how to solve it? Well, after a little bit of investigation it turns out that it is fairly easy to enable client certificate negotiation on, remembering that I’m using windows 2003. The httpcfg tool is all you need (maybe, see what happens after an iisreset below). This tool is available with the windows support tools package. There are a myriad of options for this tool but in this case we are only interested in a few commands.

    List current SSL configuration with:
    httpcfg query ssl

    IP                      : 0.0.0.0:443
    Hash                    : 76c659afffcb906038682de115c2 ddb2af7c113
    Guid                    : {4dc3e181-e14b-4a21-b022-59fc669b0914}
    CertStoreName           : MY
    CertCheckMode           : 0
    RevocationFreshnessTime : 0
    UrlRetrievalTimeout     : 0
    SslCtlIdentifier        :
    SslCtlStoreName         :
    Flags                   : 0

    Note the typo in the hash field, i.e. the certificate thumbprint. For some reason it does not display zeros, so be careful if copying from the console.

    Delete the binding, if the return code is not 0 there is a problem:
    httpcfg –delete –i 0.0.0.0:443
    HttpDeleteServiceConfiguration completed with 0.
    Now you can add it again (there must be a better way of doing this?)
    httpcfg set ssl -i 0.0.0.0:443 -h 76c659afffcb906038682de115c20ddb2af7c113 -g {4dc3e181-e14b-4a21-b022-59fc669b0914} -c MY -f 2
    HttpDeleteServiceConfiguration completed with 0.
    You can list current SSL configuration again and see the changes:
    httpcfg query ssl
    IP                      : 0.0.0.0:443
    Hash                    : 76c659afffcb906038682de115c2 ddb2af7c113
    Guid                    : {4dc3e181-e14b-4a21-b022-59fc669b0914}
    CertStoreName           : MY
    CertCheckMode           : 0
    RevocationFreshnessTime : 0
    UrlRetrievalTimeout     : 0
    SslCtlIdentifier        : (null)
    SslCtlStoreName         : (null)
    Flags                   : 2
    Now you can run the same OpenSSL command as above:
    CONNECTED(00000003)
    >>> TLS 1.0 Handshake [length 006c], ClientHello
        01 .. 00
    <<< TLS 1.0 Handshake [length 0051], ServerHello
        02 ..    00
    <<< TLS 1.0 Handshake [length 058e], Certificate
        0b ... 41
    <<< TLS 1.0 Handshake [length 0c0f], CertificateRequest
        0d ... 79
    <<< TLS 1.0 Handshake [length 0004], ServerHelloDone
        0e 00 00 00
    >>> TLS 1.0 Handshake [length 09a4], Certificate
        0b .. d4
    >>> TLS 1.0 Handshake [length 0086], ClientKeyExchange
        10 ... a4
    >>> TLS 1.0 Handshake [length 0086], CertificateVerify
        0f .. 24
    >>> TLS 1.0 ChangeCipherSpec [length 0001]
        01
    >>> TLS 1.0 Handshake [length 0010], Finished
        14 00 00 0c 66 1d 74 73 26 4c 93 5a 24 e7 97 4d
    <<< TLS 1.0 ChangeCipherSpec [length 0001]
        01
    <<< TLS 1.0 Handshake [length 0010], Finished
        14 00 00 0c 76 d4 32 92 0f d8 b9 f8 f9 a8 72 b4
    ---
    Certificate chain
     0 s:/C=US/ST=YORK/L=YORK/O=YORK/OU=YORK/CN=server.dev.com
       i:/DC=com/DC=dev/CN=TESTAuthority
    ---
    Server certificate
    -----BEGIN CERTIFICATE-----
    -----END CERTIFICATE-----
    subject=/C=US/ST=YORK/L=YORK/O=YORK/OU=YORK/CN=server.dev.com
    issuer=/DC=com/DC=dev/CN=TESTAuthority
    ---
    Acceptable client certificate CA names

    /DC=com/DC=dev/CN=TESTAuthority
    ---
    SSL handshake has read 4642 bytes and written 2907 bytes
    ---
    New, TLSv1/SSLv3, Cipher is RC4-MD5
    Server public key is 1024 bit
    Secure Renegotiation IS supported
    Compression: NONE
    Expansion: NONE
    SSL-Session:
        Protocol  : TLSv1
        Cipher    : RC4-MD5
        Session-ID: 4D12000059032A66B9D456537EDB9B0AAFA0D5762F94CED74DC8EC4E8F175B20
        Session-ID-ctx:
        Master-Key: 9C8A4CF2078FCE4B77DC9CD902DEA7B36AA64A7E110F0634F90FEA2D6AD5FA00BFA761C813387A2CBB2CA5683850724A
        Key-Arg   : None
        Krb5 Principal: None
        PSK identity: None
        PSK identity hint: None
        Start Time: 1324388273
        Timeout   : 7200 (sec)
        Verify return code: 0 (ok)
    ---
    The key is the bolded line, the certificate request, which the server now makes during the initial handshake, or the handshake, as there will only be one handshake now. If no certificate is presented by the client, then the server concludes that no client certificate is being used and the handshake finishes successfully. It is worth noting that once a request is made to the server, this request will fail with 403.7.

    If IIS is configured to accept, rather than require, client certificates, then CertificateRequest is only made when a certificate is presented to the server.

    One little problem though, changes with the httpcfg tool do not appear to be permanent, which means that it is necessary to edit the IIS metabase, which you can find in <WindowsFolder>\system32\inetsrv\metabase.xml, to make them permanent.

    Stop IIS and edit the file. I’m editing a website with id 2100412512, so I changed this:
    <IIsWebServer  Location ="/LM/W3SVC/2100412512"
                                    CertCheckMode="0"
                                    SSLCertHash="76c659afffcb906038682de115c20ddb2af7c113"
                                    SSLStoreName="MY"
                                    SecureBindings=":443:"
                                    ServerAutoStart="TRUE"
                                    ServerBindings=":8080:"
                                    ServerComment="test SSL website"
                    >
    To:
    <IIsWebServer  Location ="/LM/W3SVC/2100412512"
                                    CertCheckMode="0"
                                    SSLAlwaysNegoClientCert="TRUE"
                                    SSLCertHash="76c659afffcb906038682de115c20ddb2af7c113"
                                    SSLStoreName="MY"
                                    SecureBindings=":443:"
                                    ServerAutoStart="TRUE"
                                    ServerBindings=":8080:"
                                    ServerComment="test SSL website"
                    >
    Start IIS and run:
    httpcfg query ssl

    IP                      : 0.0.0.0:443
    Hash                    : 76c659afffcb906038682de115c2 ddb2af7c113
    Guid                    : {4dc3e181-e14b-4a21-b022-59fc669b0914}
    CertStoreName           : MY
    CertCheckMode           : 0
    RevocationFreshnessTime : 0
    UrlRetrievalTimeout     : 0
    SslCtlIdentifier        :
    SslCtlStoreName         :
    Flags                   : 2
    SUCCESS

    Saturday, 17 December 2011

    Configuring IFD for MS Dynamics CRM 2011

    I've started going through the various training manuals for the MS Dynamics CRM Certification exams and one of the things that I had never done before was to configure an Internet Facing Deployment, so I grabbed Microsoft's white paper and went to work. I am not going to provide a step by step of what I've done, if that's what you are after have a look at this post on the InteractiveWebs blog, I just wanted to comment on the issues that I encountered.

    In the white paper it wasn't too clear, I did skim through it rather than read it in detail, that it was geared towards a single server (CRM + ADFS 2.0) setup, so that it had, for me, some unnecessary steps, or quite a lot as for some reason I started using port 444 halfway through, which needless to say did not make life any easier.

    I've still not had time to go through everything in detail, I just got it working, but I cannot really understand the terminology, when you configure IFD you have to provide the following:
    • Web Application Server Domain
    • Organization Web Server Domain
    • Discovery Web Service Domain
    but these simply point to you CRM Server yet you still need these (I imagine, I've not tried odd values here), which means that you also need to add DNS entries, preferably CNames to make life easier, for it to work.
     
    You also need an orgname.mydomain.com DNS entry to actually access you IFD externally, which technically means that you need to buy that domain so that it can be accessed externally, unless you are configuring IFD for the sake of it, like I am.

    Friday, 16 December 2011

    What the ...., Microsoft?

    In the run up to Christmas we seem to have a very light workload and I thought I'd give MS Sharepoint a try to see what all the fuss is about.

    I got the ISO from MSDN and after using my newly acquired mad PowerCLI skills to clone a new VM, I ran the Sharepoint installer.

    I clicked on the install pre-requisites option and after a few minutes it stopped working, why? because it could not connect to the internet, say what?

    You expect an enterprise grade application to have internet access? This is insane, this is the sort of crap that really makes me wish I had nothing to do with Microsoft.

    Anyway, you can find all the pre-requisites here, download them and then you can install Sharepoint 2010 SP1, maybe.

    What I really don't understand is why they are not contained in the ISO: if they are pre-requisites then they should be in the ISO. It's only the optional pre-requisites, that's a good oxymoron, that should need to be downloaded, but mandatory pre-requisites? 

    I sometimes don't understand Microsoft. It seems to bend over backwards to make life easier for everybody, particularly developers, and every so often you get stuff like this, which makes no sense whatsoever.  

    Disable NIC in ESX VM using PowerCLI

    I was trying to understand how CRLs work in IIS 6.0, see my previous two posts here and here and I was trying to prevent communication between the CA server and the application server. I was having to go into vSphere and modify the settings of the NICs (disconnecting them), which got tiring pretty soon. So, I thought I would try to do it from the ESX console and after a bit of digging I found that it should be doable with the vmware-cmd command, like this:
    vmware-cmd myCAserver..vmx disconnectdevice ethernet0
    Alas, this was the result:
    Traceback (most recent call last):
      File "/usr/bin/vmware-cmd", line 88, in ?
        main()
      File "/usr/bin/vmware-cmd", line 63, in main
        operationName, result = CommandProcessor.Process(host, args)
      File "/usr/lib/vmware/vmware-cmd/CommandProcessor.py", line 11, in Process
        result = operation.DoIt(*processedArgs)
      File "/usr/lib/vmware/vmware-cmd/operations/DeviceOps.py", line 152, in DoIt
        device.SetConnected(False)
    AttributeError: 'NoneType' object has no attribute 'SetConnected'
    After a extra bit of googleing which failed to come up with a decent answer, I gave up and decided to give PowerCLI a try.

    I launched PowerCLI from the start menu and connected to the VI server with:
    Connect-VIServer viservername
    Once Connected to the vcentre server I got both VMs and stored them in a variable with the following commands:
    $CA = Get-VM –Name “myCAServer”
    $app = Get-VM –Name “myAppServer”
    I checked that this has grabbed the VM that I wanted by simply typing:
    $CA
    which returns:
    Name                 PowerState Num CPUs Memory (MB)
    ----                 ---------- -------- -----------
    myCAServer           PoweredOn  1        1024           
    Since both Guests have only one NIC, I got the nic details and stored in a variable for use later:
    $CAnic = Get-NetworkAdapter $CA
    $appnic = Get-NetworkAdapter $app
    Now I can use Set-NetworkAdapter to switch them on or off at will. To turn off the CA Server’s NIC:
    $CAnic = Set-NetworkAdapter –NetworkAdapter $CAnic –confirm:$false –connected:$false
    And then back on:
    $CAnic = Set-NetworkAdapter –NetworkAdapter $CAnic –confirm:$false –connected:$true
    I can now check the status with:
    $CAnic.ConnectionState
    which returns:
             AllowGuestControl                  Connected            StartConnected
             -----------------                  ---------            --------------
                          True                      False                      True
    Remember that command completion works pretty well, so you could just type $CAnic. And then keep pressing TAB. Similarly, if you are unsure about the switches for a cmdlet, just type - and then TAB through the options.

    It is also possible to pipe commands so that you don't need to use several variables, e.g.
    $CAnic = Get-VM -Name "myCAServer" | Get-NetworkAdapter | Set-NetworkAdapter -Connected:$false -confirm:$false
    I still use a variable, so that I can easily check the status of the NIC, but it's not necessary, I could have simply used:
     Get-VM -Name "myCAServer" | Get-NetworkAdapter | Set-NetworkAdapter -Connected:$false -confirm:$false
    I find that using variables is easier for a beginner such as myself. At any rate, I'm glad I've given PowerCLI a go as it is really good.

    Thursday, 15 December 2011

    CRL checking in IIS 6

    It turns out that it is indeed easy peasy to understand how CRLs work in IIS 6.

    If the certificate contains a CRL Distribution Point (CDP), IIS will try to contact it and if it can’t, 403.13 is your friend.

    Thus CRL checking will always take place in IIS except when:

    • Certificates don’t contain a CDP.
    • CertCheckMode is set to 1 for that particular website.

    Note that if CertCheckMode is not set, IIS takes that to mean enabled and also note that CertCheckMode is set on a website by website basis.

    Simple right?

    I wish I'd found Saurabh Singh's very informative post before I'd spent half the morning messing about with an application server and a CA server trying to work out what was going on. I'd like to believe that I would have reached the same conclusion by myself and I certainly was close, after a myriad of tests revealed that adding a CRL file to the local computer trust store made absolutely no difference, which is what actually prompted me to have another go at googleing for the an answer, but who knows.

    I wonder how IIS 7 deals with CRLs.

    Wednesday, 14 December 2011

    Disable CRL Checking in IIS 6

    It's been a bit of nightmare today, we've had quite a number of issues, ranging from missing CA certs to firewall issues, with routing issues and DNS issues thrown into the mix for good measure.

    One by one we sorted the issues out and we kept getting a 403.13 error. We even got the CRL and followed this, but to now avail.

    Unfortunately, we have no control over the firewall, so we are waiting for this to be sorted out but in the mean time I found how to disable CRL checking in IIS 6. You just need to run the trusted adsutil.vbs script from c:\inetpub\adminscripts like this:
    cscript adsutil.vbs SET w3svc/<websiteid>/CertCheckMode 1
    After setting this, it all started working. To switch CRL checking back on, use this:
    cscript adsutil.vbs SET w3svc/<websiteid>/CertCheckMode 0
    Now I just need to understand how CRL checking works in IIS, easy peasy.

    Tuesday, 13 December 2011

    A simple chat server - client

    I was reading this article about how Skype and other VOIP services punch a hole through firewalls and in the second page I was introduced to the netcat command, which can do a lot, but today I just thought I'd talk about using it as a instant chat program.

    You'll need two machines, server and client and an open firewall on the port you decide to use.

    On server type:
    nc -l 10333
    On client type:
    nc server 10333
    Syntax may vary depending on distro, the above works on RHEL.

    Anything that is typed in either server or client will be sent to the other party, thus providing you with a primitive instant chat.

    Enjoy

    Monday, 12 December 2011

    The Magic Wand Theory

    If you've been working in IT for a long time, like I have, at least it feels like a long time, you probably have experienced the effects of the magic wand theory. This theory could be formulated like this: 
    There is an employee/consultant that has sufficient knowledge of a system and/or technology that he or she will be able to fix any issue with said system or technology as if by waving a magic wand.
    At least management seem to think that this theory holds true.

    I feel very strongly about the magic wand theory as I've been on both sides of the theory: The Apprentice and The Wizard.

    The Apprentice

    I joined my current company fresh out of university and consequently there were massive gaps in my knowledge, I was the Apprentice to the consultant Wizard. We ran into several issues during the first weeks of live running for an application and time and time again the consultant would repeat the troubleshooting steps that I had carried out. Sometimes he fixed the issue, sometimes he didn't, but the reality that I was an apprentice meant that whenever there was something unexplained or that I could not explain satisfactorily, The wizard would be called. Ordinarily he would be just as stumped as I was and it was through collaboration and analysis that we managed to sort the issues out. Yet the perception that I was still an apprentice never quite faded.

    The Wizard

    I only became a wizard through the process of acquiring an apprentice, i.e. somebody with less experience than me. In a similar fashion as when I was an apprentice, my apprentice's opinions were ignored and almost always required my confirmation, even when, as was the case most of the times, I was in agreement with my apprentice, but such is life in the world of IT support.

    It is quite revealing how disconnected middle management is from upper management on this issue. The former is an ardent supporter of the magic wand theory and can be quite willing to provide perks and salary increases (within their limited power) to keep wizards from leaving, whereas the latter just cares about the bottom line and is pushing for off shoring as if it were going out of fashion.