Thursday, 6 September 2012

Use Msiexec to install or uninstall particular features of a Wix Installer

A few days ago the requirements changed again, isn't Agile development a hoot?, and all of sudden I found myself needing to modify the PowerShell script  that we've been using to install the build, I'll probably publish it in another post. It turns out that not all the servers servers needed all features installed which prompted a furious bout of Googling.

It's quite simple:
msiexec /i build.msi ADDLOCAL=MyFeature
If you want to install several features, just separate them with commas:
msiexec /i build.msi ADDLOCAL=Website,Webservices
Note that if the features need public properties to be set, then remember to do so, as otherwise it will fail to install, something like this:
msiexec /i build.msi ADDLOCAL=Website SQLSERVERINSTANCE=myinstance 

Since I did not want to uninstall and reinstall the relevant features I did another bout of less furious Googling to find out how to remove a particular feature only.

This is somewhat counter-intuitive as you use the install flag:
msiexec /i build.msi REMOVE=Website

Wednesday, 5 September 2012

Pass Command Line Arguments/Parameters to a WPF Application

Passing parameters from the command line to a WPF application is not as straightforward as doing the same in WinForms. It's a multiple step process, which I've detailed below.
  1. Edit the app.xaml.cs like this:
      using System;
      using System.Collections.Generic;
      using System.Configuration;
      using System.Data;
      using System.Linq;
      using System.Windows;
      
      namespace Tool
      {
          /// <summary>
          /// Interaction logic for App.xaml
          /// </summary>
          public partial class App : Application
          {
              public static string[] args;
      
              void OnStartUp(object sender, StartupEventArgs e)
              {
                  if (e.Args.Length > 0)
                  {
                      args = e.Args;
                  }
              }
          }
      }
    
  2. Edit the app.xaml like this:
      <Application x:Class="Tool.App"
                   xmlns="http://schemas.microsoft.com/winfx/2006/xaml/presentation"
                   xmlns:x="http://schemas.microsoft.com/winfx/2006/xaml"
                   StartupUri="MainWindow.xaml" Startup="OnStartUp">
          <Application.Resources>
               
          </Application.Resources>
      </Application>
    
  3. Edit MainWindow.xaml.cs like this:
     public MainWindow()
     {
         InitializeComponent();
         
         if (App.args != null && App.args.Length > 0)
         {
           //Do Something here with Command Line Arguments/Parameters
         }
         
     }
    
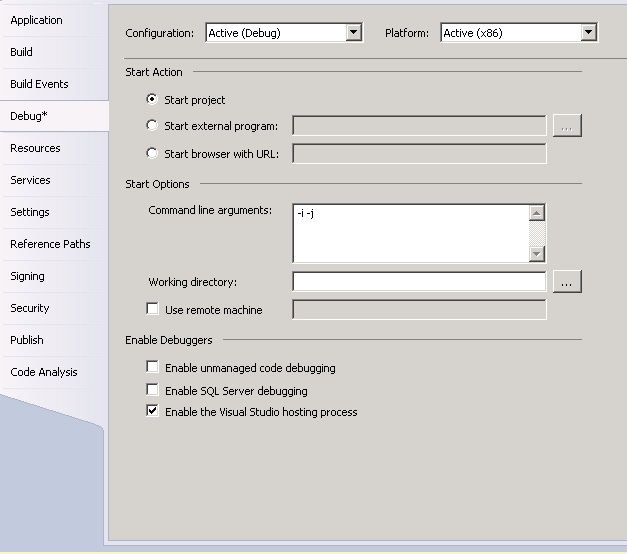
Remember that you can pass paremeters/arguments from visual studio for debugging purposes.
  1. Right Click on Project and Select Properties.
  2. Go to Debug tab.
  3. Set Command Line arguments, see screenshot below.

Kayak across the Pacific Ocean

Sometimes Google Maps Get Directions functionalty throws pretty weird results. I was trying to find out the distance between California and Hawaii, and without thinking I just went to get directions in Google Maps to see the distance and this is what Google Maps decided the best route between L.A. and Honolulu:


The odd thing is that you can only kayak across the Pacific Ocean from Seattle, not L.A, nor the myriad ports and beaches along the way.

I'll bear it in mind for next time I'm going to Hawaii.

Monday, 27 August 2012

Update TextBox using AppendText method in real time for WPF Applications

A few days ago I was working on an application that imports several different MS Dynamics CRM 2011 solutions to various environments and I had designed a simple form that contained a big text box which would be updating with progress and a couple of buttons. The problem that I had was that all the progress information would get updated at the end of the import process, which was completely useless as I wanted the progress information to be displayed in real time. 

After a lot of searching I hit upon the issue, which, without going into too much detail is related to threads. In essence, the GUI is waiting for the result of an operation and until that operation finishes it's blocked, which means that nothing is displayed. You probably have seen this when a window becomes non responsive while the application is processing a long(-ish) running process. The way around this problem is by using the Dispatcher.

The code below shows a simple example of how this is accomplished, where Import_Click is the event for a button named Import (xaml not displayed for simplicity).

The key is the WriteMessage method, which uses the dispatcher to invoke the AppendText method for the passed-in MessageBox using a lambda expression, the rest of the code is, hopefully, fairly self-explanatory.

 public partial class MainWindow : Window
 {
     private readonly BackgroundWorker import = new BackgroundWorker();
 
     public MainWindow()
     {
         InitializeComponent();
         import.DoWork += new DoWorkEventHandler(import_DoWork);
     }
     
     private void import_DoWork(object sender, DoWorkEventArgs e)
     {
         Import();
     }
     
     private void Import_Click(object sender, RoutedEventArgs e)
     {
         import.RunWorkerAsync();
     }
     
     public void Import()
     {
             WriteMessage(MessagetTextBox,string.Format("Import started @ {0}.{1}", DateTime.Now,Environment.NewLine));
             
             //DOSTUFFHERE
             
             WriteMessage(MessagetTextBox,string.Format("Import finished @ {0}.{1}", DateTime.Now,Environment.NewLine));
     }
     
     private void WriteMessage(TextBox MessageBox, string Message)
     {
         Dispatcher.Invoke((Action)(() => MessageBox.AppendText(Message)));
     }
 
 }

Sunday, 19 August 2012

Installing and using Pen Load balancing software in RHEL/CentOS 6.x

Last week I was asked to provide alternatives to NLB as we seem to be having problems getting delivery of a couple of switches for our test environment, or something like that. At any rate, NLB does not work too well with ESXi in our environment for various reasons, so I remembered about PEN, as I had used in a development environment ages ago.

You can compile from source, if you want to, but there is an already compiled rpm, which can be downloaded from here (This is the EPEL repository for CentOS 5).

Installing it's a simple case of using yum:
yum install -y pen
At this point you can start load balancing with pen like this:

 /usr/bin/pen -l pen8080.log 8080 10.168.20.82:8080 10.168.20.83:8080

This will distribute traffic arriving at this server on port 8080 to port 8080 on .82 and .83 with sticky sessions. If you want round robin stick an -r in, like this:

/usr/bin/pen -l pen8080.log -r 8080 10.168.20.82:8080 10.168.20.83:8080

The only downside of using pen like this is that if the box goes down for any reason so does Pen, which means that we need a start up script. I named the file /etc/init.d/penlb8080. The file name should match the servicename variable in the script:
#!/bin/bash
# Pen Starting Script
# chkconfig: 345 93 92
#Source function library
. /etc/init.d/functions

pen="/usr/bin/pen"
lockfile="/var/lock/subsys/pen"
servicename="penlb8080"
RETURNVALUE=0

PIDFILE=/var/run/pen.pid-8080
LOGFILE=/var/log/pen8080.log
CONTROLPORT=18080
LISTENPORT=8080
SERVERS=2
SERVER1=10.168.20.82:80
SERVER2=10.168.20.83:80

start() {
echo -n $"Starting $servicename: "
daemon $pen -S $SERVERS -p $PIDFILE -l $LOGFILE -C $CONTROLPORT $LISTENPORT $SERVER1 $SERVER2
RETURNVALUE=$?
echo
[ $RETURNVALUE = 0 ] && touch $lockfile
return $RETURNVALUE
}
stop() {
echo -n $"Stopping $servicename: "
kill -9 `cat $PIDFILE`
rm $PIDFILE
RETURNVALUE=$?
echo
[ $RETURNVALUE = 0 ] && rm -f $lockfile
return $RETURNVALUE
}
case "$1" in
start)
start
;;
stop)
stop
;;
restart)
stop
start
;;
status)
status $pen
;;
*)
echo "Usage: $servicename {start|stop|restart|status}"
exit 1
esac

exit $?
Make the script executable:
chmod +x /etc/init.d/penlb8080
Add to list of services controlled by chkconfig:
chkconfig --add penlb8080
Start this pen load balancer instance with:
service penlb8080 start
If you also wanted to run a second pen instance you could use the same script as above but with certain modifications. Say you wanted to run a second load balancer on port 80 as well, all you need to change are the following values, as well as the script name (penlb80):

servicename="penlb80"
PIDFILE=/var/run/pen.pid-80
LOGFILE=/var/log/pen80.log
CONTROLPORT=10080
LISTENPORT=80

Wednesday, 15 August 2012

Using Wix's harvest tool Heat to generate list of files from websites and directories

A while ago I was asked to write an installer for a project I'm working on and I immediately thought of Wix.

There was one problem though, thus far I had only used Wix for simple projects with not that many files but not this time, there were multiple websites and multiple projects and I wasn't going to do ~ 30+ odd files by hand, which is where Heat came in.

In order to generate a wxs file containing all files in a website this is the command to use:
Heat website MyWebsite -gg -cg  MyWebsite -o MyWebsite.wxs
where website tells heat that its harvesting a website
MyWebsite is the name of the website in IIS
-gg means that guids will be generated now
-cg MyWebsite will generate a component group called MyWebsite
-o MyWebsite.wxs will output to MyWebsite.wxs

Note that in a default installation Heat can be found in this directory:

C:\Program Files\Windows Installer XML v3.5\bin\

In order to run the above command the website needs to exist, which normally means that it has been deployed from Visual Studio.

Heat is not limited to harvesting websites though, it can also harvest directories, like this:
Heat dir "C:\solutions\" -gg -cg solutions -out solutions.wxs
Hope this helps in making the Wix experience easier.

Tuesday, 14 August 2012

The Thread was being aborted

A few weeks ago we started having an issue with a batch, to be precise it's a windows service that calls a web method that calls MS Dynamics CRM to generate a couple of files from data stored in the Dynamics CRM database. At any rate, all of a sudden it stopped working properly, it would fail at some point, reasonably early on in the process, probably it would go through about 1000 records.

Annoyingly, this coincided with a new release so naturally all suspicions fell on the build, this despite my protestation that just because two events occur one after the other does not mean that the first caused the second.

At any rate, after sneakily modifying the code in production to add as much trace logging as we could [Cowboys'r's], we found out to our surprise that it was failing while updating the records in Dynamics CRM. Unfortunately, the error was not very helpful as it seemed to vary between:

Unable to connect to the remote server

and

The thread was being aborted

After a lot of thinking and googling we thought we had come up with the answer: increase the number of connections.

Why?

It seems that when a client makes an authenticated call  a connection is opened and then closed, and since we were making loads of connections while processing our data, this seemed like the most likely culprit, as the connections available get used up.

In order to increase the number of connections available a registry hack and a reboot are needed:
  1.  Open registry editor. [from start | run | regedit]
  2. Navigate to this key [HKEY_LOCAL_MACHINE\SYSTEM\CurrentControlSet\Services\Tcpip\Parameters]
  3.  Set the TcpTimedWaitDelay key to 1388. [You might need to create this key. It's a DWORD value]
  4.  Set the MaxUserPort key to a high value, anything above 1388 and below 10000 ought to do it. [You might need to create this key. It's a DWORD value]
  5. Reboot.
We did this in one of our servers and in the morning I was extremely disappointed to see that the process had failed, but encouraged that it had processed about 2500 records. 

We ran the process manually a couple of times it was failing at roughly the same point, around 2500 records (by this point in time we had built a significant backlog of data) always with the same error:

The thread was being aborted

And then it hit me, it was timing out, so a simple fix was in order, i.e. increase the timeout on the web.config file of the web service.
<system.web>
<httpRuntime executionTimeout="300" />
</system.web>
I think that the default timeout is 90 seconds and that was clearly not enough to go through the 5000 records it can process daily (yep, it's limited to 5000 records by MS Dynamics CRM. Nope, I did not write the code)

Tuesday, 24 July 2012

The found version is 'C.0.8.40'. The expected version is '162'. (rsInvalidReportServerDatabase) - SSRS 2012

This morning I was trying to create the first organization in a MS Dynamics CRM 2011 deployment and when it tried to validate the SSRS URL, it failed with this error:
The version of the report server database is either in a format that is not valid or it cannot be read. The found version is 'C.0.8.40'.  The expected version is '162'. (rsInvalidReportServerDatabase)
I navigated to the SSRS URL and I got the same error.

It turns out that the error is fairly well known and can be easily resolved. All you need to do is recreate the reports database.
  1. Open Reporting Service Configuration Manager. [Start | All Programs | Microsoft SQL Server 2012 | Configuration Tools | Reporting Service Configuration Manager]
  2.  Connect to the report service instance that is giving you the problem
  3. Click Database.
  4. Click Change Database.
  5. Select Create a new report server database and follow the wizard.
This should get rid of this issue.

It would be a good idea to get rid of the old report database, to prevent any confusion, after you've backed it up, of course.

Monday, 23 July 2012

An unexpected error occurred. (Fault Detail is equal to Microsoft.Xrm.Sdk.OrganizationServiceFault).

In my previous post, I described how to import a solution programmatically, one thing I did not do was show how I instantiated the OrganizationServiceProxy nor how I had configured the Application Pools for the MS Dynamics website.

This is the method I used to instantiate the OrganizationServiceProxy:
 private OrganizationServiceProxy InstantiateOrgService(OrganizationServiceProxy service, string OrgName, string FQDN, int port = 80, int TimeOut = 600)
 {
     try
     {
         ClientCredentials creds = new ClientCredentials();
         creds.Windows.ClientCredential = (NetworkCredential)CredentialCache.DefaultCredentials;
 
         service = new OrganizationServiceProxy(new Uri(string.Format(Constants.OrgURL, FQDN, port, OrgName)), null, creds, null);
         service.Timeout = new TimeSpan(0, 0, TimeOut);
 
         return service;
     }
     catch (Exception ex)
     {
         MessageBox.Show(string.Format("Unable to instatiate the Org Service. Exception {0}", ex));
 
         return null;
     }
 }
I had another method that I had used where I passed in an specific set of credentials, rather than using default credentials, and that method had worked fine, but when I changed to the method above, it would not work and I would get this rather helpful message:
An unexpected error occurred.
(Fault Detail is equal to Microsoft.Xrm.Sdk.OrganizationServiceFault).
After a lot of hair pulling and useless Google searches (sorry my esteemed friend) I realized what I had changed, I was using Default Credentials, but the Application pool was not configured to use a domain account, so I changed the account running the CRM Application Pool to a domain account and this resolved the issue:


Saturday, 21 July 2012

Import solution programmatically in Microsoft Dynamics CRM 2011 (ImportSolutionRequest)

I've been working in trying to automate as much of our build as possible and one of the first things to try to automate was importing solutions.

The ImportSolutions method is designed to be invoked from a WPF application. SolutionsDirectory is entered through the GUI and should only contain solution files.

Not shown is the PublishSolution method, which is, hopefully, fairly self explanatory and only tries to publish the solution if the import was successful.

 private bool ImportSolutions(OrganizationServiceProxy OrgService, string SolutionsDirectory)
 {
    ImportSolutionRequest SolutionRequest;
    byte[] Solution;
 
    string[] files = Directory.GetFiles(SolutionsDirectory, Constants.ZipExtension);
 
    foreach (string file in files)
    {
        Solution = File.ReadAllBytes(file);
 
        SolutionRequest = new ImportSolutionRequest();
        SolutionRequest.CustomizationFile = Solution;
        SolutionRequest.ImportJobId = Guid.NewGuid();
        SolutionRequest.ConvertToManaged = true; //does this actually work?
 
        try
        {
            OrgService.Execute(SolutionRequest);
 
            Entity ImportJob = new Entity("importjob");
 
            ImportJob = OrgService.Retrieve(ImportJob.LogicalName, SolutionRequest.ImportJobId, new ColumnSet(true));
 
            XDocument xdoc = XDocument.Parse(ImportJob["data"].ToString());
 
            String ImportedSolutionName = xdoc.Descendants("solutionManifest").Descendants("UniqueName").First().Value;
            bool SolutionImportResult = xdoc.Descendants("solutionManifest").Descendants("result").First().FirstAttribute.Value
                == "success" ? true : false;
 
            Guid? SolutionId = GetSolutionGuid(OrgService, ImportedSolutionName);
 
            if (SolutionImportResult && SolutionId != null)
            {
                PublishSolution(OrgService, file, (Guid)SolutionId);
            }
 
        }
        catch (Exception ex)
        {
            MessageBox.Show(string.Format("An error occurred while uploading solution {0}.{1}Exception:{2}", file, Environment.NewLine, ex));
 
            return false;
        }
 
    }
 
    return true;
 }