Tuesday, 28 February 2012

SSH Single Sign On for CentOS 6.2 or RHEL 6.0 using a Windows 2008 AD domain

In one of my previous posts I discussed how to join a CentOS 6.2 server to a Windows 2008 AD domain. There was one thing that wasn't working and that really, and I mean, REALLY annoyed me and this was: single sign on, i.e. using SSH to login to another server in the domain without being prompted for your password again.

After a lot of head banging, cursing and wondering why oh why had I decided to embark in such a doomed enterprise, I managed to get it working. I assume that you have followed my previous post on how to join a CentOS 6 (RHEL 6 works too) and that you have two linux machines that have joined the domain. A second machine is only needed for testing purposes, you could use putty instead. I needed the second machine for other purposes, so that is the route I chose. I have also tested it with putty and it does work as well.

Here is the list of steps needed:
  1. From the Windows domain controller run the following command, which will create spns and upns. Note that you will need to run it as Administrator:
    ktpass -princ host/adtest.my.org@MY.ORG -mapuser MY\adtest$  -pass Passw0rd123 -ptype KRB5_NT_PRINCIPAL -crypto All -out adtest.keytab
  2. Copy adtest.keytab to your linux box, I simply mounted the c drive of the DC on the linux box, but this might not be available to you.
  3. If your server doesn't have a keytab file (/etc/krb5.keytab), then you can just move adtest.keytab to /etc/krb5.keytab otherwise you will need to merge it, which you can do with the ktutil tool, see this link for instructions.
  4. [Optional] Limit encryption to RC4-HMAC, by editing the kerberos configuration file /etc/krb5.conf and adding the following to the [libdefaults] directive:
  5. default_tkt_enctypes=rc4-hmac
    default_tgs_enctypes=rc4-hmac
    permitted_enctypes =rc4-hmac
  6. Restart the OpenSSH daemon:
    service sshd restart
  7. Configure the OpensSSH client. This will limit SSO to hosts in the domain:
  8. Host *.my.org
    GSSAPIAuthentication yes
    GSSAPIDelegateCredentials yes
  9. Repeat steps 1 to 6 for the second server if needed.
  10. Login to first server with a domain account that has linux attributes set.
  11. Ensure that a Kerberos ticket has been issued: 
  12. klist
    Ticket cache: FILE:/tmp/krb5cc_10000_TjT7rk
    Default principal: linuxuser@MY.ORG

    Valid starting     Expires            Service principal
    02/28/12 17:41:06  02/29/12 03:39:31  krbtgt/MY.ORG@MY.ORG
            renew until 02/29/12 03:41:06
  13. Open secure shell on second server, which will log you without a prompt for credentials
    ssh adtest5.my.org
It is very important that name resolution is working correctly as you could get issues if it doesn't work properly, thus an up to date DNS server is quite useful. If you don't have a DNS server make sure that your hosts files are up to date with all the server names involved.

If you hit any problems, the simplest way to trouble shoot is to open a debug ssh daemon, which you can do like this (you can add a couple more ds for extra debug info but I think debug1 is all you need):
/usr/sbin/sshd -p 31415 -d
You'll need to allow traffic on port 31415 or the port you choose, which you can easily do by stopping iptables. Clearly this should only be done in servers that are not internet facing. If the server is internet facing then just open port 31415, e.g:
iptables -I INPUT -p tcp --dport 31415 -j ACCEPT
You can connect to this server with:
ssh servername -p 31415 -v
This should tell you what the problem is, e.g:
debug1: Unspecified GSS failure.  Minor code may provide more information
Key table entry not found
This was actually caused by a name resolution problem.

Monday, 27 February 2012

A few random quotes

In theory, there is no difference between theory and practice; In practice, there is.
Chuck Reid
We cannot renounce the use of force otherwise a peaceful reunification would be impossible 
China's Jhian Xemin on Taiwan

It is hard to believe that a man is telling the truth when you know that you would lie if you were in his place 
H.L. Mencken

It is always the best policy to tell the truth, unless, of course, you are an exceptionally good liar 
 Jerome K. Jerome

Thursday, 23 February 2012

Join CentOS 6.2 server to a Windows 2008 Active Directory domain

Following on from my previous post detailing how to join a RHEL6 box to a Windows 2003 AD domain, in this post I discuss how to join to Windows 2008 AD domain (2008 Mode). This time rather than using RHEL 6, I've decided to use Centos 6.2 instead. I have used the standard installation rather than the minimal installation that used in the previous post, so here are the steps needed. 


Before I start though, I'd like to note that I installed the Identity Management for UNIX role in the Windows domain controller, so if you are following these instructions, make sure that you have that role installed in your domain controller. You will also need a binding account that has its Unix attributes set.

Without further ado, here are the instructions:
  1. Ensure that name resolution is working. At the very least you should be able to ping your domain controller, in my case pdc1.dev.org. If you can't, have a look at your /etc/resolv.conf file. Sample file:
    search dev.org test.com
    nameserver 10.168.20.203
  2. Depending on your installation type, you might have to install several of the packages below (It looks like I went for a base install only):
    yum install pam_krb5 pam_ldap nss-pam-ldapd samba policycoreutils-python -y
  3. Run authconfig-tui. Make sure that Kerberos realm is in capitals:


  4. Ensure that Name Service Switch is configured for ldap authentication. In essence, check that /etc/nsswitch.conf has the following values:
  5. passwd:     files ldap
    shadow:     files ldap
    group:      files ldap
  6. Edit the local LDAP name service daemon configuration (/etc/nslcd.conf). A bind account to the Active Directory is needed, so create that account now (I have created binding in the Users OU). The mappings (for Active Directory) need to be modified. Below is a list of changes to /etc/nslcd.conf. In essence uncomment the relevant parts:
  7. binddn cn=binding, cn=Users,dc=dev,dc=org
    bindpw mypass 
    #The Default search scope
    scope sub 
    #Customize certain database lookups
    base   group  dc=dev,dc=org
    base   passwd dc=dev,dc=org
    base   shadow dc=dev,dc=org
    # Mappings for Active Directory
    pagesize 1000
    referrals off
    filter passwd (&(objectClass=user)(!(objectClass=computer))(uidNumber=*)(unixHomeDirectory=*))
    map    passwd uid              sAMAccountName
    map    passwd homeDirectory    unixHomeDirectory
    map    passwd gecos            displayName
    filter shadow (&(objectClass=user)(!(objectClass=computer))(uidNumber=*)(unixHomeDirectory=*))
    map    shadow uid              sAMAccountName
    map    shadow shadowLastChange pwdLastSet
    map    shadow userPassword     unixUserPassword
    filter group  (objectClass=group)
    map    group  uniqueMember     member
  8. Change permissions on /etc/nslcd.conf file so that it is only readable by root:
    chmod 600 /etc/nslcd.conf
  9. Restart the local LDAP name service daemon:
    service nslcd restart
  10. Ensure that the local LDAP name service daemon (nslcd) is set to start with the server:
    chkconfig nslcd on
  11. Edit /etc/samba/smb.conf. Make sure that there is only a security directive active. Comment out all others.
  12. Network Related Options
    workgroup =dev
    Domain members options
    security = ads
    realm = DEV.COM
    use kerberos keytab = true  #not really sure about this one
    password server = pdc1.dev.org
  13. Ensure that iptables lets traffic through on port 389:
  14. iptables –I INPUT –p tcp --dport ldap –j ACCEPT; service iptables save
  15. Run the following command to join the domain:
  16. net ads join –U domainadmin
  17. A DNS record was not created for this server in my DNS server, not sure why, which meant that I had to add the record myself manually. Thus ensure that you do this before moving on if the DNS record is not added automatically, otherwise you might be unable to login.
  18. At this point you have successfully joined to the AD domain, you can test this by getting a list of users or group. You should get back the users and/or groups that have linux attributes, at least the binding account.
    getent passwd
    getent group
  19. In order to create a user's home directory on first login add this directive to /etc/pam.d/sshd. I only log on using ssh. If you are logging in at the box, rather than remotely, you need to modify /etc/pam.d/logon too, I believe. Note that this will not work if SELinux is on.
    session required pam_mkhomedir.so skel=/etc/skel umask=0022
  20. Allow polyinstatiation in SELinux settings:
     setsebool -P allow_polyinstantiation 1
  21. Temporarily set SELinux to permissive:
  22. setenforce 0
  23. If you login with a domain user (ssh binding@domainadtest, where domainadtest is the server that has just joined the domain), the directory will be created, but you will also have a record of what would've gone wrong on /var/log/audit/audit.conf had SElinux been on, which in my case is this:
  24. type=AVC msg=audit(1329063091.971:160): avc:  denied  { create } for  pid=5510 comm="mkhomedir_helpe" name="binding" scontext=unconfined_u:system_r:sshd_t:s0-s0:c0.c1023 tcontext=unconfined_u:object_r:home_root_t:s0 tclass=dir type=AVC msg=audit(1329063091.973:161): avc:  denied  { create } for  pid=5510 comm="mkhomedir_helpe" name=".bashrc" scontext=unconfined_u:system_r:sshd_t:s0-s0:c0.c1023 tcontext=unconfined_u:object_r:home_root_t:s0 tclass=file type=AVC msg=audit(1329063091.973:161): avc:  denied  { write open } for  pid=5510 comm="mkhomedir_helpe" name=".bashrc" dev=dm-0 ino=263825 scontext=unconfined_u:system_r:sshd_t:s0-s0:c0.c1023 tcontext=unconfined_u:object_r:home_root_t:s0 tclass=file type=AVC msg=audit(1329063091.973:162): avc:  denied  { setattr } for  pid=5510 comm="mkhomedir_helpe" name=".bashrc" dev=dm-0 ino=263825 scontext=unconfined_u:system_r:sshd_t:s0-s0:c0.c1023 tcontext=unconfined_u:object_r:home_root_t:s0 tclass=file type=AVC msg=audit(1329063092.015:163): avc:  denied  { setattr } for  pid=5510 comm="mkhomedir_helpe" name="binding" dev=dm-0 ino=263284 scontext=unconfined_u:system_r:sshd_t:s0-s0:c0.c1023 tcontext=unconfined_u:object_r:home_root_t:s0 tclass=dir
  25. Create a SELinux policy module to allow the creation of home directories when the user first logs in:
    less /var/log/audit/audit.log  | grep denied > mkdir.log 
    audit2why < mkdir.log 
    audit2allow -M mkdir -i mkdir.log 
    semodule -i mkdir.pp
  26. Renable SELinux:
    setenforce 1
That is it.

See this post to configure openSSH single sign on.

Attach to Debugger shortcut in Visual Studio

We've been doing some bug fixing this week and have ended up creating a new plug-in, so to ease the debugging pain, I have used some post build actions to deploy the plug-in while debugging, see this post for more details. The one thing that I hadn't automated was attaching to the debugger, which while not very time consuming it was starting to grate me a little bit, particularly after I mistyped a property name twice in a row.

So after a bit of googling I found this and this, which I have combined into this post. Note that I've used VS 2008, but this should work in VS 2010, just need to add import EnvDTE100 to the macro, I haven't tried it though.

In Visual Studio go to:
  1. ToolsMacros | Macro Explorer 
  2. Right Click MyMacros | New Module
  3. Name it AttachDebugger
  4. Double Click on Attach Debugger to open the Editor.
  5. Paste the code below:
  6. Option Strict Off
    Option Explicit Off
    Imports System
    Imports EnvDTE
    Imports EnvDTE80
    Imports EnvDTE90
    Imports System.Diagnostics
    Public Module AttachDebugger
        Sub W3WP()
            Try
                DTE.Debugger.DetachAll()
                For Each proc As EnvDTE.Process In DTE.Debugger.LocalProcesses
                  If proc.Name.IndexOf("w3wp.exe") <> -1 Then
                        proc.Attach()
                    End If
                Next
            Catch ex As System.Exception
                MsgBox(ex.Message)
            End Try
        End Sub
    End Module
    
  7. Save it.
  8. To add the Shortcut, now go to Tools | Options | Environment | Keyboard 
  9. Type W3WP and enter your shortcut
  10. Click Assign and off you go.
If you are deploying asynchronous plugins as well, you could create another Sub that attaches to the asynchronous service  and simply give it another shortcut.


Monday, 20 February 2012

The Windows Security problem or ...

A few weeks ago, I got home, switched my desktop PC, which runs Windows 7 Ultimate, patched to gills, and I was greeted with bucket loads of errors.

It complained that I had some sort of issue writing to disk. One of my hard drives makes a really strange noise sometimes and I thought it had finally given up the ghost. 

A pop-up appeared suggesting that I could fix it now or later, when I clicked later it bounced my desktop. It started up again and the same malarky with the errors occurred, so I decided to fix it this time. This started a program that scanned my desktop and it announced that the c:\ drive was unreadable, which is when the alarm bells should have started ringing, because if it weren't readable then how did the system boot up? 

Anyway, I followed the charade a bit more to see how it develops, after all I wasn't sure what was going on and after a diagnosis telling me that my ram is running at 83 C, which to my eternal shame I believed, at least for a moment; I'm informed that most of my problems will not be fixed by free version, but if I buy the paid version, all will be well. So I follow the link, which launches I.E.

Except that it isn't I.E. but something that looks like I.E., I guess so that people are not freaked out, and this is when the penny finally dropped and I realized that this is one of them fake programs, welcome System Check Virus;a bit slow on the uptake, I know (hangs head in shame).

I have read about these virii before and I know my mother in law actually paid to get rid of it. She got rid of her computer shortly after, so I don't know whether the pop-ups would come back after a while. I suspect that not for a while, until the new super duper version was out and her credit card was not abuse, but I digress.

So I followed this guide to get rid of the little bugger, which can be done with Malwarebytes' Anti Malware. Ironically, I had installed it but because I barely use my desktop at home anymore, I never actually ran a scan with it.
Let that be a lesson for me in the future.

It's simply mind boggling, though, that this kind of virus can run in Microsoft's latest and greatest OS and yet UAC prompts you to approve even something as mundane as opening a management console.

One of these days I will bite the bullet and buy a Mac... well maybe.

Saturday, 18 February 2012

Capacity Scheduling in MS Dynamics CRM 2011 - part 2

Capacity Scheduling can also be used to provide a limit to the number of activities a resource can achieve in a set period of time. Say for example, that a utility company needs to carry out a safety inspection on its customers' gas installation once a year. The average time per safety check is 15 minutes, but there’s traveling time, which on average is also 15 minutes. The thing is the utility company does not hand out 15 minutes slots to customers. The customer gets a 4 hour window and the engineer turns out whenever he well damn pleases (At least that is how it feels to the customer), but how to manage all this, from the company’s point of view?

We know that the average safety check takes 15 minutes and the average travel time between destinations (customer premises) is 15 minutes, so we could say that the total time per safety check is 30 minutes and there are 8 such blocks in each 4 hour window.

In this example, engineers are unlikely to have access to Dynamics CRM so rather than setting them up as users, they will be set up as Facility/Equipments, see my previous post, if you need instructions on how to set up a new facility/equipment.

I set the Work Hours to be two four slots and assigned a capacity of 7 to the first slot and 8 to the second slot. The reason for this is that engineers need to have a lunch break, in this case a 1/2 hour lunch break. It would be possible to set a break in the Work Hours for each engineer, but since the engineers already get a lot of flexibility, remember, that they are only told visit eight, or seven, customers within a 4 hour window, it makes sense to give them the flexibility of taking the lunch break when they want.

In total, I have set up 4 engineers, with different Work Hour Patterns, so that an 08:00-20:00 range can be offered to the customer, in slots like this: 08:00-12:00, 12:00-16:00, 16:00-20:00 and made them all members of a new resource group called Engineers. Although, I will not be modelling it here, resource groups could be used to provide geographical groupings, so that engineers don't have to travel hundreds of miles unnecessarily. Sites could also be used to model geographical areas too.

Create a new service with the following settings, see my previous post for more details:
  • Name: Safety Check.
  • Default duration: 4 hours.
  • Start Activities every: 4 hours.
  • Beginning At: 08:00
  • Required Resources: Choose 1 (Least Busy) from the same site from Engineers (Resource Group)

I can now book multiple appointments for each engineer, see my previous post for more details. It is interesting to note that you can see resource availability, though not capacity, in the service calendar view, as can been seen in the screenshot below. Jill Engineer has no work pattern set from 08:00-12:00, notice the white background against Jill for that period, whereas Joe Engineer has no work pattern set from 16:00-20:00.
The service calendar after 6 service activities have been booked to the 12:00 -16:00 slot:
As mentioned in the previous post, it makes sense to create a custom entity that holds the customer information and link to it a service activity. This way a report containing the appointments details (customer name, address, date and time) can be produced and emailed to engineers every day or week. Not to mention using a custom form in say, Silverlight, for booking the appointments, which can be embedded in the form.

Friday, 17 February 2012

Capacity Scheduling in MS Dynamics CRM 2011 - part 1


I’ve trying to get a better understanding of what is and isn’t possible with the service scheduling module in MS Dynamics CRM 2011.

One of our applications uses “capacity scheduling” so I’m quite happy with this concept.  I’ve not found a definition of what capacity scheduling is but Microsoft’s training material says:
In Microsoft Dynamics CRM service scheduling, two primary factors allow you to perform capacity scheduling:

• A resource required for the delivery of a service must be defined with a certain level of capacity.

• The resource selection rule for a service must be defined to require a minimum capacity level.
This is pretty meaningless and rather than try to define it myself, I will simply provide a few examples.

Trainers’r’s is a company that delivers training seminars. It has at its disposal two training classrooms in its only site, one with 15 places and another one with 30 places.  Its training seminars are delivered by a trainer, because Trainers'r's uses Dynamics CRM for various other things, the trainers are system users. This does not has to be the case but in this example it means that a few users in the system  are needed. It is advisable to set the Work Hours for these users.

First, let's set up two facilities, their work hours and capacity. I've called my facilities Small Classroom
and Large Classroom.
  1. Navigate to Settings | Business Management | Facilities/Equipment.
  2. Click New.
  3. Fill in Name: Small Classroom.
  4. Click Save.
  5. Click Work Hours.
  6. Double click All Day on today's date.
  7. Select From today's date onward and click ok.
  8. Set the weekly schedule.
  9. Double click on the highlighted area to set the working hours and capacity.
  10. Click OK.
  11. Click Save and Close, twice.
Repeat the above steps for Large Classroom. Make sure that you set capacity to 30.

Let's now set up two services two cater for a small training seminar, up to 15 people, imaginatively called Small Training Seminar and another one for bigger groups of up to 30 people, called Large Training Seminar.
  1. Navigate to Settings | Business Management | Services.
  2. Click New.
  3. Fill in Name: Small Training Seminar.
  4. Set Default Duration to: 4 hours.
  5. Set Start Activities Every to: 30 minutes.
  6. Set  Beginning At : 8:00 AM.
  7. On Required Resources Double Click Selection as per screenshot below:
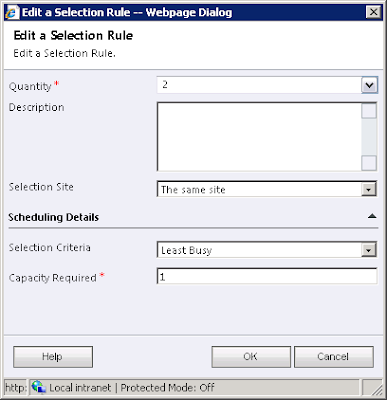
  8. Set Quantity to 2, Selection Criteria to Least Busy.
  9. Click OK.
  10. Click on Selection Rule, Set Selection Criteria to Least Busy and Capacity Required to 15. This selection rule will be the Classroom Selection Rule.
  11. Click on Resources to add the Small Classroom Facility.

  12. We have a facility now lets add a Trainer. Back on the Service screen on the Required Resources section Click Add a Selection Rule, which will pop a window up.
  13. Set the Selection Criteria to Least Busy. Leave the rest to default.
  14. Select the newly created Selection Rule and double click Resource Groups.
  15. Click New to Create a New Resource Group.
  16. Name it Trainers and click Save.
  17. Click Resources | Add Resources.
  18. Add Your Users to the Resource Group.
  19. You can now select the Trainers Resource Group.
  20. You should now have the following selection rules:
  21. Save and Close the service.
Repeat the procedure for Large Training Seminar, note that you don't need to create the Trainers resource group again and that capacity should be 30 instead of 15.

The small training seminar could also be delivered in the large training room, so that the Small Training Seminar service would look like this, which is what I will be using from here on:


You can now use these services to book service activities.  In a real world application you would probably want to create your own custom entity linked to a service activity, say TrainingSeminar, which depending on how many participants it had it would use the large or the small training seminar service.

In this example, though, the service calendar is used to manually schedule service activities:
  1. Navigate to Service | Service Calendar
  2. Click Service Activity. Fill in Subject and Select a Service.
  3. Click Schedule.
  4. Click Find Available Times.
  5. Select a Time and click Schedule.
  6. Save and Close Service Activity.
  7. Hit Refresh on the Service Calendar screen.
  8. Note how the Service Activity shows against two resources (Jane and the Large Classroom)
  9. Another Small Training seminar can be booked for Monday morning, but because the large classroom is in use no Large Training seminar can be booked for Monday morning.
It is worth noting that if you schedule a Small Training seminar for 09:00 rather than 08:00 as above, you will not be offered the possibility of booking a service activity for any of service from 08:00 till 09:00 however, a different service with a shorter duration could use that facility.  

Say for example that Trainers’r’s holds a short (30 minutes) weekly employee meeting and the company currently employees 11 employees. The administrator has set up new service called Weekly meeting.  The capacity in the selection rule is set to 11 and the possible resources are both classrooms, the service starts at 08:00 and activities start every 15 minutes.  The scheduling engine will now provide suitable appointments, which will be some on the large classroom and some on the small classroom.

In part two, I will discuss a completely different way of using Capacity Scheduling.

Thursday, 16 February 2012

We've been doing some code fixes lately and have had to release quite a few builds. We always have had a requirement to provide a list of all the files the build includes in the release notes. This has not really been a problem until recently as our builds consisted of an msi, so the list of files simply contained the msi file, but this has changed for a new application that we have recently started to support, I say recently in the loosest sense of the word, I believe the application has been in production since late October, but that is by the by. 

At any rate, this application does not used compiled assemblies or an msi to deploy the application, so I have had to look for a way of listing all the files and after consulting the oracle a little bit and failed to be impressed by the solutions proposed I thought I'd give the dir command a go. This is what I use, from the top directory containing the build files:
dir /B /S /A-D | find /I /V "contents.txt" > contents.txt
where
/B is used so that only file names will be listed
/S is used to go through subdirectories
/A-D is used to prevent directories from being listed

/I is used to provide case-insensitive search
/V is used to provide negative matching of the string, i.e. anything that does not contain the string, contents.txt, this is used so that contents.txt is not listed.

It works for me, so I thought I would share it here.

DEBUG vs RELEASE

Does it actually matter whether you release a debug build into production?

A few weeks ago I embarked on a personal project to create an arbitrary precision library for C#, I'm sure there are hundreds available, but I thought it would be a good small little project and if I ever finish it, I'll publish it in codeplex or something.

Since it's the easiest operation to implement, I started with addition, and was pretty happy with my implementation, but the question was, would it scale linearly?

The answer is yes, after some help from my friends, see graph below:


There is a clear linear scale but more, perhaps more importantly, is the difference between the DEBUG build and the RELEASE build. You can almost double the terms summed by simply compiling it as a RELEASE build, it's roughly 1/3 faster. To be sure, in real life, it probably won't make that much of a difference, but it is worth bearing in mind that performance will be affected if you deploy a DEBUG build to Production.

I repeated the same test, but this time using the addition operation to calculate a rather high term, 200000, of the Fibonacci series:


Again, there is quite a bit of difference between the RELEASE and DEBUG builds, unfortunately I lost the data for this image, so I cannot quantify the gain exactly, but from the graph it can be seen that it is roughly 1/3 faster.

Make sure that a debug build does not get into your production or performance test environment.

Sunday, 12 February 2012

Join RHEL 6 server to a Windows 2003 Active Directory domain.

I think I might be losing my mind. At work a colleague asked me for instructions on how to join a RHEL6 box to a windows domain and I just pointed him to my blog, but he could not find the post I had in mind, because it looks as if I've not actually posted it, so here it goes:
  1. Ensure that name resolution is working. At the very least you should be able to ping your domain controller, in my case mars.dev.com. If you can't, have a look at your /etc/resolv.conf file. Sample file:
    search dev.com test.com
    nameserver 10.168.20.203
  2. Depending on your installation type, you might have to install several of the packages below (It looks like I went for a base install only):
    yum install pam_krb5 pam_ldap nss-pam-ldapd samba policycoreutils-python -y
  3. Run authconfig-tui. Make sure that Kerberos realm is in capitals:


  4. Ensure that Name Service Switch is configured for ldap authentication. In essence, check that /etc/nsswitch.conf has the following values:
  5. passwd:     files ldap
    shadow:     files ldap
    group:      files ldap
  6. Edit the local LDAP name service daemon configuration (/etc/nslcd.conf). A bind account to the Active Directory is needed, so create that account now (I have created binding in the Users OU). The mappings (for Microsoft Service for unix 3.5) need to be modified. Below is a list of changes to /etc/nslcd.conf:
  7. binddn cn=binding, cn=User,dc=dev,dc=com
    bindpw mypass 
    #The Default search scope
    scope sub 
    #Customize certain database lookups
    base   group  dc=dev,dc=com
    base   passwd dc=dev,dc=com
    base   shadow dc=dev,dc=com
    # Mappings for Services for UNIX 3.5
    filter passwd (objectClass=User)
    map    passwd uid              msSFU30Name
    map    passwd uidNumber       msSFU30UidNumber
    map    passwd gidNumber       msSFU30GidNumber
    map    passwd userPassword     msSFU30Password
    map    passwd homeDirectory    msSFU30HomeDirectory
    map   passwd  LoginShell       msSFU30LoginShell
    filter shadow (objectClass=User)
    map    shadow uid              msSFU30Name
    map    shadow userPassword     msSFU30Password
    filter group  (objectClass=Group)
    map    group  uniqueMember     msSFU30PosixMember
    map    group gidNumber       msSFU30GidNumber
  8. Change permissions on /etc/nslcd.conf file so that it is only readable by root:
    chmod 600 /etc/nslcd.conf
  9. Ensure that the local LDAP name service daemon (nslcd) is set to start with the server:
    chkconfig nslcd on
  10. Edit /etc/samba/smb.conf. Make sure that there is only a security directive active. Comment out all others.
  11. Network Related Options
    workgroup =dev
    Domain members options
    security = ads
    realm = DEV.COM
    use kerberos keytab = true  #not really sure about this one
    password server = mars.dev.com
  12. Ensure that iptables lets traffic through on port 389:
  13. iptables –I INPUT –p tcp --dport ldap –j ACCEPT; service iptables save
  14. Run the following command to join the domain:
  15. net ads join –U domainadmin
  16. At this point you have successfully joined to the AD domain, you can test this by getting a list of users or group. You should get back the users and/or groups that have linux attributes, at least the binding account.
    getent passwd
    getent group
  17. In order to create a user's home directory on first login add this directive to /etc/pam.d/sshd. I only log on using ssh. If you are logging in at the box, rather than remotely, you need to modify /etc/pam.d/logon too, I believe. Note that this will not work if SELinux is on.
    session required pam_mkhomedir.so skel=/etc/skel umask=0022
  18. Allow polyinstatiation in SELinux settings:
     setsebool -P allow_polyinstantiation 1
  19. Temporarily set SELinux to permissive:
  20. setenforce 0
  21. If you login with a domain user (ssh binding@domaintest, where domaintest is the server that has just joined the domain), the directory will be created, but you will also have a record of what would've gone wrong on /var/log/audit/audit.conf had SElinux been on, which in my case is this:
  22. type=AVC msg=audit(1329063091.971:160): avc:  denied  { create } for  pid=5510 comm="mkhomedir_helpe" name="binding" scontext=unconfined_u:system_r:sshd_t:s0-s0:c0.c1023 tcontext=unconfined_u:object_r:home_root_t:s0 tclass=dir type=AVC msg=audit(1329063091.973:161): avc:  denied  { create } for  pid=5510 comm="mkhomedir_helpe" name=".bashrc" scontext=unconfined_u:system_r:sshd_t:s0-s0:c0.c1023 tcontext=unconfined_u:object_r:home_root_t:s0 tclass=file type=AVC msg=audit(1329063091.973:161): avc:  denied  { write open } for  pid=5510 comm="mkhomedir_helpe" name=".bashrc" dev=dm-0 ino=263825 scontext=unconfined_u:system_r:sshd_t:s0-s0:c0.c1023 tcontext=unconfined_u:object_r:home_root_t:s0 tclass=file type=AVC msg=audit(1329063091.973:162): avc:  denied  { setattr } for  pid=5510 comm="mkhomedir_helpe" name=".bashrc" dev=dm-0 ino=263825 scontext=unconfined_u:system_r:sshd_t:s0-s0:c0.c1023 tcontext=unconfined_u:object_r:home_root_t:s0 tclass=file type=AVC msg=audit(1329063092.015:163): avc:  denied  { setattr } for  pid=5510 comm="mkhomedir_helpe" name="binding" dev=dm-0 ino=263284 scontext=unconfined_u:system_r:sshd_t:s0-s0:c0.c1023 tcontext=unconfined_u:object_r:home_root_t:s0 tclass=dir
  23. Create a SELinux policy module to allow the creation of home directories when the user first logs in:
    less /var/log/audit/audit.log  | grep denied > mkdir.log 
    audit2why < mkdir.log 
    audit2allow -M mkdir -i mkdir.log 
    semodule -i mkdir.pp
  24. Renable SELinux:
    setenforce 1
I wonder how much tweaking, if any, will be required for a Windows 2008 Active Directory domain.

Thursday, 9 February 2012

Installing Joomla 2.5 on Centos 6.2 (netinstall)

I foolishly deleted the wrong VM a couple of weeks ago and yesterday I realized that Joomla 2.5 is out. It looks like Joomla 2.5 is the successor to Joomla 1.7. I guess version inflation is kicking off again. At any rate, I wanted to see whether my previous post would work and update it where necessary.

I have created a script to install Joomla, see this post, note that the script is only for Joomla, you will still need to manually install CentOS/RHEL.

Below are the steps needed to install Joomla on CentOS 6.2 using the netinstall iso, note that I'm running this from a VM using VirtualBox on a Windows XP SP3 system (don't ask why):

Note that if no screenshot is shown that means that you should use the default values or your own values (e.g. keyboard, time zone, etc.)
  1. Download Netinstall iso from http://isoredirect.centos.org/centos/6/isos/i386/ or http://isoredirect.centos.org/centos/6/isos/x86_64/ for 64 bit versions.
  2. Start a brand new VM and boot from the iso downloaded in step 1. 
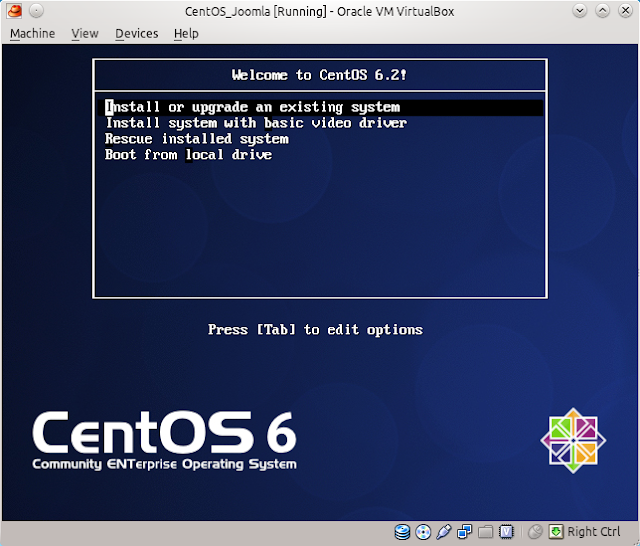
  3. Select Install or upgrade an existing system.
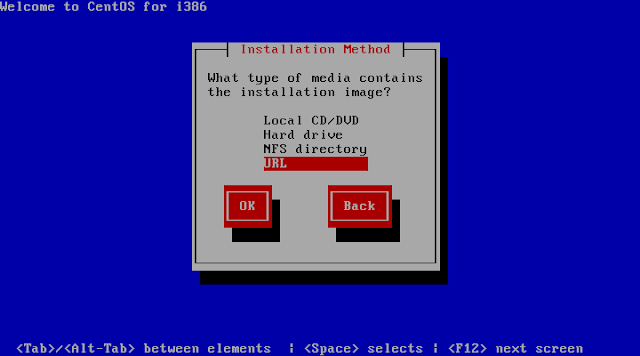
  4. Select URL and press OK.
  5. Enter http://mirror.centos.org/centos/6.2/os/i386/or http://mirror.centos.org/centos/6.2/os/x86_64/ for the 64 bit version.
  6. I only gave 512 MB of ram to the VM, which meant that the TUI installer ran instead of a graphical interface.
  7. After selecting the hard drive, I received this prompt. Select Re-Initialize All.
  8. Once the installation has finished and you are back into your system (remember to remove the mounted iso) I decided to install not only mandatory packages but also optional so I added this line to /etc/yum.conf:
    group_package_types=default,mandatory,optional
  9. Install Apache:
    yum groupinstall "Web Server"
  10. Install MySQL:
    yum groupinstall "MySQL Database server" 
  11. Install wget, man, php-mysql, unzip and policycoreutils-python (see step 26 about this package):
    yum install man wget php php-mysql unzip policycoreutils-python -y
  12. Create a temporary directory to extract and download Joomla:
    mkdir /joomla; cd /joomla 
  13. Download Joomla (note that this is likely to change, check here for the latest version):
    wget http://joomlacode.org/gf/download/frsrelease/16512/72038/Joomla_2.5.1-Stable-Full_Package.zip
  14. Extract downloaded package:
    unzip Joomla_2.5.1-Stable-Full_Package.zip
  15. Move all files to home web directory:
    mv /joomla/* /var/www/html
  16. Start MySQL and set it to start at boot time:
    service mysqld start; chkconfig mysqld on
  17. Set root's password to MySQL and get MySQL production-ready (Essentially type Y to everything):
    /usr/bin/mysql_secure_installation
  18. Create Joomla User:
    mysql -u root -p
    CREATE USER 'JoomlaUser'@'localhost' IDENTIFIED BY 'mypass';
  19. Create Joomla Database:
    mysqladmin -u root -p create Joomla
  20. Provide appropriate privileges to the JoomlaUser user:
    mysql -u root -p
    GRANT ALL PRIVILEGES ON Joomla.*
                    TO JoomlaUser@localhost IDENTIFIED BY 'mypass';
            where:
            'Joomla' is the name of your database
            'JoomlaUser@localhost' is the userid of your webserver MySQL account
            'mypass' is the password required to log in as the MySQL user
  21. Apply privileges and exit:
    flush privileges; \q
  22. Open Firewall for port 80 and save changes:
    iptables -I INPUT -p tcp --dport http -j ACCEPT ; service iptables save
  23. Turn output buffering off by editing /etc/php.ini change:
    output_buffering=4096
    to
    output_buffering=Off
  24. Create empty configuration.php file and set permissions:
    touch /var/www/html/configuration.php
    chmod 666 /var/www/html/configuration.php
  25. Start Apache and set it to start on boot:
    service httpd start; chkconfig httpd on
  26. Disable SELinux (I recommend having a look at this post for a fix that will allow you to run SELinux and Joomla. Do ensure that you test everything that you are likely and unlikely to do, e.g. add articles, add blogs, etc..). Alternatively edit /etc/selinux/config and change:
    SELINUX=enforcing
    to
    SELINUX=disabled
  27. Start the Joomla install proper by navigating to:
    http://<yourserverip>
  28. On step 4 use the following settings:
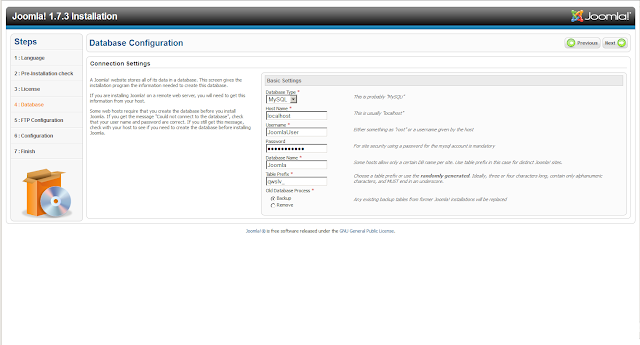
  29. I chose to install the sample data on step 6.
  30. Ensure that you remove the installation directory
    rm -rf /var/www/html/installation/
  31. You can now go and administer your site or view the sample sites if you chose to install the sample data. Enjoy!

Note that if if you do decide to use SELinux, see step 26, you need an extra step to change the context for the Joomla files:
chcon -R  unconfined_u:object_r:httpd_sys_content_t:s0 /var/www/html/
See this post, if you want to configure multiple instances of Joomla in one server.

Tuesday, 7 February 2012

Debugging Silverlight Web Resources for MS Dynamics CRM 2011

I read this post about debugging Silverlight and it felt like too much of hack. So I thought I would present my far superior (I'm kidding here, I do think it's neater, though) solution.

Assuming that you have followed the tutorial on the SDK or on this page, you should have a file called SilverlightUtilty.cs and in this file you will have a method called GetSoapService. All you need to do is make use of the #if directive.

#if !DEBUG
            Uri serviceUrl = CombineUrl(GetServerBaseUrl(), "/XRMServices/2011/Organization.svc/web");
#else
            Uri serviceUrl = new Uri("http://localhost/testorg/XRMServices/2011/Organization.svc/web");
#endif

You also need to ensure that you only use the Debug build for your development environment and Release for production, but you are doing that already, right?. At any rate, here is a step by step guide:
  1. Set up Silverlight project following this tutorial.
  2. Change code in SilverlightUtility.cs as described above.
  3. Create clientaccesspolicy.xml file:

    <?xml version="1.0" encoding="utf-8"?>
    <access-policy>
     <cross-domain-access>
      <policy>
       <allow-from http-request-headers="*">
        <domain uri="*"/>
       </allow-from>
       <grant-to>
        <resource path="/" include-subpaths="true"/>
       </grant-to>
      </policy>
     </cross-domain-access>
    </access-policy>
    

  4. Copy clientaccesspolicy.xml to the website directory (normally c:\Program Files\Microsoft Dynamics CRM\CRMWeb\).
  5. Debug from Visual Studio.
  6. Ensure that you compile it as Release before you deploy it to other environments.
Note that if you use the same org name in Dev, Test and Prod, you could change the code to simply:
Uri serviceUrl = new Uri("http://localhost/org/XRMServices/2011/Organization.svc/web");

Monday, 6 February 2012

Somebody is infrigining on my copyright

The oddest thing happened just now, I was looking at my blog stats and I noticed that some of my most popular posts are on installing phpMyAdmin and I was curious as to how they would appear on Google. When I searched for phpmyadmin centos 6.2, the second link is for a site called php2s.com and it turns out that they have copied my post about the ssl/tls install of phpmyadmin.

I don't do this for money, I don't have any ads on the site, and I don't mind people linking to my site or copying my posts so long as they properly attribute them, i.e. they explicitly state that I was the author and/or link back to this site. Copying the post verbatim and tagging the pictures as their own, without any attribution as to who the original author was is really, really annoying.

I've left them this comment:
Hello,
if you are going to copy my blog post you could at least provide an attribution.
And tagging the images as yours is just plain weird.
Anyway the blog post I wrote can be found here:
http://manyrootsofallevilrants.blogspot.com/2012/01/install-phpmyadmin-using-tlsssl-on.html
Regards,
manyrootsofallevil
After a bit more searching I also found my how to install Joomla post listed there. A quick search of some of the post reveals that this is just a content scrapping site, however, it does not seem to have any obvious ads. I've not checked their Facebook feed, so I'm not entirely sure what they are trying to achieve.

All I can say is some of the posts will be a bit confusing, if they are like my ssl/tls phpmyadmin install post, as this posts links to another post in my original blog, which may or may not have been picked by php2s but will certainly not be linked to it.

All I can say is that Frank Boros must be the most knowledgeable person in the world.

Edit.

He is actually a SEO consultant, so I know what his game is about. I guess he is trying to show case his ability to make a site top a Google search. I doff my virtual hat to you Mr. Boros. Now stop infringing on my copyright.

Saturday, 4 February 2012

WhoAmIRequest from a Silverlight Web Resource in MS Dynamics CRM 2011

Probably the simplest request that can be made in MS Dynamics CRM, is a WhoAmI request. This request returns details (UserId, BusinessUnitId & OrganizationId) of the current user or the user under whose context the code is running.

Note that this code, assumes that you have followed the "Use the SOAP Endpoint for Web Resources with Silverlight" walkthrough from the SDK, which can also can be found here.
private void WhoAmIButton_Click(object sender, RoutedEventArgs e)
{
    OrganizationRequest req = new OrganizationRequest() { RequestName = "WhoAmI" };
    IOrganizationService service = SilverlightUtility.GetSoapService();

    service.BeginExecute(req, new AsyncCallback(WhoAmIResult), service);
}
As per usual with Silverlight, it is necessary to make a callback to get the response, which is below:
private void WhoAmIResult(IAsyncResult result)
{
  try
  {
      OrganizationResponse response =  
              ((IOrganizationService)result.AsyncState).EndExecute(result);
 
      Guid userId = new Guid(response["UserId"].ToString());
  }
  catch (Exception ex)
  {                
      throw ex;
  }
}
Do note that if you need the UserId value to perform another query, you'll need to ensure that the second query is not made until this one (WhoAmIResult) has finished.

Friday, 3 February 2012

Making an Appointment Request from a Silverlight Web Resource in MS Dynamics CRM 2011

I’ve been looking at upgrading one of our Apps to MS Dynamics CRM 2011 and one of the things that we do a lot of is appointment booking.

At the moment, we have an iFrame showing an ASP.NET webpage with some buttons that when pressed, make an ajax call to a web method hosted in the ISV folder. Once the appointment is selected, the actual booking of the appointment is handled by a plug-in. I wanted to see whether we could remove the iFrame and use a Silverlight webresource.

I have to say that I found it a bit confusing and it took me quite a few attempts to get the RequestName right, this post by Jamie Miller sent me in the right direction. The search for appointments is started by a user clicking a button.

Note that this code, assumes that you have followed the "Use the SOAP Endpoint for Web Resources with Silverlight" walkthrough from the SDK, web link can be found here.

Here is the method that makes the appointment request:

private void checkButton_Click(object sender, RoutedEventArgs e)
{           
    AppointmentRequest appReq = new AppointmentRequest
    {
        Objectives = new ObservableCollection<ObjectiveRelation>(),
        RequiredResources = new ObservableCollection<RequiredResource>(),
        AppointmentsToIgnore = new ObservableCollection<AppointmentsToIgnore>(),
        Constraints = new ObservableCollection<ConstraintRelation>(),
        Sites = new ObservableCollection<Guid>(),
        Duration = 60,
        Direction = SearchDirection.Forward,
        NumberOfResults = 5,
        ServiceId = new Guid("DD535FD0-F84B-E111-8F2F-00505688095F"),
        SearchWindowStart = DateTime.UtcNow,
        SearchWindowEnd = DateTime.UtcNow.AddDays(7.0),
        AnchorOffset = 300
    };
   
    OrganizationRequest req = new OrganizationRequest() { RequestName = "Search" };
    
    req["AppointmentRequest"] = appReq;

    IOrganizationService service = SilverlightUtility.GetSoapService();

    service.BeginExecute(req, new AsyncCallback(GetAppReqResult), service);
}
As this is Silverlight, an asynchronous callback is needed to actually invoke the request, which is done by the method below.
private void GetAppReqResult(IAsyncResult res)
{
   try
   {
     OrganizationResponse resp = 
                          ((IOrganizationService)res.AsyncState).EndExecute(res);
   
     SearchResults results = (SearchResults)resp["SearchResults"];
   
     this.Dispatcher.BeginInvoke(() => ProcessAppointments(results));        
   
   }
   catch (Exception)
   {
       MessageBox.Show("Error Occurred");
   }
}

Not shown here is the ProcessAppointments method, which updates a DataGrid object in the Silverlight Web Resource.