Wednesday 31 October 2012

Microsoft Dynamics CRM Interview Questions

A few weeks ago I went to an interview for a position of CRM developer, these are the questions that I was asked:
  1. What are the differences between Plug-in and a Workflow?
  2. When will you use a workflow and when will you use a Plug-in?  
  3. What is CRM Discovery Service?
  4. What is 'Append' and 'Append To' privilege in MSCRM?
  5. Suppose if I have 20 user license and I have created 20 users. What will happen if I create 21st User?   
  6. What are the maximum number of tabs allowed on a Microsoft Dynamics CRM 4.0 form? 
  7. How to Debug the javascript that we write for some validation on entity pages.
These were found here, the first google hit on "dynamics crm interview questions"

The final question was essentially the chart on this post. The dialog part had been removed and I had to fill in what applied to plug-ins and what applied to workflows.

I thought that this had already been asked in question 2, but there you go.

I wasn't very impressed by their selection procedure, alas they did not offer me the job.
 

Create MSMQ Private Queue using Wix Installer

I was trying to create a public queue using Wix but could not, so in the end I gave up and went with a private one with enough permissions for my purposes.

The snippet shows how to do this. There is a check to ensure that MSMQ is installed and because we are using Win 2008 R2 and compiling in Windows XP, the win64 attribute is set to yes.

<Wix xmlns="http://schemas.microsoft.com/wix/2006/wi"
     xmlns:msmq="http://schemas.microsoft.com/wix/MsmqExtension">

<Property Id="MSMQ" >
 <RegistrySearch Id="msmq" Type="raw" Root="HKLM" Key="SOFTWARE\Microsoft\MSMQ\Parameters\CurrentBuild" Win64="yes"/>
</Property>

<Condition Message="Please Ensure that MS MQ is installed">
 <![CDATA[Installed or MSMQ]]>
</Condition>

<util:Group Id="Admins" Name="Administrators"/>
<util:Group Id="Everyone" Name="Everyone"/>

<msmq:MessageQueue Id="fil1004" Label="Log Queue" PathName=".\Private$\logging" Transactional="no" PrivLevel="none" >
 <msmq:MessageQueuePermission Id="fil1005" Group="Admins" QueueGenericAll="yes"/> 
 <msmq:MessageQueuePermission Id="fil1006" Group="Everyone" GetQueueProperties="yes" GetQueuePermissions="yes" WriteMessage="yes" />            
</msmq:MessageQueue>

Monday 29 October 2012

Join Ubuntu 12.10 (Quantal Quetzal) server to a Windows 2012 Active Directory domain using Centrify Express

An Anonymous poster on my last post suggested using Centrify Express rather than using Likewise Open, so I did.

The first thing to note is that I'm not sure in which repository can the package be found or indeed what the name for the package is, I tried to search with apt-cache but to no avail, so I just downloaded the package directly from the website. The package says it's only valid for 12.04 or lower but it seems to work fine, I guess they haven't  updated the website yet.

Extracted the package:
tar -xvf centrify-suite-2012.3-deb5-x86_64.tgz
Ran the installer and followed the on-screen instructions: 
sudo ./install.sh
Server rebooted and I tried to login with a username of this form domain\username and it didn't work, I then tried username@domainname and it did work this time.

Single sign on with Putty works out of the box, although, much like with Likewise-Open the DNS entry was not added automatically. I created it manually this time. Note that without the DNS entries, SSO will not work.

Tuesday 23 October 2012

Join Ubuntu 12.10 (Quantal Quetzal) server to a Windows 2012 Active Directory domain


In this post I will show you how to join a Ubuntu 12.10 server to a Windows 2012 Server Active Directory domain using using Likewise Open. I've not tried using this method for CentOS/RHEL 6.x but Likewise Open is supported, so stay tuned.

In theory, this method should work for Windows 2003/2008 (R2) domains, but I've only tried it for  Windows 2012 Server.

I won't dwell on setting up the domain and DNS servers, see this previous post for details [it's for the Beta version but it still applies], all I will say is that ensure that name resolution works from the Ubuntu server, e.g. make sure that at least you can ping the DC by hostname and fully qualified domainname. An example /etc/resolv.conf file is shown below for a domain called dev.com and DNS server with ip address (192.168.1.65), this should be set up automatically from your DHCP server, if not you'll need to edit /etc/networking/interfaces (note that the options are different to those in /etc/resolv.conf, see man page for resolvconf):
search dev.com
nameserver 192.168.1.65
Install Likewise Open:
sudo apt-get install likewise-open5
You can now join the domain with this command (where dev.com is the domain and Administrator is an account with Admin access to the domain):
sudo domainjoin-cli join dev.com Administrator
Since I'm running a default server version of Ubuntu with no GUI, there is no need to reboot the server to be able to login to the server with domain accounts.

In order to login remember that you will need to use a valid username of this form domain\username.

I've not managed to get this command to add an entry for the server to the DNS server so I had to issue this command:
sudo lw-update-dns
Finally, in order to allow domain users to use sudo, you can add this line to the /etc/sudoers file, remember to edit this file with visudo. The first will allow sudo to all domain users, the second line will only allow domain admins sudo access.
%dev\\domain^users ALL=(ALL) ALL 
%dev\\domain^admins ALL=(ALL) ALL
Another upside of using Likewise Open is that users don't need to have their Unix attributes set, which I guess means that it's probably not necessary to install the Identity Management for UNIX components on the domain controller.

My post on how to set SSH single sign-on for Ubuntu 12.04, applies for 12.10 so I won't bother with a new post for single sign-on.

Saturday 20 October 2012

Check whether database exists using PowerShell

I've using this function to check for the existence of databases for a while, there is one problem with it though and that is it will only run if Microsoft.SqlServer.Smo is in the server, or put another way, SQL server is installed. Thus far this has not been a problem, but yesterday after spending a good hour [during a meeting, I can multitask despite being a bloke] and failing to get this running remotely, I thought that I would try a simpler way.
# This function determines whether a database exists in the system.
Function IsDBInstalled([string]$sqlServer, [string]$DBName)
{
 $exists = $FALSE
 try 
 {

  # we set this to null so that nothing is displayed
  $null = [reflection.assembly]::LoadWithPartialName("Microsoft.SqlServer.Smo")
   
  # Get reference to database instance
  $server = new-object ("Microsoft.SqlServer.Management.Smo.Server") $sqlServer
   
  foreach($db in $server.databases)
  {  
   if ($db.name -eq $DBName) 
   {
    $exists = $TRUE
   }
  }
 }
 catch 
 {
  Write-Error "Failed to connect to $sqlServer"
 }
 # Return
 Write-Output $exists
}

This function will work pretty much everywhere. It's not the most elegant way of doing it but it does the job. You can choose simply to catch the exception and not do anything with it and the results would be neater but I like catching exceptions. 

# This function determines whether a database exists in the system.
Function IsDBInstalled([string]$sqlServer, [string]$DBName)
{
 $exists = $FALSE
 try
 {
  $conn = New-Object system.Data.SqlClient.SqlConnection
  $conn.connectionstring = [string]::format("Server={0};Database={1};Integrated Security=SSPI;",$sqlServer,$DBName)
  $conn.open()
  $exists = $true
 }
 catch
 {
  Write-Error "Failed to connect to DB $DBNAME on $sqlServer"
 }
 
 Write-Output $exists
}
Note that we use integrated windows authentication so that there is no need to bother with credentials.

Friday 19 October 2012

Install IIS 7.x from Powershell

This post is a follow on from this post. A few days ago I needed to install the whole shebang, rather than just a few features for IIS, so the script below can be used to install IIS as used in our environment.

The list of features includes everything that was installed in our Web Server at the time. I'm fairly certain that we don't need Web-Client-Auth, which relates to client authenticated SSL, but there you go.

The script stops if installation of any feature fails you might not want that, but we do.

The script would be more flexible if it read the features from file but then I would need to distribute two files rather than one. At any rate, you could use $windowsfeatures = Get-Content filename.txt to read from a file instead.
import-module servermanager

$windowsfeatures = @("Web-Server","Web-WebServer","Web-Common-Http","Web-Static-Content","Web-Default-Doc","Web-Http-Errors","Web-App-Dev","Web-Asp-Net","Web-Net-Ext","Web-ISAPI-Ext","Web-ISAPI-Filter","Web-Security","Web-Windows-Auth","Web-Filtering","Web-Performance","Web-Stat-Compression","Web-Dyn-Compression","Web-Mgmt-Tools","Web-Mgmt-Console","Web-Mgmt-Compat","Web-Metabase","Web-Dir-Browsing","Web-IP-Security","Web-Mgmt-Service","Web-Http-Logging","Web-Cert-Auth","Web-Client-Auth")

foreach ($feature in $windowsfeatures)
{

$state = Get-WindowsFeature -Name $feature.trim()

 if ($state.Installed -eq $true)
 {
  Write-Host "$feature is already installed"
 }
 else
 {
  Write-Host "Installing $feature"

  $result = add-windowsfeature $feature.trim()

  if (([System.Convert]::ToBoolean($result.Success)))
  {
   Write-Host "$feature has been installed"
  }
  else
  {
   Write-Host "An error occurred installing $feature"
   exit
  }
 }
}

Write-Host "All Role Services have been Installed"

remove-module servermanager

Wednesday 17 October 2012

Unlocking files that are in use using ProcessExplorer

This morning builds started failing in our TFS 2010 server due to a file being in use. It turns out that the file was being used by the backup process, god knows why they were backing up the build area but that is by the by.

After a lot of recommendations about different software, I found this post, which suggests using Process Explorer from Sysinternals, which was exactly what I needed as it was already in the server.

In this example I just used PowerShell to create a new instance of StreamWriter, which writes to a file called test.txt, thus creating a locked file, but the idea is the same for any locked file. 
  1. Start Process Explorer.
  2. Press Ctrl + F to look for handles on files.
  3. Enter the name of the locked file.
  4. Double click on it, which will take you to the file handle itself.
  5. Right Click on it and select Close Handle
  6. Click Yes.

Tuesday 16 October 2012

Configure TFS 2010 as a build server - part 2

In part one of the series, I discussed how to install the build server role for TFS 2010.

Part 2 is a very short post with a list of pre-requisites before builds will work:

From the TFS 2010 server:
  1. Install Visual Studio 2010 Shell, which can be obtained here.
  2. Install Wix 3.x. Version 3.6 can be found here.
  3. Install Enterprise Library 5.0, which can be found here
If you have no need for Wix or the enterprise library you can skip steps 2 and 3.I do, so that's why they were installed.

In part 3 of the series I will discuss how to create build definitions.

Monday 15 October 2012

Configure TFS 2010 as a build server - part 1

After a few weeks of trying to find the time I finally got around configuring our TFS 2010 server as a build server. Due to a dearth of servers in our environment our TFS server is actually an all in one server, DB included.

The only pre-requisite is an already configured instance of TFS 2010 and a default collection created.
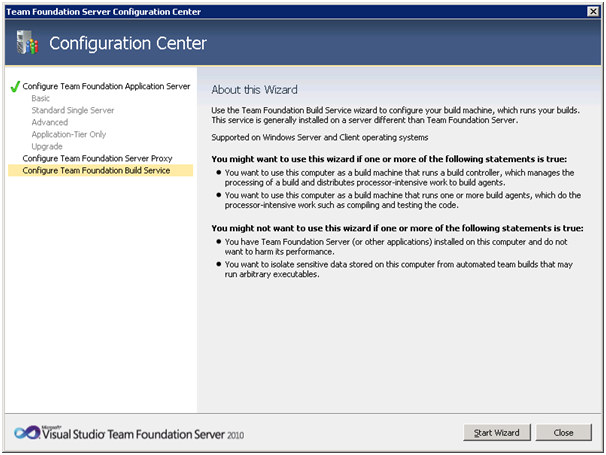
  1. Start Team foundation server administration console. (Start| All programs | Microsoft Team Foundation 2010 | Team foundation server administration console)
  2. On the  Build Configuration item, click on Configure Installed Features, which will start this wizard.
  3. Ensure Configure Team Foundation Build Service is selected and Click Start Wizard.
  4. Click Next.
  5. Select the relevant collection, in our case we are using the default collection and click Next.
  6. Click Next
  7.  Enter User Credentials and click Next.
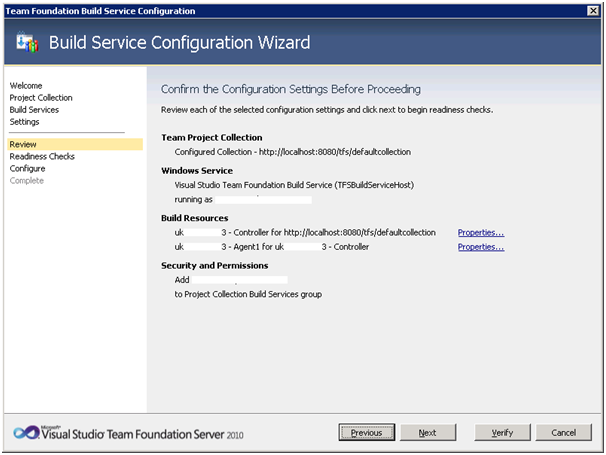
  8. Click Verify. [The warning is due to the Widnwos Firewall being switched off]
  9. Click Configure.
  10. Configuration should only take a few minutes.
  11. Configuration Completed.

At this point TFS is ready to start, however there are a few things that need to be installed in order for it to work properly. I will discuss these in in part 2. discuss the ne

Sunday 14 October 2012

Conditionally add a registry key value using Wix

We always seem to have difficulties with WPRCTokens in MS Dynamics CRM when we are load testing, so we normally set a registry entry in the MSCRM registry part called IgnoreTokenChecks to 1, this enables us to do load testing without any issues.  

Last week I was asked to include this in the build, which I thought it was a bad idea as it only seems to be relevant for load testing. At any rate, I was overruled so here it is. (Note that I added the component disabletokenchecks to the main feature <ComponentRef Id='DisableTokenChecks'/>)
  <Property Id="DYNAMICS" >
    <RegistrySearch Id="DynamicsKey" Type="raw" Root="HKLM" Key="SOFTWARE\Microsoft\MSCRM" Name="roles" Win64="yes"/>
  </Property>
 
  <Component Id="DisableTokenChecks" Guid="B4F1008F-1CF2-4170-94A5-2466AB15E145" Win64="yes">
    <Condition>DYNAMICS</Condition>   
     <RegistryValue Id="value" Action="write" Type="integer" Value="1" Name="IgnoreTokenCheck" Root="HKLM" Key="SOFTWARE\Microsoft\MSCRM"/>     
  </Component>
A few things I had to grapple with:
  1. I was compiling in an old Windows XP machine, don't even ask why, which meant that I had to add Win64=yes to the component.
  2. The condition is there to ensure that it doesn't get installed in the web server. We have a web server that doesn't have CRM installed and an app server that does.
  3. The check in the condition is made for the roles key as this key is present in the app/web server but doesn't seem to be present in the DB server.


Saturday 13 October 2012

Run PowerShell script with different credentials

I was trying to run a PowerShell script with different credentials and for some reason it wasn't quite working.
This is what I was trying to do:
$secpass = ConvertTo-secureString "password" -asPlainText -Force

$cred = New-Object System.Management.Automation.PSCredential ("username",$secpass)

start-process powershell.exe -Credential $cred -ArgumentList  ".\Install.ps1 -serverfile .\servers.txt " 
I would get this error:
Start-Process : This command cannot be executed due to the error: Logon failure: unknown user name or bad password.
The thing is that I had used the credentials to do an invoke-command and they worked fine.
invoke-command -Credential $cred -ComputerName $server -ScriptBlock { Invoke-Expression "C:\temp\Install.ps1 -serverfile c:\temp\servers.txt" } 
So I did a bit of investigating:
PS C:\temp> $cred.GetNetworkCredential()
UserName Password Domain
username password
Which lead me to two questions:
  1. Where did I expect the domain to come from if I've not passed it in?
  2. Why did it work before?
At any rate, the solution is fairly obvious:
$secpass = ConvertTo-secureString "password" -asPlainText -Force

$cred = New-Object System.Management.Automation.PSCredential ("domain\username",$secpass)

start-process powershell.exe -Credential $cred -ArgumentList  ".\Install.ps1 -serverfile .\servers.txt " 
So now we get:
PS C:\temp> $cred.GetNetworkCredential()
UserName Password Domain
username password domain
The script now runs fine

Install and uninstall MSI remotely using PowerShell

In yesterday's post I discussed how to uninstall a msi using powershell in today's post I present a script to remotely install and uninstall msi to a list of servers.

In this project I'm working on at the moment we have two builds: one for the application servers and another for the database servers. As I mentioned yesterday we seem to be applying way too many builds so the whole business of logging on to the various servers (four in total), uninstalling the old build and installing the new build, so I've written this script to automate the whole lot.

Now it's simply a case of copying the zip file with the MSIs and this script to server one, extract them and run the script.

See below for an example server file.
 
Install Script:
 param ($serverfile, $targetdir, $domainname, $username, $password,$db)
 
 if (-not($serverfile) -or -not($targetdir) -or -not($domainname) -or -not($username) -or -not ($password) -or -not($db)) 
 {
   echo 'Script should be called like this:'
   echo 'Install -serverfile servers -targetdir "c:\PSS\" -domainname "pss" -username "pss_svc" -password "notsecure" -db "db instance"'
   exit
 }
 
 #default to c:\temp, this needs to be in the server
 $dest = 'c$\temp\'
 
 #This is really good as it allows us to have some sort of type safety
 $srvs = Import-Csv $serverfile
 
 foreach ($item in $srvs) 
 { 
  if ($item.Type -eq "App" )
  {
     $name = $item.Hostname
     $path = [string]::Format("\\{0}\{1}", $item.HostName,$dest)
 
     New-Item -ItemType directory -Path $path -Force > $null
    
     echo "Copying PSS Deployment.msi to $name"
 
     Copy-Item -Path '.\Deployment.msi' -Destination $path -Force
 
     $wmi = [string]::Format("\\{0}\ROOT\CIMV2:Win32_Product",$item.Hostname)
  
     #check that PSS App it's not already installed.
 
     echo 'Checking for an already installed version of PSS Application'
     
     $app = Get-WmiObject -Class "Win32_Product" -ComputerName "$name" | where-object {$_.Name -match "PSS Application"}
     
     if ($app)
     {    
      $version = $app.Version
      
      echo "PSS Application is already installed. Current Version is $version"     
      echo "Uninstalling $version"
               
      $app.uninstall() > $null
     
     }
     
     echo "Start Install of PSS Application"
 
     $product = [WMIClass]$wmi
     $var = $product.Install("c:\temp\Deployment.msi", "TARGETDIR=$targetdir DOMAINNAME=$domainname USER=$username PASSWORD=$password", $true)
    
 
     if ($var.ReturnValue -ne 0)
     { 
       echo "Error installing PSS Deployment.msi on $name"
       $exit = [string]::Format("exitcode: {0}", $var.ReturnValue)
       echo $exit
     }   
 
     echo "Installed  on $name"
  }  
  elseif ($item.Type -eq "DB" )
  {
     $name = $item.Hostname
     $path = [string]::Format("\\{0}\{1}", $item.HostName,$dest)
 
     New-Item -ItemType directory -Path $path -Force > $null
    
     echo "Copying PSS Database.msi to $name"
 
     Copy-Item -Path '.\Database.msi' -Destination $path -Force
 
     $wmi = [string]::Format("\\{0}\ROOT\CIMV2:Win32_Product",$item.Hostname)
  
     #check that  it's not already installed.
 
     echo 'Checking for an already installed version of PSS Database'
     
     $app = Get-WmiObject -Class "Win32_Product" -ComputerName "$name" | where-object {$_.Name -match "PSS Database"}
     
     if ($app)
     {    
      $version = $app.Version
      
      echo "PSS Database is already installed. Current Version is $version"     
      echo "Uninstalling $version"
               
      $app.uninstall() > $null
     
     }
     
     echo "Start Install PSS Database"
 
     $product = [WMIClass]$wmi 
     $var = $product.Install("c:\temp\Database.msi", "SQLSERVER=$db TARGETDIR=$targetdir DOMAINNAME=$domainname USER=$username PASSWORD=$password", $true)
  
 
     if ($var.ReturnValue -ne 0)
     { 
       echo "Error installing PSS Database.msi on $name"
       $exit = [string]::Format("exitcode: {0}", $var.ReturnValue)
       echo $exit
     }   
 
     echo "Installed  on $name"
 
     }
          
  else
  {
   echo 'Unknown or missing type'
  }
 }

Example serverfile:
HostName,Type 
uk701,App 
uk702,App 
uk703,App 
uk704,DB
There are a few things that could be improved:
  1. I really should create a function rather than having the same piece of code twice.
  2. [string]::format is probably overkill but I couldn't get it to work otherwise.
  3. I should really only run the uninstall if an exitcode of 1638 is received from the install but at the moment the builds are always there so it seemed pointless.
  4. Hard coding of paths is a bad idea even if to c:\temp

Friday 12 October 2012

Uninstall Wix Msi using PowerShell

We've been doing way too many builds recently and the old routine of uninstalling the old build before running the build was getting tired so I did a bit of digging and found out how to remove an msi using PowerShell:

This is the part of the script that uninstalls the old build:

$data = gp HKLM:\Software\Microsoft\Windows\CurrentVersion\Uninstall\* | Select 
DisplayName, DisplayVersion | where {$_ -match "MyApplication"}

if ($data)
{
 $version = $data.DisplayVersion

 echo "MyApplication  is already installed. Current Version is $version"

 echo "Uninstalling version $version"

 $app = Get-WmiObject -Class Win32_product | Where-Object { $_.Name -match "MyApplication"}

 $app.Uninstall() > $null
}
The main downside of this method is that it is very slow, but the upside is that it does not require manual intervention, so it allows one to get on with other stuff. Sending the output of the $app.uninstall() call to $null ensures that no output is displayed to the screen. It might be desirable to provide some output.

$exitcode = $app.Uninstall()
echo "exit code: $($var.ReturnValue)"

Wednesday 10 October 2012

Add a Radio Button Group to Wix Installer

I spent a good hour yesterday banging my head against the Wix wall again. I was trying to add a radio button to an installer, but not matter what I did the buttons would not be displayed.

It took me far too long to realize that the positions of the Radiobuttons are relative to the Radiobuttongroup control. The problem was that I was setting positions for the page, which meant that they were miles off and not being displayed.

The property is used to set some values in a config file.

This is what I ended up using:

I defined this property in the Product.wxs

<Property Id="AUTH" Secure="yes" Value="False"/>

and used this in the UI.wxs file
 <Dialog Id="UserDetailsDlg" Width="370" Height="270" Title="[ProductName] Setup">
   <Control Id="Title" Type="Text" X="15" Y="6" Width="200" Height="15" Transparent="yes" NoPrefix="yes" Text="{\WixUI_Font_Title}Service Details" />
   <Control Id="Description" Type="Text" X="25" Y="23" Width="280" Height="15" Transparent="yes" NoPrefix="yes" Text="Enter Service Details" />
   <Control Id="BannerBitmap" Type="Bitmap" X="0" Y="0" Width="370" Height="44" TabSkip="no" Text="!(loc.InstallDirDlgBannerBitmap)" />
   <Control Id="BannerLine" Type="Line" X="0" Y="44" Width="370" Height="0" />
   <Control Id="DomainNameLabel" Type="Text" X="20" Y="70" Width="135" Height="13" Text="Domain:" />
   <Control Id="DomainName" Type="Edit" X="161" Y="70" Width="180" Height="15" Property="DOMAINNAME" />
   <Control Id="UserNameLabel" Type="Text" X="20" Y="90" Width="135" Height="13" Text="User Name:" />
   <Control Id="UserName" Type="Edit" X="161" Y="90" Width="180" Height="15" Property="USER"  />
   <Control Id="PasswordLabel" Type="Text" X="20" Y="110" Width="135" Height="13" Text="Password:" />
   <Control Id="Password" Type="Edit" Password="yes" X="161" Y="110" Width="180" Height="15" Property="PASSWORD" />
   <Control Id="LBLabel" Type="Text" X="20" Y="150" Width="135" Height="13" Text="Load Balancer:" />
   <Control Id="LB" Type="Edit" X="161" Y="150" Width="180" Height="15" Property="LB" />
   <Control Type="Text" Id="ADFSLabel" Width="50" Height="17" X="20" Y="190" Text="ADFS"/>
   
   
   <Control Type="RadioButtonGroup" Property="AUTH" Id="AUTH" Width="144" Height="44" X="161" Y="190">
     <RadioButtonGroup Property="AUTH">
       <RadioButton Text="Integrated Authentication" Height="13" Value="False" Width="150" X="0" Y="0" />
       <RadioButton Text="ADFS" Height="13" Value="True" Width="50" X="0" Y="15" />
     </RadioButtonGroup>
   </Control>
   
   
   <Control Id="BottomLine" Type="Line" X="0" Y="234" Width="370" Height="0" />
   <Control Id="Next" Type="PushButton" X="236" Y="243" Width="56" Height="17" Default="yes" Text="Next">
     <Condition Action="disable">
       (USER = "") OR (PASSWORD = "") OR (DOMAINNAME = "")  OR (LB = "")
     </Condition>
     <Condition Action="enable">
       <![CDATA[(USER <> "") AND (PASSWORD <> "") AND (DOMAINNAME <>"")  AND (LB <> "")  ]]>
     </Condition>
   </Control>
   <Control Id="Back" Type="PushButton" X="180" Y="243" Width="56" Height="17" Text="Back" />
   <Control Id="Cancel" Type="PushButton" X="304" Y="243" Width="56" Height="17" Cancel="yes" Text="Cancel">
     <Publish Event="SpawnDialog" Value="CancelDlg">1</Publish>
   </Control>
 </Dialog>