Monday 23 April 2012

Run Linpack (HPL) on an HPC (beowulf-style) cluster using CentOS 6.2


A few weeks ago I attended a symposium on HPC and Open Source and ever since I've been wanting to set up my own HPC cluster. So I did, here are the instructions to set up an HPC cluster using CentOS 6.2. 

I have set up a two node cluster, but these instructions could be used for any number of nodes. The servers I've used only have a single 74 GB hard drive, a single NIC, 8 GB of RAM and 2 quad core CPUs, so that the cluster has 16 cores and 16 GB of RAM.
  1. Install CentOS using a minimum install to ensure that the smallest amount of packages get installed.
  2. Enable NIC by editing NIC config file (/etc/sysconfig/network-scripts/ifcfg-eth0) (I used the text install and it seems to leave the NIC disabled, but it's quicker to navigate from the ILO interface):
  3. DEVICE="eth0"
    ONBOOT="yes"
    BOOTPROTO=dhcp
  4. Disable and stop the firewall (I'm assuming no internet access for your cluster, of course):
    chkconfig iptables off; service iptables stop
  5. Install ssh clients and man. This installs the ssh client and scp among others things as well as man, which is always handy to have:
    yum -y install openssh-clients man
  6. Modify ssh client configuration to allow seamless addition of hosts to the cluster. Add this line to /etc/ssh/ssh_config (Note that this is a security risk if your cluster has access to the internet):
    StrictHostKeyChecking no
  7. Generate pass-phrase free key. This will make it easier to add hosts to the cluster (just press enter repeatedly after running ssh-keygen):
    ssh-keygen
  8. Install compilers and libraries (Note that development packages were obtained from here and yum was run from the directory containing them):
    yum -y install gcc gcc-c++ atlas blas lapack  mpich2 make mpich2-devel atlas-devel
  9. Add node hostname to /etc/hosts.
  10. Create file /$(HOME)/hosts and add node hostname to it.
This creates a single node and thus it would be a bit of a stretch to call it a cluster, but adding extra nodes is as simple as repeating steps 1-9.  A few extra steps are needed, though, to ensure smooth running:
  1. Add each extra node to the hosts file (/etc/hosts) of all nodes [A DNS server could be set up instead.] and to (/$(HOME)/hosts).
  2. Copy key generated in step 5 to all nodes (If you don't have a head node, i.e. a node that does not do any calculations, remember to add the key to itself too):
    ssh-copy-id hostname
I have not made any comments on networking and this is because the servers that I have been using only have a single NIC as mentioned above. There are gains to be made by forcing as much intra-node communication as possible through the loopback interface, but this requires unique (/etc/hosts) files for each node and my original plan was to set up a 16 node cluster.

SELinux does not seem to have any negative effects, so I have left it on. I plan to test without it to see whether performance is improved.

At this point all that remains is to add some software that can run on the cluster and there is nothing better than HPL or Linpack, which is widely used to measure cluster efficiency (the ratio between theoretical and actual performance). Do the following steps on all nodes:
  1. Download HPL from netlib.org and extract it to your home directory.
  2. Copy Make.Linux_PII_CBLAS file from  $(HOME)/hpl-2.0/setup/ to $(HOME)/hpl-2.0/
  3. Edit Make.Linux_PII_CBLAS file (Changes in Bold. Note that the MPI section is commented out):
  4. # ----------------------------------------------------------------------
    # - HPL Directory Structure / HPL library ------------------------------
    # ----------------------------------------------------------------------
    #
    TOPdir       = $(HOME)/hpl-2.0
    INCdir       = $(TOPdir)/include
    BINdir       = $(TOPdir)/bin/$(ARCH)
    LIBdir       = $(TOPdir)/lib/$(ARCH)
    #
    HPLlib       = $(LIBdir)/libhpl.a
    #
    # ----------------------------------------------------------------------
    # - Message Passing library (MPI) --------------------------------------
    # ----------------------------------------------------------------------
    # MPinc tells the  C  compiler where to find the Message Passing library
    # header files,  MPlib  is defined  to be the name of  the library to be
    # used. The variable MPdir is only used for defining MPinc and MPlib.
    #
    #MPdir        = /usr/lib64/mpich2
    #MPinc        = -I$(MPdir)/include
    #MPlib        = $(MPdir)/lib/libmpich.a
    #
    # ----------------------------------------------------------------------
    # - Linear Algebra library (BLAS or VSIPL) -----------------------------
    # ----------------------------------------------------------------------
    # LAinc tells the  C  compiler where to find the Linear Algebra  library
    # header files,  LAlib  is defined  to be the name of  the library to be
    # used. The variable LAdir is only used for defining LAinc and LAlib.
    #
    LAdir        = /usr/lib64/atlas
    LAinc        =
    LAlib        = $(LAdir)/libcblas.a $(LAdir)/libatlas.a
    # ----------------------------------------------------------------------
    # - Compilers / linkers - Optimization flags ---------------------------
    # ----------------------------------------------------------------------
    #
    CC           = /usr/bin/mpicc
    CCNOOPT      = $(HPL_DEFS)
    CCFLAGS      = $(HPL_DEFS) -fomit-frame-pointer -O3 -funroll-loops
    #
    # On some platforms,  it is necessary  to use the Fortran linker to find
    # the Fortran internals used in the BLAS library.
    #
    LINKER       = /usr/bin/mpicc
    LINKFLAGS    = $(CCFLAGS)
    #
    ARCHIVER     = ar
    ARFLAGS      = r
    RANLIB       = echo
    #
    # ----------------------------------------------------------------------
  5. Run make arch=Linux_PII_CBLAS.  
  6. You can now run Linpack (on a single node):
     cd bin/Linux_PII_CBLAS
    mpiexec.hydra -n 4 ./xhpl 
Repeat steps 1- 5 on all nodes and the you can now run Linpack on all nodes like this (from directory $(HOME)/hpl-2.0/Linux_PII_CBLAS/ ):
mpiexec.hydra -f /$(HOME)/hosts -n x ./xhpl 
where x is the number of cores in your cluster.

For results of running Linpack, see my next post here.

Friday 20 April 2012

Find installed location of RPM Package

I've been trying to run HPL on a homemade HPC (in the loosest sense of the word) cluster and I was struggling with some of the dependencies.

Rather than compile from source, I had decided to use the available binaries for various packages, so I needed to find out where the libraries where actually held, with the added problem of not being fully aware of the names of what I was looking for. Enter the rpm tool and its myriad options:
Usage: rpm [-aKfgpWHqVcdilsKiv?] [-a|--all] [-f|--file] [-g|--group] [-p|--package] [-W|--ftswalk] [--pkgid] [--hdrid] [--fileid] [--specfile]   [--triggeredby] [--whatrequires] [--whatprovides] [--nomanifest] [-c|--configfiles] [-d|--docfiles] [--dump] [-l|--list] [--queryformat=QUERYFORMAT] [-s|--state] [--nofiledigest] [--nomd5] [--nofiles] [--nodeps] [--noscript] [--comfollow] [--logical] [--nochdir] [--nostat] [--physical] [--seedot] [--xdev] [--whiteout] [--addsign] [-K|--checksig] [--delsign] [--import] [--resign] [--nodigest] [--nosignature] [--initdb] [--rebuilddb] [--aid] [--allfiles] [--allmatches] [--badreloc] [-e|--erase <package>+] [--excludedocs] [--excludepath=<path>] [--fileconflicts] [--force] [-F|--freshen <packagefile>+] [-h|--hash] [--ignorearch] [--ignoreos] [--ignoresize] [-i|--install] [--justdb] [--nodeps] [--nofiledigest] [--nomd5] [--nocontexts] [--noorder] [--nosuggest] [--noscripts] [--notriggers] [--oldpackage] [--percent] [--prefix=<dir>] [--relocate=<old>=<new>] [--replacefiles] [--replacepkgs] [--test] [-U|--upgrade <packagefile>+] [--quiet] [-D|--define 'MACRO EXPR'] [-E|--eval 'EXPR'] [--macros=<FILE:...>] [--nodigest] [--nosignature] [--rcfile=<FILE:...>] [-r|--root ROOT] [--querytags] [--showrc] [--quiet] [-v|--verbose] [--version] [-?|--help] [--usage] [--scripts] [--setperms] [--setugids] [--conflicts] [--obsoletes] [--provides] [--requires] [--info] [--changelog] [--xml] [--triggers] [--last] [--dupes] [--filesbypkg] [--fileclass] [--filecolor] [--fscontext] [--fileprovide] [--filerequire] [--filecaps]
Since I knew the package name I could run rpm -qi mpich2, which provides loads of information, but crucially not where the files are located:
Name        : mpich2                       Relocations: (not relocatable)
Version     : 1.2.1                             Vendor: CentOS
Release     : 2.3.el6                       Build Date: Fri 12 Nov 2010 05:23:32 AM GMT
Install Date: Wed 18 Apr 2012 10:29:31 AM BST      Build Host: c5b2.bsys.dev.centos.org
Group       : Development/Libraries         Source RPM: mpich2-1.2.1-2.3.el6.src.rpm
Size        : 7302214                          License: MIT
Signature   : RSA/8, Sun 03 Jul 2011 05:45:52 AM BST, Key ID 0946fca2c105b9de
Packager    : CentOS BuildSystem <http://bugs.centos.org>
URL         : http://www.mcs.anl.gov/research/projects/mpich2
Summary     : A high-performance implementation of MPI
Description :
MPICH2 is a high-performance and widely portable implementation of the
MPI standard. This release has all MPI-2.1 functions and features
required by the standard with the exeption of support for the
"external32" portable I/O format.

The mpich2 binaries in this RPM packages were configured to use the default
process manager 'MPD' using the default device 'ch3'. The ch3 device
was configured with support for the nemesis channel that allows for
shared-memory and TCP/IP sockets based communication.

This build also include support for using '/usr/sbin/alternatives'
and/or the 'module environment' to select which MPI implementation to use
when multiple implementations are installed.
In order to find where the files are actually located I had to run rpm -ql mpich2, which provides the required information:
/etc/mpich2-x86_64
/etc/mpich2-x86_64/mpe_callstack_ldflags.conf
....
/usr/share/man/mpich2/man1/mpif90.1.gz

Thursday 19 April 2012

Weird characters displayed in Linux

I was compiling HPL today and I was getting this error, among others:
 error: expected declaration specifiers or â...â before âMPI_Commâ
I have seen this encoding issue in some man pages too and had simply ignored it, but today I thought I've had enough so I looked for a solution. The solution is very simple:
export LC_ALL=C
 The output now is:
error: expected declaration specifiers or '...' before 'MPI_Comm'
Don't forget to add it to your .bashrc file (/home/username/.bashrc) to make the change permanent.

Monday 16 April 2012

Add new disk to VMware linux guest without rebooting

I've been helping out jimmy with performance testing of the pmsapp and I was trying to rebuild the array for testing of RAID 5 performance when I found this little beauty to obviate the need for a reboot after adding a hard drive to an guest (VM) in linux.

In essence, once the disk has been added to the guest, run this:
echo "- - -" > /sys/class/scsi_host/host#/scan
substitute # with the appropriate number.

You can check that it has been successfully added to the system with: 
fdisk -l | grep MB

Friday 13 April 2012

MB2-867- Microsoft Dynamics CRM 2011 Installation and Deployment

I passed the MB2-867 exam today. I got a score of 933, which means that I got 69 out of 74 questions right. To be honest, there were only three questions that I was really clueless about and about another 3 that I wasn't sure about, so all in all a good result.

Tuesday 10 April 2012

Six Stages of Debugging

I found this today (here) and it made me chuckle, so true:

  1. That can’t happen.
  2. That doesn’t happen on my machine.
  3. That shouldn’t happen.
  4. Why does that happen?
  5. Oh, I see.
  6. How did that ever work?

Friday 6 April 2012

Configure MS Dynamics CRM 2011 E-mail Router - part 2

In part 1, I showed how to configure the MS Dynamics CRM 2011 E-mail Router and in this brief post I will show how to configure users to use the e-mail router and the various tracking options.

Open up a user record from Settings | System | Administration | Users.

On E-mail Access Configuration set both Incoming and Outgoing to: E-mail Router as shown below.


Each user can select different tracking options, to do this, users need to go to: File | Options | E-mail


The default option is to track E-mail messages in response to CRM e-mail. This option relies on e-mail correlation, so it is worth having a look at the e-mail correlation settings to ensure that they are sensible.

You can check the e-mail correlation settings from: Settings | System | Administration | System Settings | E-mail.


A tracking token can be used to improve matching accuracy. Adjust the number of digits to match number of users and e-mail frequency. e.g. set Number of digits for user numbers to 3 if fewer than 999 users will be using the system.

In part 3 I will discuss the use of a forward mailbox, which is the recommended option for large deployments.

Thursday 5 April 2012

Configure MS Dynamics CRM 2011 E-mail Router - part 1

I’ve been getting ready to take the MB2-867 exam: Microsoft Dynamics CRM 2011 Installation and Deployment for the past month or so, and this time I decided that I wanted to earn the certification rather than just pass it. So I installed and configured the E-mail router. Even though, I’ve been using MS Dynamics CRM since version 3.0, I’ve never had the need to use the e-mail router, so this was a bit of a first for me and I thought I would share it here.

I have modeled here the configuration used in our production deployment, where the users are grouped according to their geographical sites, so that there is an OU in AD for each geographical site. Thus, in this example, CRMUsers is meant to represent a single geographical office or site and is a daughter OU of CRM2011. Note, that permissions have deliberately been prevented from cascading as this is company policy here.

Pre-requisites:
  •  MS Dynamics CRM 2011 fully installed (i.e. either in one server or all roles installed in various servers).
  •  MS Exchange 2010 SP1 installed, configured and working
  • Admin access to AD and Exchange.
  • Installed MAPI libraries (http://www.microsoft.com/download/en/details.aspx?id=1004) on server that will run the E-mail router (Either a separate server or the MS Dynamics CRM server).
  • Installed E-mail router (no pending reboots).
  • Domain User Account that is member of Domain Users and local Administrators group in server running the E-mail router (ERSA in this case, E-mail Router Service Account).
The installation is very straight forward so I’ve decided not to discuss it here. I have concentrated on the configuration side. The following steps will describe how to configure the E-mail router:
  1. Add user ERSA to MS Dynamics CRM organization.
  2. Give ERSA user the System Administrator role.
  3. Add user ERSA to PrivUserGroup group.
  4. Change user running email router service to user ERSA.
  5. Create mailbox for user ERSA.
  6. Login to OWA or outlook to complete mailbox creation.
  7. Re-start email router service.
  8. Create CRMUSers OU in AD.
  9. Place all MS Dynamics CRM users in this OU (This is really only needed for users that will be sending emails from MS Dynamics CRM 2011).
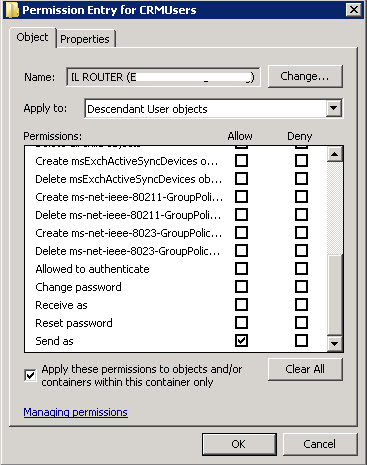
  10. Add send as permissions for ERSA to the users inside the CRMUSers OU. 

    1. Go to CRMUsers OU | Properties | Security | Advanced | Add.
    2. Type ERSA | Check Names | Click OK.
    3. Ensure settings are as per screenshot below (If you want the permission to cascade down do not tick the check box).

  11.  From the Exchange Management Shell, create a new Management Scope:
  12. New-ManagementScope -Name:"ReportingGroup" -RecipientRestrictionFilter {MemberofGroup -eq "CN=ReportingGroup {b0c96867-26af-446c-8b7de5cd3c89a1bd},OU=CRM2011,DC=dev,DC=org"}
  13. Assign ApplicationImpersonation Role to scope:
    New-ManagementRoleAssignment -Name:"ERSA" -User:"ERSA" -Role:"ApplicationImpersonation" -CustomRecipientWriteScope:"ReportingGroup"
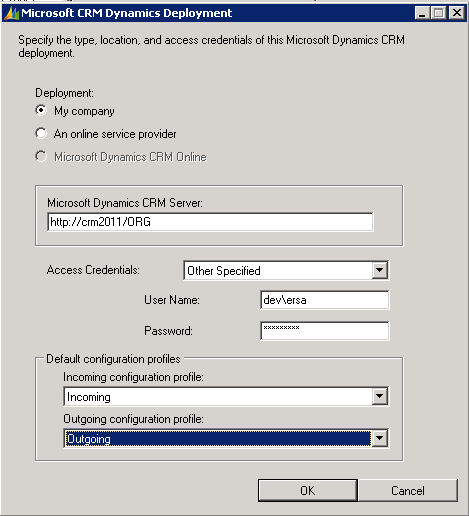
  14. From the E-mail router server; launch E-mail Router Configuration Wizard: 

  15. On the Configuration Profiles tab; select New to create an Incoming Profile.

    Select New to create an Outgoing Profile.

    On the Deployments tab; click New to create a New profile.

    On the Users, Queues and Forward Mailboxes; click Load Data.

    Select any user and click Test Access.

There are two important points to make about step 11: 

The ReportingGroup for each organization, will, by default, contain all users in that organization, so I thought that it was the perfect candidate for this task. Clearly, in multi-tenant situations, multiple management scopes will be needed if this approach is followed. This may or may not be acceptable. The alternative would be to create a new group and make all MS Dynamics CRM Users that need email access members of this group.

The second point is that an OU does not list its membership, so it is not possible to simply try, on step 11, "MemberofGroup -eq "OU=CRMUSers,DC=Dev,DC=org" annoyingly it is a perfectly valid Management Scope, just one that contains no members. So it will be created but will not work.

In part 2, I will show how to configure users to use the email router and the various tracking options.

Tuesday 3 April 2012

Restart a Windows Server from a Linux Server

I stumbled upon this little beauty today:
net rpc shutdown -r -W dev -U localadmin -S hostname
-W workgroup or domain
-U user that is able to switch off windows box
-S Hostname of windows box (-I can be used instead of -S to provide an IP address)

In essence this is the shutdown command in Windows that is being sent from Linux via RPC.

In order to shut the windows server down, one could use this:
net rpc shutdown  -W dev -U localadmin -S hostname

The system load quota of 1000 requests per 2 seconds has been exceeded

I was trying to create a couple of mailboxes from the Exchange Management Console this morning in our exchange server (in dev) but I kept getting this error whenever I tried to do;  well,  just about anything:


The solution was very simple:
iisreset
If only everything was so easy in life.