Monday 15 December 2014

OrganizationServiceContext performance in MS Dynamic CRM 2013

The OrganizationServiceContext has a SaveChanges method that essentially does what it says on tin, namely the changes on the objects back to the database.

I've never used this method, preferring to use the regular Update method  on the IOrganizationService instead, but last week I had a moment of doubt, what if it is faster, what if it's multi-threaded, so I decided to run some tests to see whether there was any performance difference, spoiler alert: There wasn't
The tests consisted of the update of a three fields on the account entity for 2000 accounts and were run from an idle CRM server to minimize the influence of network traffic.

Results shown below are for the average of the three runs I did, except for the parallel version, using Parallel.ForEach, where it shows the single run I did.

OrganizationServiceContext IOrganizationService IOrganizationService (Parallel)
126.7 s 130.1 s 49.6 s

My fears were unfounded and the SaveChanges method, while slightly faster in these tests, does not seem to be appreciatively faster.

The difference is less than 3% and the slowest run using the OrganizationServiceContext was basically the same as the fastest with IOrganizationService : ~129 s


Saturday 13 December 2014

Housework

Over the past three and half months my lovely girlfriend has been suffering from terrible eczema, so she's basically not been helping much with the household chores, which is why I've been looking at how long I've spend doing housework everyday.

I have been measured how long I spent doing work and what sort of work it was. The measurements almost certainly an underestimate as I've probably missed little tasks here and there, e.g. cleaning up a spill or any such ad hoc task.

I've broken down the tasks in three categories: Cooking, Cleaning and Miscellaneous.

The first two are self explanatory, although it's worth mentioning that when it comes to cooking I have only counted the preparation time, except for when the cooking time was so short that it would not really allow me to do anything else, in practice this only has significant a bearing in Sundays figures as we normally have pancakes, french toast or eggs Benedict for breakfast.

Miscellaneous is anything that is not cooking or cleaning, e.g. tidying up, putting the washing away, etc..

We live in a, small?, two bedroom apartment (about 60 m2) and have no children or pets, don't eat out much (twice a month since the data keeping started) and mostly cook from scratch, so without further ado, these are the figures:

Total:


As a percentage:


Friday 21 November 2014

TIL - Solving Out of Memory exceptions in .NET

So yesterday I was playing about with a high memory VM in Azure and I wrote a little app to swallow the server's RAM whole.
Only thing is that it stopped running and didn't swallow the server's RAM whole.

So I changed the build to x64, but no dice.

After a bit of googling, it turn out that by default there is a limit that needs to be defeated, the 2 GB limit and it can be defeated by adding the following to the config file.
<configuration>
 <runtime>
  <gcAllowVeryLargeObjects enabled="true" />
 </runtime>
</configuration>

Thursday 20 November 2014

Introduction to the Cloud with Microsoft Azure - Part 2

Following from the previous post, I will continue explaining the features that Azure offers for VMs.

The first feature I want to discuss is the Dashboard, which allows you to have a view of what your VM is doing.


A very nice feature of Azure VMs is alerting, in essence, you can get notified once a certain threshold has been exceed. In the example below will set an alert to email the administrator if CPU exceeds 80% for more than 5 minutes.

Click on Monitor and Select the Metric that you want and alert for and then Click add Rule


The next feature I want to cover is the firewall. When a new machine is provisioned the firewall will only be opened for PowerShell and Remote Desktop/SSH

You can see this by navigating to Virtual Machines -> <YourVM> -> Dashboard -> Endpoints


Let's add a new rule. Just Click Add and follow the screens below:


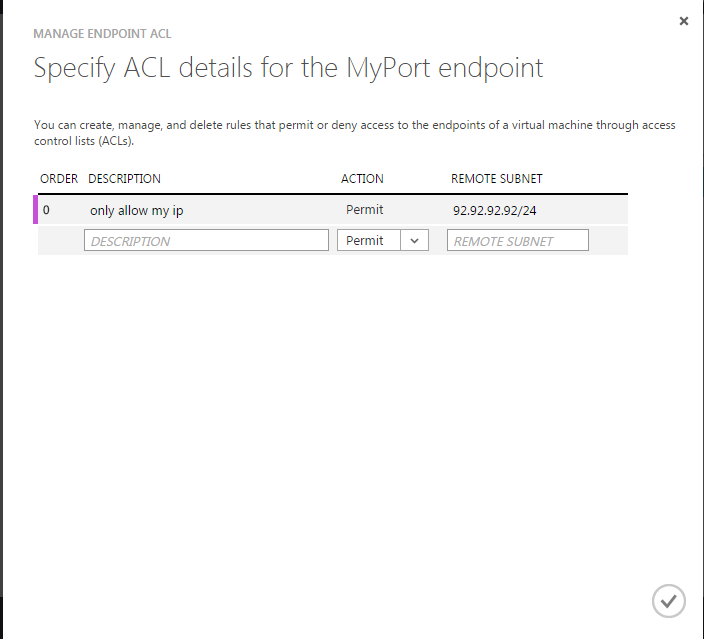
It is possible to specify ACLs for firewall rules, so below I've added a rule for my IP address, note that this only apply to the  particular rule selected when you clicked manage ACL:


Finally, one of my favourite features. Configuring the VM itself. It is possible to change the sizing of the VM here, but this will effectively take offline for a few minutes:


I haven't covered availability sets and a few other features, which I guess will have to wait until part 3.

Wednesday 12 November 2014

Introduction to the Cloud with Microsoft Azure - Part 1

My new company has been kind enough to provide me with an MSDN subscription, which comes with some Azure credits so I thought that I would try to make use of it.

I thought I would start with the easiest part and describe Virtual Machines in the cloud.

The first thing to bear in mind is that this is not a substitute for regular hosting providers, if you are going to be using your server 24/7, you would be worse off in the cloud. Take this small example:

At the time of writing, you can get a dedicated 16 CPUs, 64 GB of RAM, 1.2 TB of HDD and unmetered connection for £150 per month (123 hosting)

A comparable machine in Azure, A7 (8 CPUs, 56 GB of RAM, not sure how much HDD), will set you back £416 per month and that doesn't count data transfers or disk operations.

So, Why would anybody use Azure or any other cloud solution?

It's pay as you go, which means that you can have say, a test environment, and only use it when there is a release, this might mean that your usage is one out of every four weeks depending on your release scheduled and because you can turn it off while not in use, you might only pay for say 5 days or 2.5 days if you turn it off at the end of the day, so now the comparison looks more like:

Traditional Hosting: £150
Azure: £33.60 + Bandwidth + Disk Operations

A much better proposition.

At any rate, enough with the economics of the cloud.

Logging to the Azure Portal and navigate to Virtual Machines, where you'll find something like this:


Click on New -> Quick Create -> Create Virtual Machine

I've gone for gold and selected the most powerful machine.


You can also browse the gallery, if you don't like the OS options available or you want a pre-built machine. Say you want a Biztalk2013 image


Finally, when you've tired of all the playing about you can just delete it:

Navigate to Cloud Services -> Select the one you want to delete -> Click Delete -> Select Delete the cloud service and its deployments.


You can manage your VMs from Virtual Machines on the menu and I will go on more detail about it on my next post.

Tuesday 11 November 2014

I broke Ms Dynamics CRM 2013 today

So I have a custom workflow activity that has an output of a custom reference, something like this:

[Output("ClientRecord")]
[ReferenceTarget("new_clientrecord")]
public OutArgument<EntityReference> ClientRecord { get; set; }
And like idiot I did this:

ClientRecord.Set(executionContext, ClientRecordEntity);
where ClientRecordEntity is an Entity and not an EntityReference.
Running the Dialog that contained this workflow activity, resulted in a very, very long wait and after that, 503 for absolutely everybody using the dev environment.
A proud day, today
I broke CRM.

Saturday 8 November 2014

Visualization of Azure VM Pricing

I did a presentation on the merits of using Microsoft's Azure for a our development and test environments and here are a few of the plots I produced.

Pricing correct as of today (2014_11_08), see this for up to date pricing.

I tried to plot everything in one graph, but it didn't really work all that well.

Red indicates Standard A instance, Blue Basic A Instance and Green Standard D Instance.

Exhibit A:

 Exhibit B:


Alright then, let's try to split them up.

By Number of Cores first (Red indicates Standard A instance, Blue Basic A Instance and Green Standard D Instance):


By Memory (RAM) size (Red indicates Standard A instance, Blue Basic A Instance and Green Standard D Instance):


Tuesday 4 November 2014

Install and configure MariaDB.

This is a fairly easy objective:

Run the following command to install MariaDB:
sudo yum -y install mariadb mariadb-server
 To start and enable it so that it starts again post reboot:
systemctl start mariadb.service
systemctl enable mariadb.service
Finally, run this script (and follow the steps therein) to finalize the installation:
mysql_secure_installation 
I'm not entirely, if anything else is required by this objective to be honest and I'm a bit rusty with Linux, which is why I started with something easy.

Tuesday 28 October 2014

Limit Regarding Lookup in MS Dynamics CRM 2013

So Today we had an interesting requirement: We had a custom entity, called Paper, for which we wanted to limit the entities that could be selected for the regarding lookup.

I can't come up with a supported way of doing this so this is the unsupported way:

In essence, this will limit the Regarding to new_keyissue and new_goal.

You'll need to fire it on the onChange event like this, NEW.Paper.limitRegardingLookup.

if (typeof (NEW) == "undefined")
{ NEW = {}; }
NEW.Paper = {
    limitRegardingLookup: function () {
        
        var KeyIssueOTC = GetEntityTypeCode("new_keyissue");
        var goalOTC = GetEntityTypeCode("new_goal");
  
        var ObjectTypeCodeList = KeyIssueOTC + ", " + goalOTC;
        var LookupTypeNames = "new_keyissue:"+ KeyIssueOTC + ":Key Issues,new_goal:" + goalOTC + ":Goal";
        
 Xrm.Page.getControl("regardingobjectid").setFocus(true);
  
        document.getElementById("regardingobjectid_i").setAttribute("lookuptypes", ObjectTypeCodeList);
        document.getElementById("regardingobjectid_i").setAttribute("lookuptypenames", LookupTypeNames);
        document.getElementById("regardingobjectid_i").setAttribute("defaulttype", KeyIssueOTC);

    }
};

function GetEntityTypeCode(entityName) {
    try {
        var lookupService = new RemoteCommand("LookupService", "RetrieveTypeCode");
        lookupService.SetParameter("entityName", entityName);
        var result = lookupService.Execute();
        if (result.Success && typeof result.ReturnValue == "number") {
            return result.ReturnValue;
        }
        else {
            return null;
        }
    }
    catch (ex) {
        throw ex;
    }
}

Sunday 26 October 2014

Enable .NET Framework 3.5 in Windows 2012 Azure Virtual Machine (VM) - Error Code 0x800F0906

Yesterday I tried to install Ms SQL Server in a Azure VM that was running Windows 2012 R2, but it would complain about not being able to enable it.

So I tried from Server Manager and I got the following error:


Since this is a Azure VM, I don't think I should be downloading the Windows ISO, so ... well, it turns out that this is a known issue for which there is a fix, so all you need to do is apply the latest Windows updates and then it will install fine.

Control Panel -> Windows Updates


11 updates, WTF MS?


The one we care about.

The question I have is why in the name of all that is holy, isn't the fix already applied when the VM is provisioned? I get that MS can't just release a new image for every fix but preventing the install of SQL Server seems to be a big enough issue to warrant a new image, even if there are SQL Server VMs, but they are more expensive and .... at any rate, hope it saves people time.

I guess it's a matter of time, hopefully.

Monday 20 October 2014

Validating SharePoint file names in JavaScript

SharePoint limits the valid characters of file names, which can be a problem, so to prevent this issue, we use this function to validated filenames in our Web App that integrates with SharePoint.

var validateFileName = function (value){

var specialCharacters = new RegExp("[\\\\\/:*?\"<>|#{}%~&]");

if (specialCharacters.test(value)) {      
 return true;
}
else{
 return false;
}

}
Only thing to note is that \\\\ is needed to represent \ in the regular expression, see this for more details

Tuesday 30 September 2014

TIL - Format Guids to string in C#

Too long to explain, oh yes, it was SharePoint related, but I learnt today about various options for formatting Guids available in the framework:

Shameless copy and paste from this page.

Specifier
Format of return value
N
32 digits:
00000000000000000000000000000000
D
32 digits separated by hyphens:
00000000-0000-0000-0000-000000000000
B
32 digits separated by hyphens, enclosed in braces:
{00000000-0000-0000-0000-000000000000}
P
32 digits separated by hyphens, enclosed in parentheses:
(00000000-0000-0000-0000-000000000000)
X
Four hexadecimal values enclosed in braces, where the fourth value is a subset of eight hexadecimal values that is also enclosed in braces:
{0x00000000,0x0000,0x0000,{0x00,0x00,0x00,0x00,0x00,0x00,0x00,0x00}}

So crmRecord.Id.ToString("N").ToUpperInvariant() results in : "7AD6FAB54528E411940D005056BC69C8"

Friday 26 September 2014

TIL - Set EventId when Logging to the Event Log with Log4net

I used to be a fan of the Enterprise Library, but lately I've found myself using Log4net instead, which is not bad.

We wanted to log fatal errors to the event log, which can be easily done by configuring a trace listener, however we also wanted control over the event id displayed in the event log to allow meaningful monitoring

Turns out it's pretty simple:
log4net.ThreadContext.Properties["EventID"] = 1337;log.ErrorFormat("Elite Exception: {0}.",  ex); 


Tuesday 23 September 2014

TIL - Create Scheduled Tasks with parameters using schtasks

Today I had to create a couple of schedule task to run this application I wrote, the problem was that when I did this:
schtasks /create /sc daily /tn "Application" /TR "'c:\Program Files (x86)\Application\Application.exe -t'" /ST 00:30:00 /RU user /RP password 
It created a task but then when it started, it would not actually run nor stop, so after a bit of googling and a few tries i came up with this
schtasks /create /sc daily /tn "Application" /TR "'c:\Program Files (x86)\Application\Application.exe' -t" /ST 00:30:00 /RU user /RP password 
Note how the command, in bold, is surrounded by single quotes and the whole, i.e. command and parameters is surrounded by double quotes, so this will run Application.exe with parameter -t @ 00:30 everyday
Hope it helps.

Monday 22 September 2014

Remove Users from group in SharePoint 2013 from Client Object model.

This is the method that we use to remove users from groups in Sharepoint 2013

It's a bit more convoluted than it needs to be as for some reason Sharepoint 2013 appends the claim provider to the username, which means that rather than having:
 dev\duser1  
we have something like:
i:0#.w|dev\duser1  
so in order to ensure that the it will always find the relevant user, we do the extra call to ResolvePrincipal.

using Microsoft.SharePoint.Client;
using Microsoft.SharePoint.Client.Utilities;

     public bool RemoveUser(string url, string groupName, string userName)  
     {  
       using (ClientContext context = new ClientContext(url))  
       {  
         var principal = Utility.ResolvePrincipal(context, context.Web, userName, PrincipalType.User,  
           PrincipalSource.All, context.Web.SiteUsers, false);  
         context.ExecuteQuery();  
         if (principal.Value != null)  
         {  
           string login = principal.Value.LoginName;  
           GroupCollection siteGroups = context.Web.SiteGroups;  
           Group group = siteGroups.GetByName(groupName);  
           var query = context.LoadQuery(group.Users.Where(usr => usr.LoginName == login).Include(u => u.LoginName));  
           context.ExecuteQuery();  
           User user = query.SingleOrDefault();  
           if (user != null)  
           {  
             group.Users.RemoveByLoginName(user.LoginName);  
             context.ExecuteQuery();  
           }
           return true;               
         }  
       }  
       return false;  
     }  

Monday 1 September 2014

Product Versions in MSI installers created with WIX - part 2

In a previous post I described how to change the version of MSI installers created with WiX.

This post discusses a way of linking the version number of an assembly (library, dll, executable) to the product version.

This is more suited to a library/framework, where you want to ensure that the product version is the same as the library/framework.
  1. On the library project, edit the AssemblyInfo.cs file:

  2. Remove these two lines:
    [assembly: AssemblyVersion("1.0.0.0")]
    [assembly: AssemblyFileVersion("1.0.0.0")]
  3. Create a new File called VersionInfo.cs on the Properties folder.

  4. Contents of file should be:
    [assembly: System.Reflection.AssemblyVersion("0.0.0.*")]
  5. Edit the project file (you'll need to unload the project if you want to do it from Visual Studio) and at the end, you'll find a commented out section. Get rid of it (everything between <!-- -->) and add the following:
  6. <Target Name="BeforeBuild"> < <WriteLinesToFile Condition=" '$(Version)' != '' " File="Properties\VersionInfo.cs" Overwrite="True" Lines="[assembly: System.Reflection.AssemblyVersion(&quot;$(Version)&quot;)] // Auto-generated by build process" /> </ </Target>
  7. On the product.wxs file on your WiX project, just add the following:
  8. <Product Id="12c0deff-c0de-c0de-c0de-123f422c0dea" Name="Name" Language="1033" Version ="!(bind.FileVersion.filAB3D3C60ED5901936249D5C56B6C90A6)" Manufacturer="ManyRootsofallevil" UpgradeCode="fafffaff-c0de-c0de-c0de-123f422c0dea">
    Where filAB3D3C60ED5901936249D5C56B6C90A6 is the id of your library file
  9. Finally, add the following to the wix project. Make sure this is on the initial PropertyGroup Element:
  10. <Version Condition=" '$(Version)' == ''">0.0.0.1</Version>
You can now build this using:

msbuild solution.sln /p:Version=1.3.3.7

Friday 29 August 2014

TIL - Copy References in GAC to output folder

A while back I had this problem, looks like there is a simple solution:

<Reference Include="DocumentFormat.OpenXml, Version=2.5.5631.0, Culture=neutral, PublicKeyToken=31bf3856ad364e35, processorArchitecture=MSIL">
 <SpecificVersion>False</SpecificVersion>
 <Private>True</Private> <HintPath>..\..\..\OpenXml SDK 2.5\DocumentFormat.OpenXml.dll</HintPath>
</Reference>
Setting <Private>True</Private> ensures that the reference is copied to the output folder, looks like setting it to Copy Local, just doesn't do the trick

Thursday 21 August 2014

TIL - DeploymentItem files not copied in MSTest

I have a set of unit tests that need an xml file to work  and I despite me using the DeploymentItem attribute the test was not working.

Turns out that DeploymentItem will only copy from the build directory, so I set the Copy to Output Directory property of the file to Copy always:


Monday 18 August 2014

Product Versions in MSI installers created with WIX - part 1

I must confess that in the past I used to do this manually or not at all (loud gasps) as I've never had a fully functioning CI environment but, this has changed recently so here it goes.

In essence the challenge is to change the version number of the installer every time a new build is done, so that the build number is reflected in both Windows (Control Panel -> Programs and Features ) and the file itself, e.g. installer.1.0.0.0.msi

There are two main ways of doing this, that I know of:
  • Pass the build number to the Wix Installer.
  • Get the build number from a library or executable.

In this post, I will discuss the first way, all changes unless stated are made to the wix project file (wixproj extension), so you will need to unload the project from Visual Studio or use another editor to make these changes.

We need a Property to hold the version number, which appropriately is called VersionNumber, I've made sure that this is populated with a default value, in case the build is done from Visual Studio.
<VersionNumber Condition=" '$(VersionNumber)' == '' ">0.0.0.0</VersionNumber>
I then appended the version number to the installer:
<OutputName>Installer.$(VersionNumber)</OutputName>
We then need to add a preprocessor variable to each build configuration, I've called it MSIVersion, as this is the version of the msi package:
<DefineConstants>MSIVersion=$(VersionNumber)</DefineConstants>
and finally we use this preprocessor variable in the product definition in the Product.wxs file.
<Product Id="01010101-deaf-beef-c0de-863f442f44fb" Name="MROAE" Language="1033" Version="$(var.MSIVersion)" Manufacturer="MROAE" UpgradeCode="01010101-daaa-beef-c0de-863f442f44fb">
This solution can now be build with the following command:
msbuild mysolution.sln /p:VersionNumber=1.0.0.1
A sample wixproj file can be found below with changes detailed above:

<?xml version="1.0" encoding="utf-8"?>
<Project ToolsVersion="4.0" DefaultTargets="Build" xmlns="http://schemas.microsoft.com/developer/msbuild/2003">
  <PropertyGroup>
    <Configuration Condition=" '$(Configuration)' == '' ">Debug</Configuration>
    <Platform Condition=" '$(Platform)' == '' ">x86</Platform>
    <PackageVersion>3.8</PackageVersion>
    <ProjectGuid>{02af16dd-0000-0000-0000-d60ba5af40cc}</ProjectGuid>
    <SchemaVersion>2.0</SchemaVersion>
    <OutputType>Package</OutputType>
    <WixTargetsPath Condition=" '$(WixTargetsPath)' == '' AND '$(MSBuildExtensionsPath32)' != '' ">$(MSBuildExtensionsPath32)\Microsoft\WiX\v3.x\Wix.targets</WixTargetsPath>
    <WixTargetsPath Condition=" '$(WixTargetsPath)' == '' ">$(MSBuildExtensionsPath)\Microsoft\WiX\v3.x\Wix.targets</WixTargetsPath>
    <VersionNumber Condition=" '$(VersionNumber)' == '' ">0.0.0.0</VersionNumber>
    <Name>Installer</Name>
    <OutputName>Installer.$(VersionNumber)</OutputName>
  </PropertyGroup>
  <PropertyGroup Condition=" '$(Configuration)|$(Platform)' == 'Debug|x86' ">
    <OutputPath>bin\$(Configuration)\</OutputPath>
    <IntermediateOutputPath>obj\$(Configuration)\</IntermediateOutputPath>
    <DefineConstants>Debug;MSIVersion=$(VersionNumber)</DefineConstants>
  </PropertyGroup>
  <PropertyGroup Condition=" '$(Configuration)|$(Platform)' == 'Release|x86' ">
    <OutputPath>bin\$(Configuration)\</OutputPath>
    <IntermediateOutputPath>obj\$(Configuration)\</IntermediateOutputPath>
    <DefineConstants>MSIVersion=$(VersionNumber)</DefineConstants>
  </PropertyGroup>
  <ItemGroup>
    <Compile Include="Service.wxs" />
    <Compile Include="Product.wxs" />
  </ItemGroup>
  <ItemGroup>
    <ProjectReference Include="..\Service\Service.csproj">
      <Name>Service</Name>
      <Project>{000c956c-0000-0000-0000-970884f34476}</Project>
      <Private>True</Private>
      <DoNotHarvest>True</DoNotHarvest>
      <RefProjectOutputGroups>Binaries;Content;Satellites</RefProjectOutputGroups>
      <RefTargetDir>INSTALLFOLDER</RefTargetDir>
    </ProjectReference>
  </ItemGroup>
  <ItemGroup>
    <Content Include="Icons\Product.ico" />
     </ItemGroup>
  <ItemGroup>
    <Folder Include="Icons" />
  </ItemGroup>
  <ItemGroup>
    <WixExtension Include="WixUtilExtension">
      <HintPath>$(WixExtDir)\WixUtilExtension.dll</HintPath>
      <Name>WixUtilExtension</Name>
    </WixExtension>
  </ItemGroup>
  <Import Project="$(WixTargetsPath)" />
  <!--
 To modify your build process, add your task inside one of the targets below and uncomment it.
 Other similar extension points exist, see Wix.targets.
 <Target Name="BeforeBuild">
 </Target>
 <Target Name="AfterBuild">
 </Target>
 -->
</Project>

And the Product File(product.wxs)

<Product Id="01010101-deaf-beef-c0de-8f3f4a2f44fb" Name="MROAE" Language="1033"
Version="$(var.MSIVersion)" Manufacturer="MROAE" 
UpgradeCode="01010101-daaa-beef-c0de-8f3f4a42f44b">

Monday 11 August 2014

Uninstall MSI from command line


From a command prompt, run with elevated permissions:
msiexec /x {ba5eba11-deaf-beef-ce11-ca5e1337c0de} /qn
where {ba5eba11-deaf-beef-ce11-ca5e1337c0de} is the product code of the application you want to uninstall.

From PowerShell, run with elevated permissions:
msiexec /x "{ba5eba11-deaf-beef-ce11-ca5e1337c0de}" /qn
If you don't know the product code you can get it from the registry, using wmic or from PowerShell using the following command:
gwmi -Class win32_product | ?{$_.Name -match "product name"}
For 7-zip the product code is:

PS C:\Users\Bob> gwmi -Class win32_product | ?{$_.Name -match "7-zip"}

IdentifyingNumber : {23170F69-40C1-2702-0920-000001000000}
Name              : 7-Zip 9.20 (x64 edition)
Vendor            : Igor Pavlov
Version           : 9.20.00.0
Caption           : 7-Zip 9.20 (x64 edition)

Wednesday 6 August 2014

TIL - Send CTRL + ALT + DEL to Remote Destop Connection

I needed to change my password on the test domain today but I only log on to the test domain through a remote desktop connection, so in order to do a CTRL + ALT + DEL on the remote desktop, I did:

CTRL + ALT + END


Monday 4 August 2014

List Entity relationships in CRM 2011/2013 - Brain Dump 6

Cleaning up my inbox today when I found this SQL query, in short a quick way of listing all the relationships for a particular entity:

SELECT distinct (rel.name),ent.name,
        Case [CascadeDelete]
                         when 0 then 'None'
                         when 1 then 'All'
                         when 2 then 'Referential'
                         when 3 then 'Restrict'
                        end as CascadeDelete
      ,Case [CascadeAssign]
                         when 0 then 'None'
                         when 1 then 'All'
                         when 2 then 'Referential'
                         when 3 then 'Restrict'
                        end as CascadeAssign
      ,Case [CascadeShare]
                         when 0 then 'None'
                         when 1 then 'All'
                         when 2 then 'Referential'
                         when 3 then 'Restrict'
                        end as CascadeShare
      ,Case [CascadeUnShare]
                         when 0 then 'None'
                         when 1 then 'All'
                         when 2 then 'Referential'
                         when 3 then 'Restrict'
                        end as CascadeUnShare
      ,Case [CascadeReparent]
                         when 0 then 'None'
                         when 1 then 'All'
                         when 2 then 'Referential'
                         when 3 then 'Restrict'
                        end as CascadeReparent
      ,Case [CascadeMerge]
                         when 0 then 'None'
                         when 1 then 'All'
                         when 2 then 'Referential'
                         when 3 then 'Restrict'
                        end as CascadeMerge
       from MetadataSchema.Relationship rel
      
join  MetadataSchema.Entity ent on rel.ReferencedEntityId = ent.entityid
where rel.name like '%<entityname>%'
order by ent.Name

And the results:


Wednesday 23 July 2014

TIL - Hidding HTML elements with jQuery in IE.

The snippets of code below are equivalent, however the code in red does not work in IE (at least IE 9 and 11)

$('#myid').prop('hidden', true);
$('#myid').hide();

$('#myid').prop('hidden', false);
$('#myid').show();

Monday 21 July 2014

Update Entity from JavaScript in Ms Dynamics CRM 2011/2013 using OData endpoint

Posting this for future reference:

function updateEntity(entityName, id, entity ) {

    var url = oDataUrl + "/" + entityName + "Set(guid'" + id + "')";

    entityData = window.JSON.stringify(entity);

    return $.ajax({
        type: "POST",
        contentType: "application/json;charset=utf-8",
        datatype: "json",
        data: entityData,
        url: url,
        beforeSend: function (x) {
            x.setRequestHeader("Accept", "application/json");
            x.setRequestHeader("X-HTTP-Method", "MERGE")
        },
    });
}
entityName is the logical entity name.
id is the Id of the record that we want to update
entity is a object that contains that values that need changing.
 e.g.:
 account = {};
 account.Name = "New Name"; 

 oDataUrl is the Url of the OData endpoint for your organization

Tuesday 15 July 2014

RHEL 7 - RHCE + RHCSA Exam Objectives

I intend to go through these exams at some point in the near future and I thought it would be handy to have the objectives for both exams here.

Note: I'm reusing the links from my RHEL 6 post, so if something doesn't quite work let me know and I'll update the post with a new RHEL 7 post. I do intend to go through them but it might take me a while.

I'll attempt to link newer post to the relevant objective, where appropriate. Almost always, it won't be appropriate and in that case I have made an attempt to link to a page with the relevant information for the objective.

Feel free to suggest a better or alternatively link to ones I have provided.

RHCSA Exam Objectives

Red Hat reserves the right to add, modify and remove objectives. Such changes will be made public in advance through revisions to this document.

RHCSA exam candidates should be able to accomplish the tasks below without assistance. These have been grouped into several categories.

Understand and Use Essential Tools

* Access a shell prompt and issue commands with correct syntax
Use input-output redirection (>, >>, |, 2>, etc.)
Use grep and regular expressions to analyze text
Access remote systems using ssh
* Log in and switch users in multi-user runlevels
* Archive, compress, unpack and uncompress files using tarstargzip, and bzip2
Create and edit text files
Create, delete, copy and move files and directories
Create hard and soft links
* List, set and change standard ugo/rwx permissions
Locate, read and use system documentation including man, info, and files in /usr/share/doc .
[Note: Red Hat may use applications during the exam that are not included in Red Hat Enterprise Linux for the purpose of evaluating candidate's abilities to meet this objective.]

Operate Running Systems

Boot, reboot, and shut down a system normally
Boot systems into different runlevels manually
* Interrupt the boot process in order to gain access to a system
Identify CPU/memory intensive processesadjust process priority with renice, and kill processes
Locate and interpret system log files and journals.
Access a virtual machine's console
Start and stop virtual machines
* Start, stop and check the status of network services
* Securely transfer files between systems.

Configure Local Storage

* List, create, delete partitions on MBR and GPT disks.
Create and remove physical volumes, assign physical volumes to volume groups, create and delete logical volumes
Create and configure LUKS-encrypted partitions and logical volumes to prompt for password and mount a decrypted file system at boot
Configure systems to mount file systems at boot by Universally Unique ID (UUID) or label
Add new partitions, logical volumes and swap to a system non-destructively

Create and Configure File Systems

* Create, mount, unmount, and use vfat, ext4 and xfs file systems.
Mount, unmount and use LUKS-encrypted file systems
Mount and unmount CIFS and NFS network file systems
Configure systems to mount ext4, LUKS-encrypted and network file systems automatically
* Extend existing logical volumes
Create and configure set-GID directories for collaboration
Create and manage Access Control Lists (ACLs)
Diagnose and correct file permission problems

Deploy, Configure and Maintain Systems

Configure networking and hostname resolution statically or dynamically
* Schedule tasks using at and cron
* Start and stop services and configure services to start automatically at boot
Configure systems to boot into a specific runlevel automatically
Configure a physical machine to host virtual guests
Install Red Hat Enterprise Linux systems as virtual guests
Configure systems to launch virtual machines at boot
* Configure a system to use time services.
* Install and update software packages from Red Hat Network, a remote repository, or from the local filesystem
Update the kernel package appropriately to ensure a bootable system
Modify the system bootloader

Manage Users and Groups

Create, delete, and modify local user accounts
Change passwords and adjust password aging for local user accounts
Create, delete and modify local groups and group memberships
* Configure a system to use an existing authentication service for user and group information.

Manage Security

Configure firewall settings using firewall-config, firewall-cmd or iptables
Configure key-based authentication for SSH
Set enforcing and permissive modes for SELinux
* List and identify SELinux file and process context
* Restore default file contexts
Use boolean settings to modify system SELinux settings
Diagnose and address routine SELinux policy violations

RHCE Exam Objectives

Red Hat reserves the right to add, modify and remove objectives. Such changes will be made public in advance through revisions to this document.

RHCE exam candidates should be able to accomplish the following without assistance. These have been grouped into several categories.
System Configuration and Management

* Use network teaming or bonding to configure aggregated network links between two Red Hat Enterprise Linux systems.
* Configure IPv6 addresses and perform basic IPv6 troubleshooting
Route IP traffic and create static routes
* Use FirewallD, including Rich Rules, Zones and custom rules, to implement packet filtering and configure network address translation (NAT).
Use /proc/sys and sysctl to modify and set kernel run-time parameters
Configure system to authenticate using Kerberos
Configure a system as an iSCSI initiator that persistently mounts an iSCSI target
Produce and deliver reports on system utilization (processor, memory, disk, and network)
Use shell scripting to automate system maintenance tasks
Configure a system to log to a remote system
Configure a system to accept logging from a remote system

Network Services

Network services are an important subset of the exam objectives. RHCE candidates should be capable of meeting the following objectives for each of the network services listed below:

* Install the packages needed to provide the service
* Configure SELinux to support the service
Use SELinux port labelling to allow services to use non-standard ports.
* Configure the service to start when the system is booted
* Configure the service for basic operation
* Configure host-based and user-based security for the service

RHCE candidates should also be capable of meeting the following objectives associated with specific services:

HTTP/HTTPS

Configure a virtual host
Configure private directories
Deploy a basic CGI application
Configure group-managed content
Configure TLS security

DNS

Configure a caching-only name server
Configure a caching-only name server to forward DNS queries

NFS

Provide network shares to specific clients
Provide network shares suitable for group collaboration
* Use Kerberos to control access to NFS network shares.

SMB

Provide network shares to specific clients
Provide network shares suitable for group collaboration

SMTP

* Configure a system to forward all email to a central mail server

SSH

Configure key-based authentication
Configure additional options described in documentation

NTP

Synchronize time using other NTP peers


Database Services

* Install and configure MariaDB.
* Backup and restore a database.
* Create a simple database schema.
* Perform simple SQL queries against a database.

Monday 14 July 2014

The authentication endpoint Kerberos was not found on the configured Secure Token Service!

We finally managed to overcome all issues and deployed the build to the OAT environment and it went: KABOOM!!!
Unable to get item. Exception: System.NotSupportedException: The authentication endpoint Kerberos was not found on the configured Secure Token Service! at Microsoft.Xrm.Sdk.Client.IssuerEndpointDictionary.GetIssuerEndpoint(TokenServiceCredentialType credentialType) at Microsoft.Xrm.Sdk.Client.AuthenticationCredentials.get_IssuerEndpoint() at Microsoft.Xrm.Sdk.Client.ServiceConfiguration`1.AuthenticateInternal(AuthenticationCredentials authenticationCredentials) at Microsoft.Xrm.Sdk.Client.ServiceConfiguration`1.AuthenticateFederationInternal(AuthenticationCredentials authenticationCredentials) at Microsoft.Xrm.Sdk.Client.ServiceConfiguration`1.Authenticate(AuthenticationCredentials authenticationCredentials) at Microsoft.Xrm.Sdk.Client.ServiceConfiguration`1.Authenticate(ClientCredentials clientCredentials) at Microsoft.Xrm.Sdk.Client.OrganizationServiceConfiguration.Authenticate(ClientCredentials clientCredentials) at Microsoft.Xrm.Sdk.Client.ServiceProxy`1.AuthenticateClaims() at Microsoft.Xrm.Sdk.Client.ServiceProxy`1.AuthenticateCore() at Microsoft.Xrm.Sdk.Client.ServiceProxy`1.Authenticate() at Microsoft.Xrm.Sdk.Client.ServiceProxy`1.ValidateAuthentication() at Microsoft.Xrm.Sdk.Client.ServiceContextInitializer`1.Initialize(ServiceProxy`1 proxy) at Microsoft.Xrm.Sdk.Client.OrganizationServiceProxy.RetrieveMultipleCore(QueryBase query) at Microsoft.Xrm.Sdk.Client.OrganizationServiceProxy.RetrieveMultiple(QueryBase query) at Consumer.ItemManager.RetrieveLastItem(String type) at
Consumer.ItemManager.RetrieveLastItem(String type) at
Consumer.Service.ConsumerService.Process[T](Config feed)

I thought that the Kerberos endpoint must not be enabled in ADFS, but it was and after a bit of investigating, it turns out that this is a known issue in MS Dynamics CRM 2011/13.

The interesting bit about this issue is that the front end was working fine, but trying to use the SDK in any way was not working.

The MEX endpoint that gets set when Claims Based Authentication is configured is like this:
https://adfs.domain.com/adfs/ls/mex
This is a bit of a problem, as it doesn't exist :(

The Working MEX endpoint is:
https://adfs.domain.com/adfs/services/trust/mex
Microsoft have kindly provided a PowerShell script to rectify this issue:

Save this as UpdateMEXEndpoint.ps1

Param (
     #optional params
     [string]$ConfigurationEntityName="FederationProvider",
     [string]$SettingName="ActiveMexEndpoint",
     [object]$SettingValue,
     [Guid]$Id
 )
 $RemoveSnapInWhenDone = $False
 
 if (-not (Get-PSSnapin -Name Microsoft.Crm.PowerShell -ErrorAction SilentlyContinue))
 {
     Add-PSSnapin Microsoft.Crm.PowerShell
     $RemoveSnapInWhenDone = $True
 }
 
 $Id=(Get-CrmAdvancedSetting -ConfigurationEntityName FederationProvider -Setting ActiveMexEndpoint).Attributes[0].Value
 
 $setting = New-Object "Microsoft.Xrm.Sdk.Deployment.ConfigurationEntity"
 $setting.LogicalName = $ConfigurationEntityName
 if($Id) { $setting.Id = $Id }
 
 $setting.Attributes = New-Object "Microsoft.Xrm.Sdk.Deployment.AttributeCollection"
 $keypair = New-Object "System.Collections.Generic.KeyValuePair[String, Object]" ($SettingName, $SettingValue)
 $setting.Attributes.Add($keypair)
 
 Set-CrmAdvancedSetting -Entity $setting
 
 if($RemoveSnapInWhenDone)
 {
     Remove-PSSnapin Microsoft.Crm.PowerShell
 }

This can then be used to modify the relevant setting:

UpdateMEXEndpoint.ps1 –SettingValue “https://<ADFS STSHOST>/adfs/services/trust/mex”

An alternative to use this script is updating the FederationProvider table in the MSCRM_Config database, but this is not supported.

Monday 7 July 2014

Storing sensitive data (e.g. passwords) in MS Dynamics CRM 2011/2013

We need to integrate with a third party, who have decided that implementing a federated trust is too complex and thus have just given us a user name and password.

Since the integration is done via a couple of plug-ins and custom activities we've decided to store the password in Dynamics CRM, the only problem is that there is no out of the box way of storing the passwords that would allow a relatively simple automated deployment.

Sure, we can register plug-in and use the secure configuration but that means deploying the solution and then re-registering the plug-ins with the secure data but this wasn't suitable.

We ruled out symmetric encryption as we would just have the same problem but for the encryption key, so the obvious choice was asymmetric encryption, the problem is that asymmetric encryption is not really suitable for large amounts of data, so we settled on the recommend way of using asymmetric encryption to encrypt the encryption key of a symmetric encryption scheme.

The thing is, the .NET framework sort of includes this in the form of the EncryptedXml class, which can use a certificate to encrypt and decrypt Xml documents and we can use this for storing a password for instance.

A sample of how to use this class can be seen below:

using System;
using System.Collections.Generic;
using System.Linq;
using System.Security.Cryptography;
using System.Security.Cryptography.X509Certificates;
using System.Security.Cryptography.Xml;
using System.Text;
using System.Threading.Tasks;
using System.Web;
using System.Xml;
using System.Xml.Linq;
using log4net;

namespace Encryption
{
    public class Encryption
    {
        ILog logger;
        X509Certificate2 certificate;

        public Encryption(string certificateThumbprint) 
        {
            logger = LogManager.GetLogger("Encryption");
            certificate = GetCert(certificateThumbprint);
        }

        public string Encrypt(string plaintext)
        {
            XmlDocument Doc = new XmlDocument();
            Doc.LoadXml(string.Format("<sensitivedata>{0}</sensitivedata>", HttpUtility.HtmlEncode(plaintext)));
            Doc.PreserveWhitespace = true;
            XmlElement toEncrypt = Doc.GetElementsByTagName("sensitivedata")[0] as XmlElement;
            EncryptedXml eXml = new EncryptedXml();
            EncryptedData edElement = eXml.Encrypt(toEncrypt, certificate);
            EncryptedXml.ReplaceElement(toEncrypt, edElement, false);
            return Doc.OuterXml;
        }

        public string Decrypt(string encryptedtext)
        {
            XmlDocument Doc = new XmlDocument();
            Doc.LoadXml(encryptedtext);
            EncryptedXml exml = new EncryptedXml(Doc);
            exml.DecryptDocument();
            string plaintext = HttpUtility.HtmlDecode(XDocument.Parse(Doc.OuterXml).Element("sensitivedata").Value);
            return plaintext;
        }

        private X509Certificate2 GetCert(string thumbprint)
        {
            X509Certificate2 cert = null;
            X509Store store = new X509Store(StoreLocation.LocalMachine);
            store.Open(OpenFlags.ReadOnly);
            try
            {
                X509Certificate2Collection certCollection = store.Certificates;
                cert = certCollection.Cast<X509Certificate2>().Where(c => c.Thumbprint.Equals(thumbprint)).Single();
            }
            catch (Exception ex)
            {
                logger.ErrorFormat("An error occurred looking for certificate with thumbprint: {0}.\nException:{1}."
                    , thumbprint, ex);
            }
            finally
            {
                store.Close();
            }
   
            return cert;
        }
    }
}

The thing to note is that sensitive data to be encrypted needs to be valid xml data, in other words, if your sensitive data contains ampersands it will not be parsed, which is why I use the HttpUtility class to encode and decode the sensitive data.
 
 It does seem a little bit fiddly but it is quite almost all done by the framework, so it's really less code to maintain and the extra text that needs to be stored is not a consideration as it's a single record.
 
Furthermore, it would be trivial to modify and return a plaintext Xml Document for processing instead of the value of an element, but the value of an element is what I needed.

Saturday 5 July 2014

URLs fields in MS Dynamics CRM 2011 - MS Dynamics CRM 2011 annoyances part 1337

We had a requirement to let users see a URL field but not change the URL, the requirement, quite sensibly specified that the users should be able to click on the link.
I thought this was a textbook case for field security profiles, alas I was wrong. In MS Dynamics CRM 2011 if a URL field is read only, however this is achieved, the URL will not be clickable.

Despite the message, it does not work, note how the mouse icon does not change.


Fortunately, this has been rectified in MS Dynamics CRM 2013