Monday, 8 October 2018

Using Dynamic 365 Service Endpoints - Part 2

In the previous post, we discussed using Service Endpoints and how they can be used to integrate with other systems via a Azure Service Bus Queue.

There are other ways that Service Points can be used for integrating with other systems.

  1. Topic

  2. Integrating with a Topic is very similar to integrating with a Queue, except that multiple systems can consume the same message.

    Let's say we wanted to integrate with our customer's Audit service and a third party system, then we would use a Topic to ensure that both systems would get the messages

  3. One-Way Listener

  4. This requires an active listener.If there is no active listener on an endpoint, the post to the service bus fails. Dynamics 365 will retry the post in exponentially larger and larger time spans until the asynchronous system job that is posting the request is eventually aborted and its status is set to Failed

    The utility of this is beyond me given that the operation will always succeed in Dynamics due to endpoint steps requiring to be asynchronous. I might be misunderstanding how this works though.

    A sample can be found here

  5. Two-Way Listener

  6. A two-way contract is similar to a one-way contract except that a string value can be returned from the listener to the plug-in or custom workflow activity that initiated the post.

    This seems like a more interesting proposition as the other system can send information back to Dynamics 365, e.g. return the result of a calculation

    A sample can be found here

  7. REST Listener

  8. A REST contract is similar to a two-way contract on a REST endpoint.

    A sample can be found here

  9. Event Hub

  10. This contract type applies to Azure Event Hub solutions.


Friday, 5 October 2018

Using Dynamic 365 Service Endpoints - Part 1

Dynamics 365 offers various possibilities for integrating with 3rd party systems, one of them is using a Service Endpoint, which is a fancy way of calling the Azure Service Bus, which can be used for integrating with 3rd party systems.

In reality things are a bit more complicated and will be discussed in a future post.

In this example we will create a Service Bus queue that will receive any new Search Engines so that these can be processed by a single 3rd party system.


1. Create Azure Service Bus Queue

From the Azure Portal
  1. Create a Namespace


  2. Create a Queue


  3. Add SAS Policy


2. Register Service Endpoint

In order to register a Service Endpoint we will need the connection details for the Queue, which can be obtained from the Azure Portal.

  1. Register New Endpoint


  2. Add Connection Details


  3. Complete Registration


  4. The Message Format is important as the code needed to read the messages will be different depending on the format.


  5. Register New Step


  6. Bear in mind that it needs to be registered against the service endpoint itself.


    This is what we've ended up with

3. Test

We create a new Search Engine


We can see that the message has been sent on Azure Portal


4. Processing Queue Messages

The code used to process the Queue messages can be found here and the full VS Solution can be found here.

Some of the code has been pilfered from the CRM Samples and updated it to work with the latest version, at the time of writing of Azure Service Bus.

The verbosity of the messages is peculiar and it would be nice to be able to do something similar to plug-in  (Pre/Pro)EntityImages, namely just send a few parameters.

In this highly contrived exampled we might just need to send two parameters (name and url) to our 3rd party system, yet ~ 5 KB of data are sent.

Thursday, 4 October 2018

Dynamics 365 New Features - Alternate Keys

I will confess that these are new features for me, so if you happen to have left the Dynamics CRM world at the same time as me and are coming back to it now this post will be super useful otherwise, well not so much maybe

Alternate Keys

With alternate keys, you can assure an efficient and accurate way of integrating data into Microsoft Dynamics 365 from external systems. It’s especially important in cases when an external system doesn’t store the Dynamics 365 record IDs (GUIDs) that uniquely identify records. The alternate keys are not GUIDs and you can use them to uniquely identify the Dynamics 365 records. You must give an alternate key a unique name. You can use one or more entity fields to define the key. For example, to identify an account record with an alternate key, you can use the account name and the account number. You can define alternate keys in the Dynamics 365 web application without writing code, or you can define them programmatically. Note that while you can define the alternate keys in the user interface (UI), they can only be used programmatically, in code.
An entity can have up to 5 alternate keys and for each one a new index will be created, this is done a as background job, so there will be an associated decrease in insert performance, whether this will be noticeable it's hard to say.


This allows us to write code like this, see below, to change the account name, the assumption here is that this account, 1234, is coming from another system and in this system it's using integer keys.

For the record, alternate keys allow the following types

Decimal Number
Whole Number
Single Line of Text

Code:

using (CrmServiceClient client = new CrmServiceClient(ConfigurationManager.ConnectionStrings["Inc"].ConnectionString))
            {
                try
                {
                    Entity account = new Entity("account", "accountnumber", 1234);
                    account["name"] = "Changing Name";
                    client.Update(account);
                }
                catch (Exception ex)
                {
                    Console.WriteLine(ex);
                }
            }


Wednesday, 3 October 2018

Serve Javascript and source map files locally using Fiddler - part 2

In the previous post in this two part series we showed how to use Fiddler to serve client side content from our local machine.

This worked fine but could become pretty tedious so in this post I describe a different way.

A single rule like this will cover all eventualities but we need to make certain changes to our project


There is an issue here though.

If we create a new library through the front end, it will be called:
 <prefix>_<name> 
but we would like a rule like this:

 <prefix>_/<prefix>_<name> 

The reason for this is that this allows our rule to work for only our custom libraries

Without  <prefix>_/ our rule would match all manner of web resources which effectively would prevent the system from working.

The solution is to programmatically create the web resources so that the naming convention that we want to use is respected.

In this example the spkl framework have been used to do this, see spkl.json for details and the exported Dynamics solution


This is the corresponding url:

This enables us to have one rule to ring them all and in the darkness bind them or something like that :)

Tuesday, 2 October 2018

Serve Javascript and source map files locally using Fiddler - part 1

One of the major downsides of developing on Dynamics 365 is that the feedback loop can be pretty long.

Say if we wanted to test a change to an existing Javascript library this is what we would need to do:

  1. Make code changes in Visual Studio
  2. Upload to Dynamics Server
  3. Publish
  4. Test

2 and 3 can be time consuming, specially on slow networks or heavily used servers, however there is another way, enter Fiddler.

Fiddler is a Web debugging Proxy that can be used to serve files.

In this example, I have create an extremely simple webresource that contains a single function that provides an annoying greeting every time a account record is opened.

Dynamics solution can be found here and script (in typescript) can be found here (ignore the method name for now)

We can now use Fiddler to serve the files from disk

  1. Launch Fiddler
  2. Select AutoResponder Tab
  3. Create AutoResponder Rules as shown


I've create a single rule for each file

account.js
account.js.map
account.ts

This will allow us to debug our typescript code


Note that once the library has been registered with the form, it's possible to add methods on the source code without uploading them to the server as long as you serve them from Fiddler.

Let's say we wanted a function called  setCreditLimit, which sets the credit limit of the account to say $10000, we could do the following in Visual Studio and register the appropriate handler in the form without having to actually upload the changed file.

If we are doing piecemeal changes like this the effect is not great as we still need to publish the form, but you could register all the events needed and then work at your leisure from Visual Studio.

Having to add rules can get a little bit tedious so in another post we will showcase a different way that will allow to set up a single rule


Don't Forget to upload the web resources once you've finished.

Monday, 1 October 2018

Developing and Testing Plug-ins in Dynamics 365 - Part 4 - Debugging with the Plugin Profiler

If we were using a on-premises instances and had access to the Dynamics 365 server then we would be able to have a remote debugger running on the server and step through the plug-in code at our leisure. However, Microsoft is quite keen to move everybody on to the cloud thus we need another way. Enter Plugin profiler.

The plugin profiler is solution that can be installed on any Dynamics 365 instance and can be used to generate plug-in traces that can then be used to step through the plug-in code.

The key difference is that the stepping through the code is done after the plug-in has run and not in real time. In short, the sequence is as follows:


  1. Trigger Plug-in (e.g. create account ...)
  2. Save Plug-in trace
  3. Load Plug-in trace with Plugin Registration Tool
  4. Step Through plug-in code.

Pre-Requisites
  • Plugin Registration Tool installed (see this post for more details)
  • Admin access to Dynamics 365 instance
  • Visual Studio 2017
Debugging Online Plug-ins
  1. Start Plugin Registration Tool
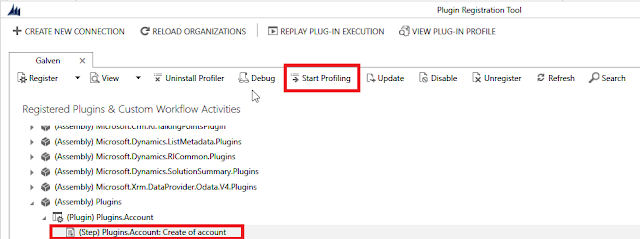
  2. Click Install Profiler
  3. Select the step to be profiled
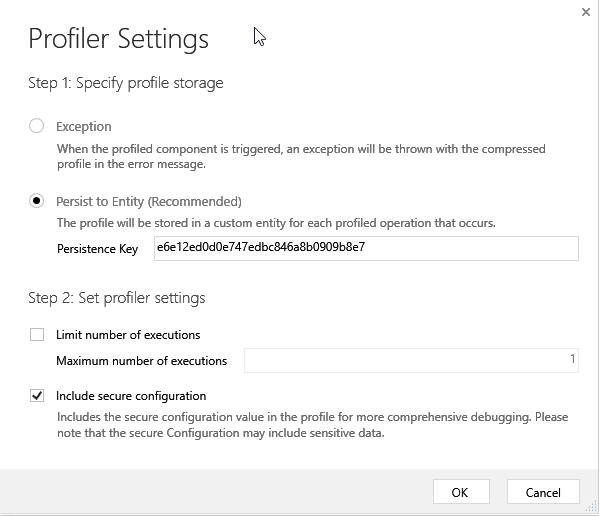
  4. Click Start Profiling


  5. Go with the defaults


  6. Invoke Step (Create account in this case)
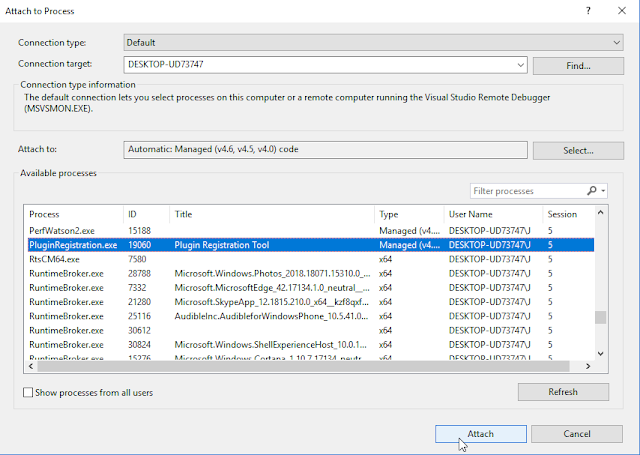
  7. On Visual Studio, Click Debug | Attach To Process | PluginRegistrationTool.exe


  8. Click Debug


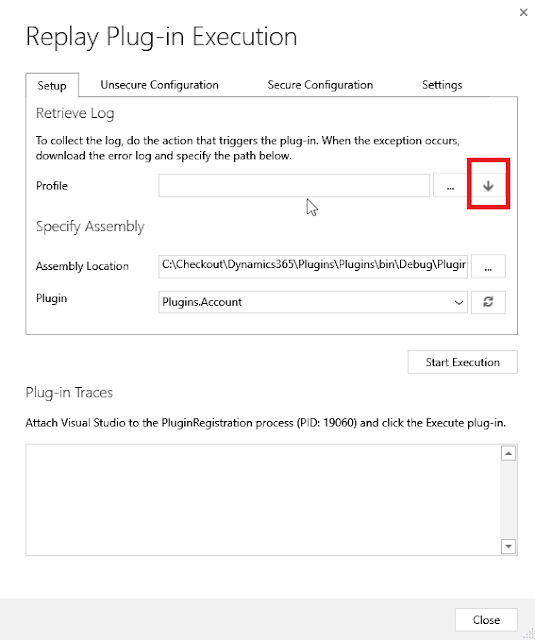
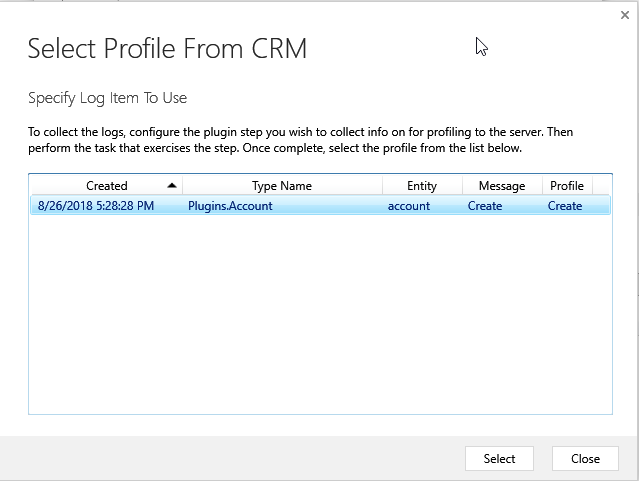
  9. Select Assembly Location and Relevant Plugin
  10. Click on Highlighted arrow and select profile


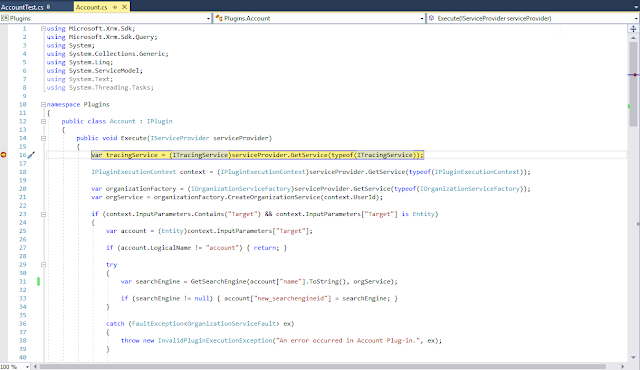
  11. Place a break point on Visual Studio
  12. Click Start Execution
  13. The break point will be hit and we can step through the code at our leisure