Monday, 8 October 2018

Using Dynamic 365 Service Endpoints - Part 2

In the previous post, we discussed using Service Endpoints and how they can be used to integrate with other systems via a Azure Service Bus Queue.

There are other ways that Service Points can be used for integrating with other systems.

  1. Topic

  2. Integrating with a Topic is very similar to integrating with a Queue, except that multiple systems can consume the same message.

    Let's say we wanted to integrate with our customer's Audit service and a third party system, then we would use a Topic to ensure that both systems would get the messages

  3. One-Way Listener

  4. This requires an active listener.If there is no active listener on an endpoint, the post to the service bus fails. Dynamics 365 will retry the post in exponentially larger and larger time spans until the asynchronous system job that is posting the request is eventually aborted and its status is set to Failed

    The utility of this is beyond me given that the operation will always succeed in Dynamics due to endpoint steps requiring to be asynchronous. I might be misunderstanding how this works though.

    A sample can be found here

  5. Two-Way Listener

  6. A two-way contract is similar to a one-way contract except that a string value can be returned from the listener to the plug-in or custom workflow activity that initiated the post.

    This seems like a more interesting proposition as the other system can send information back to Dynamics 365, e.g. return the result of a calculation

    A sample can be found here

  7. REST Listener

  8. A REST contract is similar to a two-way contract on a REST endpoint.

    A sample can be found here

  9. Event Hub

  10. This contract type applies to Azure Event Hub solutions.


Friday, 5 October 2018

Using Dynamic 365 Service Endpoints - Part 1

Dynamics 365 offers various possibilities for integrating with 3rd party systems, one of them is using a Service Endpoint, which is a fancy way of calling the Azure Service Bus, which can be used for integrating with 3rd party systems.

In reality things are a bit more complicated and will be discussed in a future post.

In this example we will create a Service Bus queue that will receive any new Search Engines so that these can be processed by a single 3rd party system.


1. Create Azure Service Bus Queue

From the Azure Portal
  1. Create a Namespace


  2. Create a Queue


  3. Add SAS Policy


2. Register Service Endpoint

In order to register a Service Endpoint we will need the connection details for the Queue, which can be obtained from the Azure Portal.

  1. Register New Endpoint


  2. Add Connection Details


  3. Complete Registration


  4. The Message Format is important as the code needed to read the messages will be different depending on the format.


  5. Register New Step


  6. Bear in mind that it needs to be registered against the service endpoint itself.


    This is what we've ended up with

3. Test

We create a new Search Engine


We can see that the message has been sent on Azure Portal


4. Processing Queue Messages

The code used to process the Queue messages can be found here and the full VS Solution can be found here.

Some of the code has been pilfered from the CRM Samples and updated it to work with the latest version, at the time of writing of Azure Service Bus.

The verbosity of the messages is peculiar and it would be nice to be able to do something similar to plug-in  (Pre/Pro)EntityImages, namely just send a few parameters.

In this highly contrived exampled we might just need to send two parameters (name and url) to our 3rd party system, yet ~ 5 KB of data are sent.

Thursday, 4 October 2018

Dynamics 365 New Features - Alternate Keys

I will confess that these are new features for me, so if you happen to have left the Dynamics CRM world at the same time as me and are coming back to it now this post will be super useful otherwise, well not so much maybe

Alternate Keys

With alternate keys, you can assure an efficient and accurate way of integrating data into Microsoft Dynamics 365 from external systems. It’s especially important in cases when an external system doesn’t store the Dynamics 365 record IDs (GUIDs) that uniquely identify records. The alternate keys are not GUIDs and you can use them to uniquely identify the Dynamics 365 records. You must give an alternate key a unique name. You can use one or more entity fields to define the key. For example, to identify an account record with an alternate key, you can use the account name and the account number. You can define alternate keys in the Dynamics 365 web application without writing code, or you can define them programmatically. Note that while you can define the alternate keys in the user interface (UI), they can only be used programmatically, in code.
An entity can have up to 5 alternate keys and for each one a new index will be created, this is done a as background job, so there will be an associated decrease in insert performance, whether this will be noticeable it's hard to say.


This allows us to write code like this, see below, to change the account name, the assumption here is that this account, 1234, is coming from another system and in this system it's using integer keys.

For the record, alternate keys allow the following types

Decimal Number
Whole Number
Single Line of Text

Code:

using (CrmServiceClient client = new CrmServiceClient(ConfigurationManager.ConnectionStrings["Inc"].ConnectionString))
            {
                try
                {
                    Entity account = new Entity("account", "accountnumber", 1234);
                    account["name"] = "Changing Name";
                    client.Update(account);
                }
                catch (Exception ex)
                {
                    Console.WriteLine(ex);
                }
            }


Wednesday, 3 October 2018

Serve Javascript and source map files locally using Fiddler - part 2

In the previous post in this two part series we showed how to use Fiddler to serve client side content from our local machine.

This worked fine but could become pretty tedious so in this post I describe a different way.

A single rule like this will cover all eventualities but we need to make certain changes to our project


There is an issue here though.

If we create a new library through the front end, it will be called:
 <prefix>_<name> 
but we would like a rule like this:

 <prefix>_/<prefix>_<name> 

The reason for this is that this allows our rule to work for only our custom libraries

Without  <prefix>_/ our rule would match all manner of web resources which effectively would prevent the system from working.

The solution is to programmatically create the web resources so that the naming convention that we want to use is respected.

In this example the spkl framework have been used to do this, see spkl.json for details and the exported Dynamics solution


This is the corresponding url:

This enables us to have one rule to ring them all and in the darkness bind them or something like that :)

Tuesday, 2 October 2018

Serve Javascript and source map files locally using Fiddler - part 1

One of the major downsides of developing on Dynamics 365 is that the feedback loop can be pretty long.

Say if we wanted to test a change to an existing Javascript library this is what we would need to do:

  1. Make code changes in Visual Studio
  2. Upload to Dynamics Server
  3. Publish
  4. Test

2 and 3 can be time consuming, specially on slow networks or heavily used servers, however there is another way, enter Fiddler.

Fiddler is a Web debugging Proxy that can be used to serve files.

In this example, I have create an extremely simple webresource that contains a single function that provides an annoying greeting every time a account record is opened.

Dynamics solution can be found here and script (in typescript) can be found here (ignore the method name for now)

We can now use Fiddler to serve the files from disk

  1. Launch Fiddler
  2. Select AutoResponder Tab
  3. Create AutoResponder Rules as shown


I've create a single rule for each file

account.js
account.js.map
account.ts

This will allow us to debug our typescript code


Note that once the library has been registered with the form, it's possible to add methods on the source code without uploading them to the server as long as you serve them from Fiddler.

Let's say we wanted a function called  setCreditLimit, which sets the credit limit of the account to say $10000, we could do the following in Visual Studio and register the appropriate handler in the form without having to actually upload the changed file.

If we are doing piecemeal changes like this the effect is not great as we still need to publish the form, but you could register all the events needed and then work at your leisure from Visual Studio.

Having to add rules can get a little bit tedious so in another post we will showcase a different way that will allow to set up a single rule


Don't Forget to upload the web resources once you've finished.

Monday, 1 October 2018

Developing and Testing Plug-ins in Dynamics 365 - Part 4 - Debugging with the Plugin Profiler

If we were using a on-premises instances and had access to the Dynamics 365 server then we would be able to have a remote debugger running on the server and step through the plug-in code at our leisure. However, Microsoft is quite keen to move everybody on to the cloud thus we need another way. Enter Plugin profiler.

The plugin profiler is solution that can be installed on any Dynamics 365 instance and can be used to generate plug-in traces that can then be used to step through the plug-in code.

The key difference is that the stepping through the code is done after the plug-in has run and not in real time. In short, the sequence is as follows:


  1. Trigger Plug-in (e.g. create account ...)
  2. Save Plug-in trace
  3. Load Plug-in trace with Plugin Registration Tool
  4. Step Through plug-in code.

Pre-Requisites
  • Plugin Registration Tool installed (see this post for more details)
  • Admin access to Dynamics 365 instance
  • Visual Studio 2017
Debugging Online Plug-ins
  1. Start Plugin Registration Tool
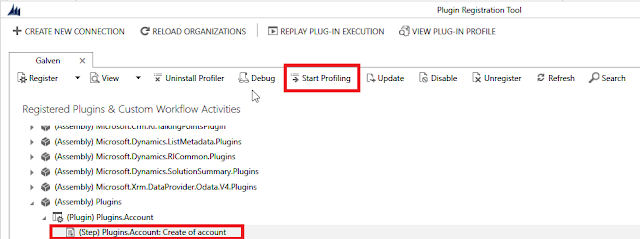
  2. Click Install Profiler
  3. Select the step to be profiled
  4. Click Start Profiling


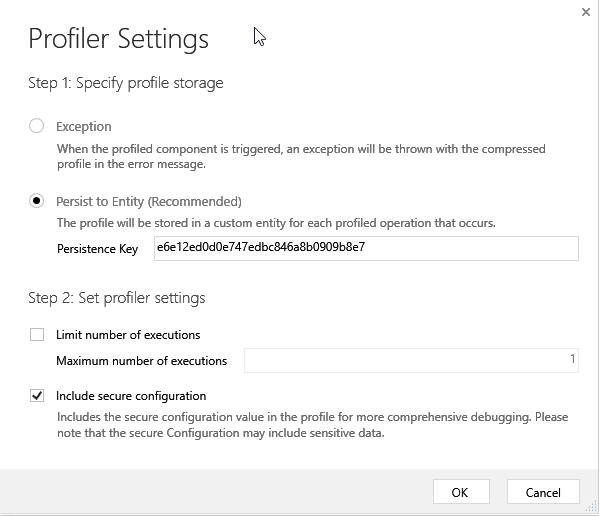
  5. Go with the defaults


  6. Invoke Step (Create account in this case)
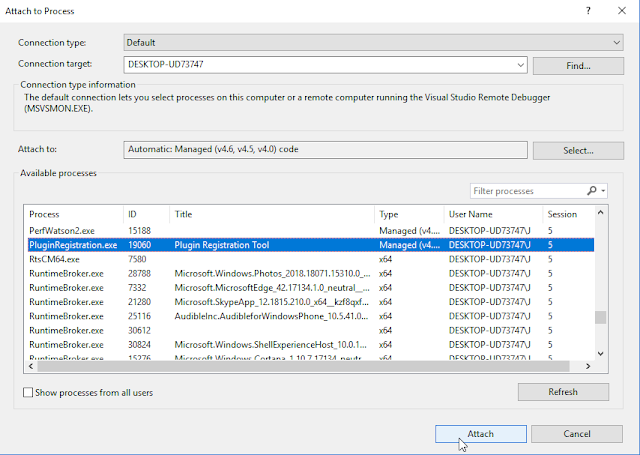
  7. On Visual Studio, Click Debug | Attach To Process | PluginRegistrationTool.exe


  8. Click Debug


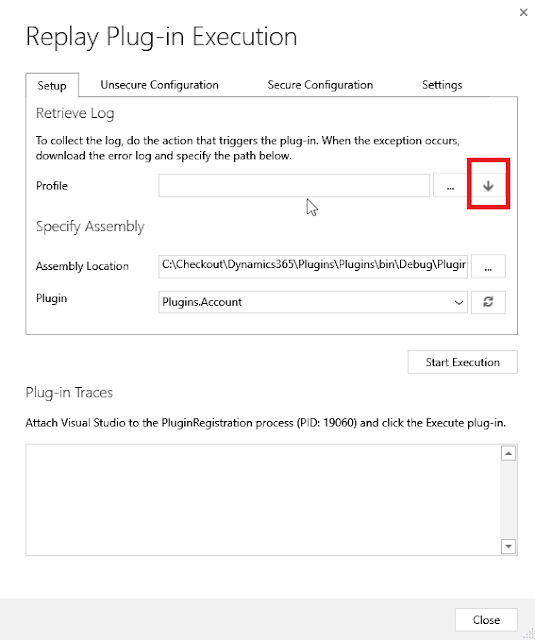
  9. Select Assembly Location and Relevant Plugin
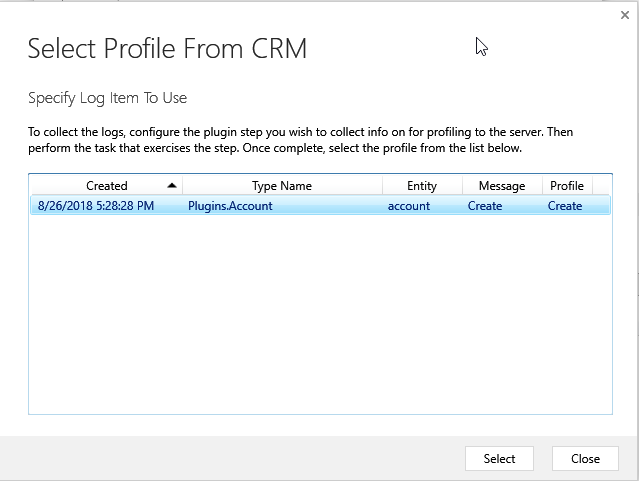
  10. Click on Highlighted arrow and select profile


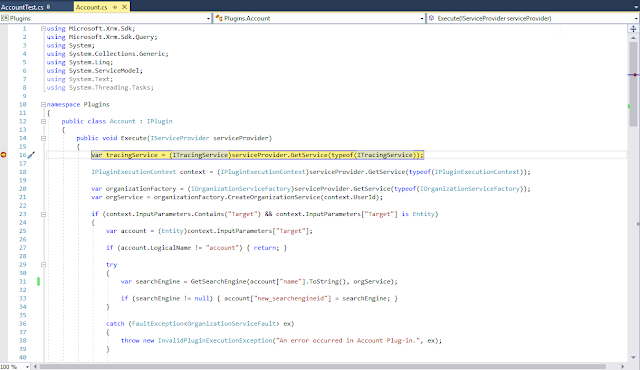
  11. Place a break point on Visual Studio
  12. Click Start Execution
  13. The break point will be hit and we can step through the code at our leisure


Friday, 28 September 2018

Developing and Testing Plug-ins in Dynamics 365 - Part 3 - DataMigration Utility

In the last part of this series we looked at using an option set (drop down) to store the list of relevant search engines, it turns out that our customer wants to have both the name of the Search  Engine and its URL.

1. Using a Lookup instead

We could add two fields but that's a bit clunky so we will add a new Entity called Search Engine and a new look up from the account form.

The entity has two fields:

Name (new_name)
URL (new_url)

I have also added a new 1:N relationship to the account entity

Search Engine (new_searchengineid);

The Dynamics 365 solution can be found here.

The plug-in has been modified like this

We have landed ourselves in some trouble when it comes to unit testing again with this code as GetSearchEngine depends on the IOrganizationService, which we can't mock as discussed previously.

I've refactored the code here to remove this dependency and with unit tests.

2. Test induced Damage

Let's say that we really wanted to use mocks, so I have refactored again to allow this

The solution is here, with account plug-in and test

In order to be able to mock the data (Search Engines) I have created a ISearchEngineRetriever that has the GetSearchEngines method and inject this interface on a new class SearchEngineFinder that has our old trusty GetCorrespondantSearchEngine method.

This allows to mock away the GetSearchEngines method.

This is silly, don't do it.

You could argue that this would allow you to, in the future, inject a different ISearchEngineRetriever  if you wanted to get the data from somewhere else, and that would be true but why worry about that eventuality when it might never happen and if it does happen it's unlikely to happen in the way you've anticipated.

If you do know that this data will come from another source in the future, then may be something along these lines would be reasonable, maybe.

3. Data

There is a problem in the approach that we have taken, namely adding a new entity as we now need to have that data (Search Engines) in the production environment (as well as test, etc..)

Luckily we have tools, see this post for more details

We will use the Data Migration Utility to export from our dev environment into our other environments

  1. Fire up Data Migration Utility (DataMigrationUtility.exe)
  2. Select Create Schema
  3. We will need to Log In
  4. Select Solution
  5. Select Entity
  6. Add Fields to be exported, new_name and new_url have been selected here.
  7. Click Save and Export
  8. Select appropriate files for the schema and data
  9. Finished !!!

The advantage of this method is that the Ids (Guids) of the entities will be preserved across environments, which means that Workflows will continue to work seamlessly, more on this here.

A Guid has 2 ^ 122 possibilities (there are six bits that are reserved) so it's extremely unlikely that duplicate Guids will happen.

To import
  1. Fire up Data Migration Utility (DataMigrationUtility.exe)
  2. Select Import Data
  3. Select data file and Click Import Data

Thursday, 27 September 2018

Developing and Testing Plug-ins in Dynamics 365 - Part 2

In part 1, we made a start into the fabulous world of plug-in development on Dynamics 365. In this post we modify our plug-in by first using an option set and then using lookup.

1. Add Search Engine Option Set

It turns out that we need to store the related Search Engine according to our company's magic sauce for determining the company's Search Engine(namely does the first letter of the company name match a known search engine) and not the url.

So we create a new field to store this

  1. Navigate to an account and click Form
  2. Click New Field
  3. Save And Close
  4. Refresh Form
  5. Add New Field to Form
  6. Save
  7. Publish
2. Alert Code to use New Option Set

The code has been now changed see full solution here, plugin here and unit test here but there is a major flaw, which is that any new search engine that might need adding will require code changes, which is clearly not an acceptable state of affairs.

We can see the results here:


3. Metadata FTW

Instead of hard-coding the values, we will retrieve the values from Dynamics, which will ensure that we have an up to date list.

This does present us with a bit of a conundrum, in that we will not be able to unit test this any more to the same degree as before. To be clear, we can create unit tests but ultimately if there is an edge case that our algorithm misses then it might be missed by our unit tests.

Let's say that if the first letter of the company is D, then it our magic sauce, should also return no selection, at the moment, see code here, this has not been implemented and thus will not be tested for,

Ultimately the only way to solve this is to have integration tests, where we actually query our integration test Dynamics instance.  The problem is that this will make the tests slow and if you want to run a lot of them, and you generally do, then that is a problem, so we have to compromise

This has been implemented here, with tests here and the full solution here.

4. Mocking Metadata

Let's say that we are not happy with the approach that we've taken previously and that we want to mock our dependencies.

We can do something similar to this and this is how it would be tested (full solution) Note that it's not working as I cannot mock RetrieveAttributeResponse object easily (AttributeMetadata is read only) so reflection is called for.

In reality this is somewhat pointless as there aren't likely scenarios that would require this level of complication for little or no benefit.

Furthermore, somebody has already done the hard work, which will be discussed on part 5.

An alternative would be to inject an interface, say ICRMRepository to GetSearchEngineOptionSet, so that ICRMRepository.GetSearchEngines could be mocked to return the desired data, but I think that this is a completely unnecessary complication that adds no benefit.

If you are reading this and thinking:

but if you had an interface in the future  you'd be able to do ...

I would counter that it makes little sense do extra work now to potentially save work later as we are sure to never get that time back but we're not sure whether we will need the extra work.


Wednesday, 26 September 2018

Developing and Testing Plug-ins in Dynamics 365 - Part 1


In this post I will introduce what a plug-in is, how to develop, deploy and test plug-ins.

Pre-Requisites
  • Visual Studio 2017 Installed
  • Admin Access to a Dynamics 365 instance
What is a Plug-in?
A plug-in is custom business logic (code) that you can integrate with Microsoft Dynamics 365 (online & on-premises) to modify or augment the standard behavior of the platform. Another way to think about plug-ins is that they are handlers for events fired by Microsoft Dynamics 365. You can subscribe, or register, a plug-in to a known set of events to have your code run when the event occurs.
So there we have it, it's definitely not the most user friendly name but it's here to stay, I guess better than callouts (Dynamics CRM 3.0 FTW)

1A. Tooling

In order to work with Plug-ins we will need to install the Plugin registration tool
  1. Open Powershell
  2. Navigate to the folder you want to install the tools to
  3. Copy and paste the following PowerShell script into the PowerShell window and press Enter.
A Tools folder with four sub folders will be created:
  • ConfigurationMigration
  • CoreTools
  • PackageDeployment
  • PluginRegistration
The last one is the one we are interested in.

1B. Tooling

In order to be able to register plug-ins and do a large set of operations, we need to use the PluginRegistration tool

  1. Open the tool from ..\Tools\PluginRegistration\PluginRegistration.exe
  2. Click Create New Connection 
  3. Tick Show Advanced
  4. We enter user account details
    • Online Region
    • User Name
    • Password
  5. Click Login
The connections details will be saved so that next time they will be available.

2A. Project Preparation
A standard library (dll) project is needed for Plug-ins, additionally the project will need to be signed.
  1. Create new Class Library (.NET Framework) Project called Plugins in Visual Studio and set Framework version to 4.5.2. 
  2. Right Click Plugins project and go to Properties (Alt + Enter might work)
  3. Click on Signing
  4. Tick Sign the assembly
  5. On the drop down, select <new>
  6. Give the key a name and untick Protect my key file with a password
  7. Click OK
2B. References

We are going to need some references to the SDK in order to create our first plugin
  1. Right Click on References
  2. Select Manage Nu-Get Packages
  3. Click Browse
  4. Search for Microsoft.CrmSdk.CoreAssemblies
  5. Click Install to install Latest version (9.0.2.4 at the time of writing)
3. Development

The project is stored here and the plug-in code can be found here

The plug-in is really simple, it will set a search engine as the url for a new account if the first letter of the account name matches the first letter of a known search engine, empty otherwise.

We will register this in the pre-create operation so that it only fires on account creation.

One thing to note is that as the plug-in as it's currently written cannot be unit tested very easily or at all really. We will explore this in more detail on section 6.

4. Register Plug-in

Registering a plugin has two phases:
  1. Register Library
  2. Register Steps
The first step refers to installing the library on the server, while the seconds configures the events for which the plug-in will be triggered.

Start the Plugin Registration Tool

  1. Click Register and then Register New Assembly

  2.  
  3. Select the plugins assembly (Plugins.dll) and click Register Selected Plugins

  4. Locate Plugins Assembly, right Click and then select Register New Step

  5. We fill in the details as shown below and Click on Register New Step


Note how the plug-in has been registered to trigger on the Create event (message in CRM parlance) of the account Entity and it will happen synchronously before the write operation. This is needed as the plug-in modifies the value of the entity and then the modified value is saved.

5. Test Plug-in

We create a record and save it. The website field is populated.


The problem is that the current solution is hard to unit test so let's try to improve that

6. Unit Testing

In order to make unit testing easier, we refactor the plug-in. The whole project can be found here and the changes can be found here.

Note how nothing really has changed, except that we can now easily unit test the plug-in, by extracting out the method.

The sole unit test is failing at this stage as we failed to take into account capitalisation when matching the first letter, hurrah for unit tests!!.

The fixed project is here and the fixed code is here.

The last comment I will make in this section is the Test Driven tests that I have used, see GetSearchEngineTest test method here.

This is a very powerful feature as it allows us to write a single unit test and then pass different inputs into it.

This is what it looks like on Test Explorer, which allows you to see which one is failing if any.


In part 2, we will look at how we can remove the hard-coded search engines to improve the code and also introduce more Dynamics 365 functionality

Tuesday, 25 September 2018

Azure Cognitive Services and Dynamics 365 - Part 2

In part 1, we looked at how we could integrate Azure Cognitive Services with Dynamics 365 to provide keyword search suggestions for Knowledge Based articles.

In this second part we discuss the Similar Records Suggestions Feature


Important

At the time of writing, the integration of Cognitive Services with Dynamics 365 is in preview mode and the preview is only available for North American instances.


In order to configure the integration, see sections 1 to 3 of part 1


1A. Add Advanced Similarity Rules
  1. Navigate to Settings | Data Management | Similar Records Suggestions
  2. Click New
  3. Fill in details, ensuring that Use Text Analytics for Target Match is set to Yes and entity is set to Case
  4. Click Save
1B. Add Match Fields

On the same record as section 1A, we click the plus sign as shown below and we add some Match Fields.

We set the same fields as in part 1, namely Subject of any regarding activity, title of any regarding note and description field.


Once this has been done, the similarity rule can be activated.

2. Testing It

We create a few cases with similar description and/or subject for tasks, title for notes.


When we click on Similar Cases: Find

This appears to have picked up the word fault on the description and used it to suggest it, not exactly what we were after but it highlights the posibilities


These are a complement to the duplicate detection rules although I have to admit that I've not managed to get them to trigger but the API in Azure is being invoked ...

Monday, 24 September 2018

Azure Cognitive Services and Dynamics 365 - Part 1

Microsoft Cognitive Services is a collection of APIs, which can be used to add artificial intelligence capabilities into applications. You can see see the full list here and play with the demos by clicking on the links therein.

Important

At the time of writing, the integration of Cognitive Services with Dynamics 365 is in preview mode and the preview is only available for North American instances.


1. Activate Text Analytics

In order to enable the integration follow these steps:

  1. Navigate to Settings | Administration | System Settings
  2. Go to Preview tab
  3. Select Yes on Enable the Dynamics 365 Text Analytics Preview
  4. Click OK
2. Create Text Analytics Endpoint in Azure

We need to create a Text Analytics service in Azure:
  1. Login to Azure Portal
  2. Click Create a resource
  3. Search for Text Analytics
  4. Click Create, which will take you to the wizard (of sorts)
  5. Fill in:
    • Name
    • Subscription
    • Location
    • Pricing Tier
    • Resource Group
Once the resource has been created we will need endpoint URL and an access key to access it from Dynamics 365, which we can get from the resource itself on the azure portal, as shown below:


3. Configure Dynamics 365 to use Text Analytics

The final configuration step is to add the details from section 2 to Dynamics 365.
  1. Navigate to Settings | Administration | Azure Machine Learning Text Analytics Service Configuration
  2. Fill in with details from the previous section: 
    • Azure Service Url
    • Azure Account Key
  3. Click Test Connection
  4. Click Activate
  5. Tick Activate existing text analytics models and Click Activate
Note that the results of Test Connection will be displayed on the Connection Test Information section.

4A. Create Knowledge Search Model
  1. Navigate to Settings | Service Management | Knowledge Search Field Settings
  2. Click New
  3. Fill in details
  4. Click Save
4B. Create Keyword or Key phrase Determination Field

On the same record as section 4A, we click the plus sign as shown below and we add some rules

The rules determine which fields will be used to generate the default search strings for Knowledge Based articles.

In the example below we  have set up, perhaps somewhat redundantly the subject of regarding Tasks, Activities, the case description field and the title of any regarding notes as relevant keywords/phrases.


5. Add Knowledge Base Search Suggestions to Case

  1. Navigate to Settings | Customizations | Customize the System
  2. Expand Entities | Case | Form
  3. Click on the Default Form: Case
  4. Double Click on the Conversation Tab
  5. Go to Web Client Properties | Knowledge Base Search
  6. On Additional Options, tick Turn on Automatic Suggestions 
  7. On Give knowledge base (KB) suggestions using, ensure you select Text Analytics
  8. Save Form
  9. Publish Entity.
6. Testing it

The feature will use Text Analytics to extract meaningful keywords to search for from the fields set up on section 4B

As mentioned on section 4B, in this example we  have set up,  the subject of Tasks, Activities, the case description field and the title of any notes as relevant keywords/phrases.

So in an example case, where we have a description and a task like this:


If we click on KB Records this is the result


It's used the fields to suggest the search words

I have to admit that I expected it to search the KB articles, but this is not what the feature is about.


7. Enable Knowledge Management on Other Entity

It is possible to do the same for pretty much any entity

  1. Navigate to Settings | Customizations | Customize the System
  2. Expand Entities | Account 
  3. Tick Knowledge Management
  4. Click on the Default Form: Account
  5. Add Knowledge Base Search
  6. On Additional Options, tick Turn on Automatic Suggestions 
  7. On Give knowledge base (KB) suggestions using, ensure you select Text Analytics
  8. Click Ok
  9. Save Form
  10. Publish Entity.
We will then need to create a Knowledge Search Model as per section 4.

Thursday, 20 September 2018

Visual Studio 2015, Git, Aurelia and case Sensitiveness

The support team was complaining today that they couldn't reset user passwords anymore, which was surprising.

After a bit of digging there was this really useful error

Unhandled rejection (SystemJS) Template markup must be wrapped in a <template> element e.g. <template> <!-- markup here --> </template> Error: Template markup must be wrapped in a <template> element e.g. <template> <!-- markup here --> </template>
and a more useful part

Error loading https://....../dist/main/user/resetPasswordDialog.html!template-registry-entry

The issue is that there is discrepancy in case for the first letter of the view, so that it's looking for this:

main/user/resetPasswordDialog.html

but we actually have this:

main/user/ResetPasswordDialog.html


Simple error to fix, right?

This is where things get interesting.

Git's client on Visual Studio 2015 would not recognise the change of case on the file name as a change and thus I had a bit of a problem.

I tried making changes to the file to force the change but to no avail, in the end and to cut a long story short, it turns out that I could change the case directly on Visual Studio Team Services or should I say Azure DevOps?

In any case, I suppose this is a Windows thing  but it was very annoying as I thought I might need to get creative, e.g. spin up a Linux VM and clone the repo ...


Monday, 10 September 2018

Validation Travails with Aurelia-Validation

One of our testers finally got a chance to have a look at our Aurelia App, which is extremely rare and she found an issue where validation would not apply under certain conditions.

After a little bit of investigating, the conditions turned out to be editing ... sigh

This is the code:

import { ValidationController, validateTrigger, ValidationRules, ValidationError } from 'aurelia-validation';
import { BootstrapFormRenderer } from '../../validation/bootstrapFormRenderer'
import { stuff here } from ...
import { inject, NewInstance, computedFrom, BindingEngine } from 'aurelia-framework';
import { Router } from 'aurelia-router';
import { AuthService } from 'aurelia-authentication'


@inject(BindingEngine, NewInstance.of(ValidationController), Router, AuthService)
export class AddEditUser {
    private User this.user;

    constructor(bindingEngine: BindingEngine, validationController: ValidationController, router: Router, authService: AuthService) {
        this.bindingEngine = bindingEngine;        
        this.router = router;
        this.authService = authService;
        this.validationController = validationController;
        this.validationController.validateTrigger = validateTrigger.changeOrBlur;
        this.validationController.addRenderer(new BootstrapFormRenderer());
        this.user = new User();
    }

    activate(params, navigationInstruction) {
        this.editMode = Object.keys(params).length > 0;

        if (this.editMode) {
            this.service.find(params.id).then(user => {
                this.user = new User(user.Id,
                    user.FirstName,
                    user.MiddleName,
                    user.LastName,
                    user.Email,
                    user.UserName,
                    user.JobRole,
                    user.PhoneNumber,
                    user.UserRole,
                    user.ContactPreference,
                    null,
                    null,
                    user.Status);

            });
        } 
    }

    bind() {       

        ValidationRules
            .ensure("userName").required().maxLength(256).matches(/^[a-z0-9@\.\-\_]+$/i).withMessage("User Name can be up to 256 characters long. Only alphanumeric characters and . _ - @ are allowed.")
            .ensure("firstName").required().maxLength(64).matches(/^([a-zA-Z\'\-\s])+$/i).withMessage("First Name can be up to 64 characters long. Only letters, apostrophes, hyphens and spaces are allowed.")
            .ensure("middleName").maxLength(64).matches(/^([a-zA-Z\'\-\s])+$/i).withMessage("Middle Name can be up to 64 characters long. Only letters, apostrophes, hyphens and spaces are allowed.")
            .ensure("lastName").required().maxLength(64).matches(/^([a-zA-Z\'\-\s])+$/i).withMessage("Last Name can be up to 64 characters long. Only letters, apostrophes, hyphens and spaces are allowed.")            
            .ensure("email").email().withMessage("Provide a valid Email.").maxLength(256)
            .ensure("email").required().when((user: User) => user.contactPreference === ContactPreferenceType.Email).withMessage("Email is required when it's your contact preference")
            .ensure("phoneNumber").minLength(10).maxLength(12).matches(/^\d+$/).withMessage("Provide a valid Phone number. Only numbers allowed")
            .ensure("phoneNumber").required().when((user: User) => user.contactPreference === ContactPreferenceType.SMS).withMessage("Phone number is required when it's your ontact preference")
            .ensure("status").required()
            .ensure("role").required()
            .on(this.user);
    }

    public saveUser() {

        this.validationController.validate()

            .then((errors: ValidationError[]) => {
                if (errors.length === 0) {

                    this.service.update(this.user.userName, this.user.firstName, this.user.middleName, this.user.lastName,
                        this.user.email, this.user.phoneNumber, this.user.contactPreference, this.selectedTeam.id, this.selectedOrganization.id,
                        this.user.jobRole, this.user.status, this.user.role).then(result => {
                            this.userUpdated = true;
                            this.navigateBack();
                        }).catch(error => {
                            console.log(error);
                            this.failedToUpdateUser = true;
                        });
                }
            });
    }

    public addUser() {
        this.validationController.validate()
            .then((errors: ValidationError[]) => {
                if (errors.length === 0) {
                    this.service.register(this.user.userName, this.user.firstName, this.user.middleName, this.user.lastName,
                        this.user.email, this.user.phoneNumber, this.user.contactPreference, this.selectedTeam.id, this.selectedOrganization.id,
                        this.user.jobRole, this.user.status, this.user.role).then(result => {
                            this.userAdded = true;
                            this.navigateBack();
                        }).catch(error => {
                            console.log(error);
                            this.failedToAddUser = true;
                        });
                }
            });
    }

    public submit() {

        if (this.editMode) {
            return this.saveUser();
        }

        return this.addUser();
    }

}

And this is what I did to get it working, namely add the rules to the object after the object (user) was created.

activate(params, navigationInstruction) {
        this.editMode = Object.keys(params).length > 0;

        if (this.editMode) {
            this.service.find(params.id).then(user => {
                this.user = new User(user.Id,
                    user.FirstName,
                    user.MiddleName,
                    user.LastName,
                    user.Email,
                    user.UserName,
                    user.JobRole,
                    user.PhoneNumber,
                    user.UserRole,
                    user.ContactPreference,
                    null,
                    null,
                    user.Status);
                this.bind()
            });
        } 
    }

I tried this too but it made no difference, on the saveUser method.

this.validationController.addObject(this.user);

Tuesday, 10 July 2018

Azure On-premise Backup on Windows 2008 R2

We have one server that runs Windows 2008 R2 still, too long to explain, and we've recentely decided to move our backups to Azure.

I had no issues on Windows 2016 or 2012 but the backups would not run on Windows 2008 R2 unless Backup Now was click, which is not exactly what one wants from a backup solution.

A scheduled task is created/amended every time you set backup schedule, which is reasonable enough, but the problem that I had was that the task was not working.

This is the task in question


Program/Script:

C:\Windows\system32\windowspowershell\v1.0\powershell.exe

Add Arguments (optional):

-command Import-Module MSOnlineBackup; Start-OBBackup -Name "2cdeaf83-dead-c0de-beef-c345bead15b1
When I tried to run this on powershell, I got this error:

Import-Module : The specified module 'MSOnlineBackup' was not loaded because no valid module file was found in any module directory.
I looked for the path where MSOnlineBackup was and found it here:

'C:\Program Files\Microsoft Azure Recovery Services Agent\bin\Modules\MSOnlineBackup\MSOnlineBackup.psd1'

So, I added this path to the system path and ..... nothing happened, same error.

Desperate times, call for desperate measures, so I changed the arguments on the task to:
-command Import-Module 'C:\Program Files\Microsoft Azure Recovery Services Agent\bin\Modules\MSOnlineBackup\MSOnlineBackup.psd1'; Start-OBBackup -Name "2cdeaf83-dead-c0de-beef-c345bead15b1"

This works.

A word of caution though, any changes to the schedule, will result in the task going back to what it was and thus will not work, so I would suggest creating a new task and ignore the standard task.

I have not tried rebooting the server, which seems to be required for path changes, so use this if you can't reboot for a while???

Monday, 16 April 2018

Homemade Energy Bars

For those of you who know me, you know that I do cycle quite a bit, today I've decided to share the secret of my success to the cycling world by posting my recipe for homemade energy bars.

Ingredients:
  • 300 g Porridge Oats
  • 280 g Peanut Butter
  • 250 g Lyle's Syrup
Instructions:

  • Mix together
  • Spread on a tray (approx 10" by 10")


The good thing about this recipe is that it's extremely flexible. You want to add protein powder, go right ahead, I would suggest that you sift it first but why not? Seeds? Nuts? sure. I've even added raw cocoa powder (carefully sifted, otherwise the bars will surprise you with chunks of cocoa powder)

Enjoy.